Unit Testing
In the Java world, we create Classes to encode logic. Those classes will generally contain a lot of methods that work together to achieve the programmer’s goals, but the question may arise, “How can we ensure that written code really achieves these goals?” The answer is generally Unit Testing.
Wikipedia defines Unit Testing as “a method by which individual units of source code are tested to determine if they are fit for use”. Units themselves are the smallest pieces of code that have any logic within them, so we can test them. We know how a Unit should behave, and what should be the result of any input.
Test Double
Before we discuss more about unit testing, let’s consider an analogy from a popular film. When the Russo brothers need Chris Evans (as Captain America) to perform a dangerous scene, they realise that it may be difficult and may even cause injuries for the actor. They will naturally engage a “stunt-double” – a specialist actor who resembles Evans enough to fool movie goers but is skilled in the actions required.
In the world of Software Engineering, a similar idea is used.
In his 2006 article “Test Double”, well known software developer Martin Fowler discussed this idea. He said that Test Double is a term introduced by Gerard Meszaros in his book “xUnit Test Patterns, Refactoring Test Code”, and is a generic term for any case where you replace a production object for testing purposes.
In his book, Meszaros lists various kinds of double that can be used:
- Dummy objects that are passed around but never actually used. Usually, they are just used to fill parameter lists
- Fake objects that have working implementations, but usually take some shortcut which make them unsuitable for production (an InMemoryTestDatabase is a good example).
- Stubs, which provide canned answers to calls made during the test, usually not responding at all to anything outside what’s programmed in for the test.
- Spies, which are stubs that also record some information based on how they were called. One form of this might be an email service that records how many messages it was sent.
- Mocks, which are pre-programmed with expectations which form a specification of the calls they are expected to receive.
They can throw an exception if they receive a call they don’t expect and are checked during verification to ensure they got all the calls they were expecting.
We need to decouple dependencies using a Test Double, so in this example we will use Stubs and Mocks. While mocks are generally used for behaviour verification, stubs can be used for either state or behaviour verification. We will use Mockito’s “when()” for stubs and “verify()” for mocks. In the next part, we will focus on how to test a three-tiered application.
Three-Tier Application
The two pillars of a good architecture follow only two principles:
- The “Separation of Concerns (SoC)” principle, which helps a software architect to define the required layers and the purpose and responsibility of each layer
- The “Keep It Simple Stupid (KISS)” principle, which prevents us from creating too many layers. Because every layer has a price, if we create too many, the price will be too high – this is not a good approach.
So, following those principles, three layers is generally enough for most applications. We use a Web Layer, a Service Layer and a Repository Layer in most cases.
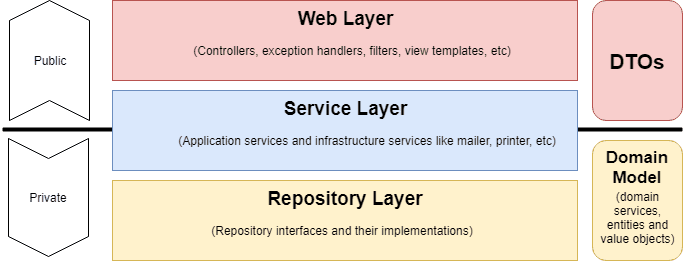
In Unit Testing, we need to test every layer. There will be a lot of dependencies between layers (and even between classes inside a layer), but the principle of unit testing is to test only a single unit (not its dependencies). So, we have a challenge. This article will try to meet this challenge by examining it piece by piece.
Unit Testing Using Spring Boot
Let say we have a REST API.
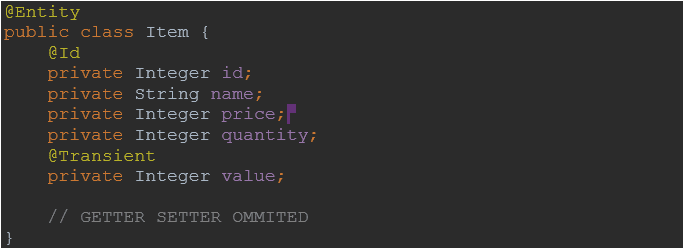
Imagine that we have a class named Item, and that has the properties id, name, price, quantity and value. Value will be populated in its service – let’s call it ItemService. The ItemService will implement an interface named ItemService, and ItemService will depend on ItemRepository to fetch data from database.
Here we will use Spring Boot with Spring Data JPA as an implementation of JPA. Here are some code snippets for the related classes.
First don’t forget to update our pom.xml and add artifact spring-boot-starter-test so we can use Spring Boot testing libraries in our project.

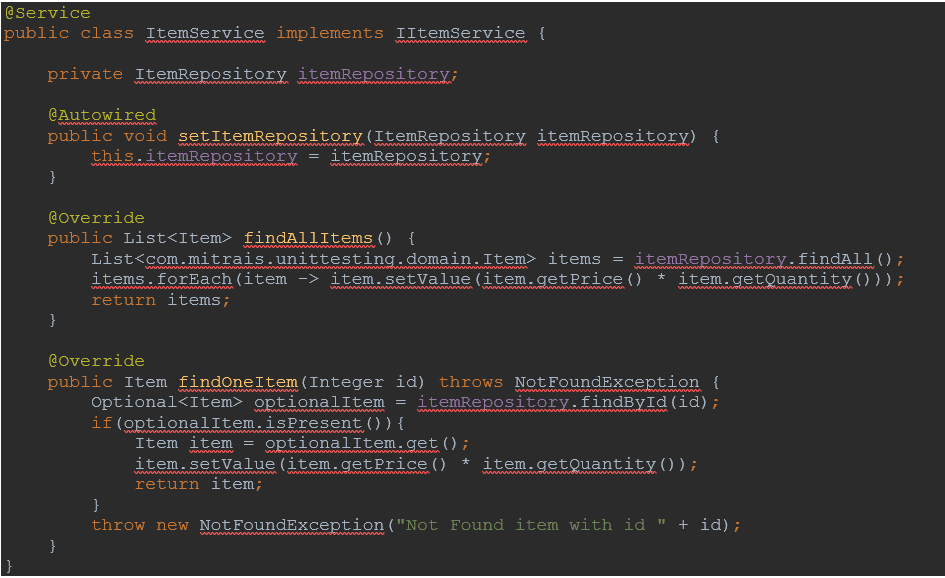
1. Testing the Service Layer
ItemService is dependent on ItemRepository, so we need to Test Double the ItemRepository (a so-called mock in this dependency). Every method from ItemRepository that be called from ItemService we need a stub.
Here is our service:

Here is the Test class setup,
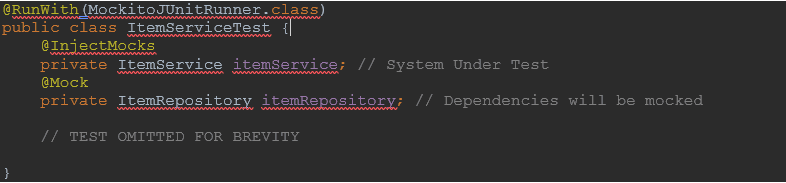
With this setup, to run a unit test with Mockito we need to annotate the class with @RunWith(MockitoJUnitRunner.class). With this annotation, the compiler will recognise other mockito annotations like @Mock and @InjectMocks.
Our System Under Test (SUT) is the ItemService class, and the dependency we want to Test Double is ItemRepository. So we annotate ItemService with @InjectMocks and the ItemRepository with @Mock annotation.
In this case, what we will actually test is the value property, because it is the only one logically changed.
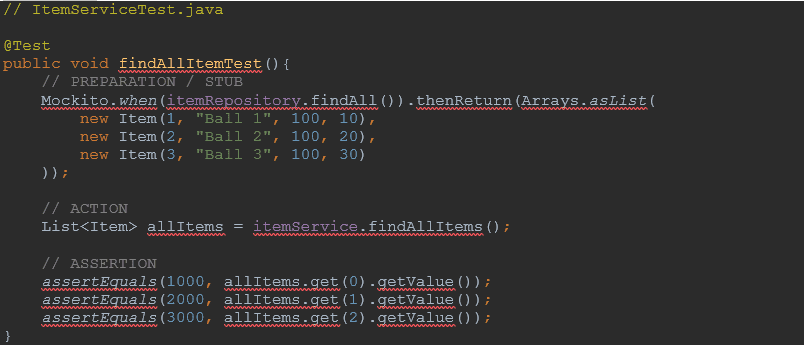
We will split the Test case into three parts. The first is PREPARATION / STUB, where we need to Stub the return from the itemRepository.findAll() method. The second part is ACTION, where we invoke the method we want to test – in this case it was findAllItems() method. The last part is ASSERTION, because we only to check the value property.
As well as testing the successful case, the Unit Testing need to test an unsuccessful case. We will see that below when we test method findOneItem from ItemService.

The first test case is a successful / Basic test, and the later one is Test Case with a “not found” exception. We only need to add property expected at @Test annotation and put the exception class there.
2. Testing the Controller Layer
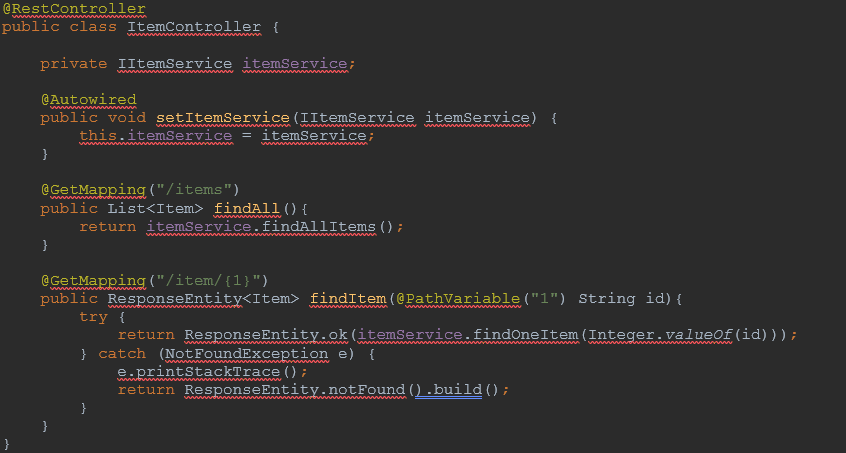
Since ItemController is dependent on ItemService, we will need to Test Double the Service. Here is our Controller Class.
Here, we will create a REST Controller that will return a JSON String to the caller. When testing a REST resource, there are usually a few orthogonal responsibilities that the tests should focus on:
- the HTTP response code
- other HTTP headers in the response
- the payload (JSON, XML)

Testing for the Controller will be different than testing a service. We need to annotate the class with @RunWith(SpringRunner.class) and add another annotation . This means that this Test context will load only the ItemController.class. If we didn’t provide the class inside WebMvcTest, it would load all the controller, and we don’t expect that.
MockMvc is a class for simulating a http request Because ItemController is dependent on ItemService we will mock it using the annotation @MockBean. Of course, we need to stub the method that is called from the Action Test method.
Now let’s continue to the test case. Here we will test the /items endpoint, with filled and empty JSON Arrays as a return.
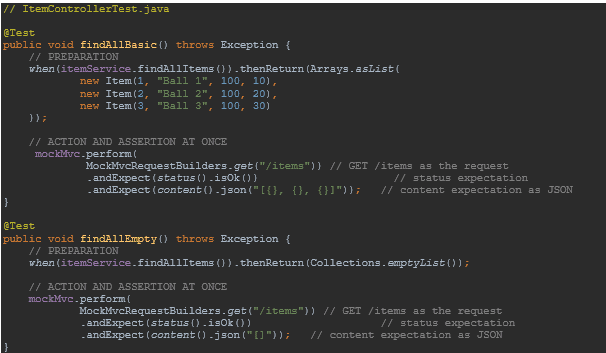
We create a request as RequestBuilder using the MockMvcRequestBuilders class, and perform this request using the MockMvc class perform() method. Beside doing the action, we can assert at once using the andExpect method.
For this findAllBasic test, we assert the status is ok (200) and the content is a JSON Array with 3 JSON Objects. As before, we need to stub the itemService so it will behave as we want it to (Return 3 items).
For the findAllEmpty test, we assert the status is ok (200) and the content is a JSON Empty Array, so we stub the itemService to return empty. More about JSON Assertion can be read by searching the API documentation for the JSONAssert.assert() method.
3. Testing the Repository Layer
The Repository layer is best tested using an in-memory-database such as H2. In terms of Test Double, it is called Fake. The reason why we use in-memory-database is to remove dependency to external system (actually database).
This is our ItemRepository interface:
![]()
Ideally, we will not create any test for anything we didn’t make. With this repository, we don’t need to create any test if we are not creating our own Query implementation. But for the sake of this post, we will test their method. Because we are using SpringBoot for this project, we only need to add the H2 dependency at our pom.xml like this

SpringBoot will seamlessly configure this for us if we add JPA when creating the project using the Spring Initializr.
Here is the test setup:
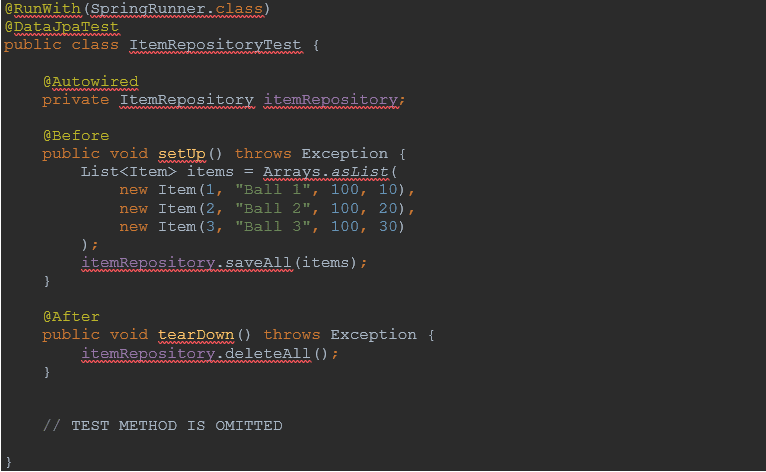
In a similar way, we can use the SpringRunner.class, but instead using @DataJpaTest to load the repositories. Don’t forget the @Autowired repository that we will use in this test class, so Spring can scan it properly.
We add the setUp() method annotated with @Before to load the initial data we are using for this test. The @Before annotation will invoke before each test method. Add the tearDown() method annotated with @After to deleteAll items, since @After will invoke after each test method.
Here we are our test cases:
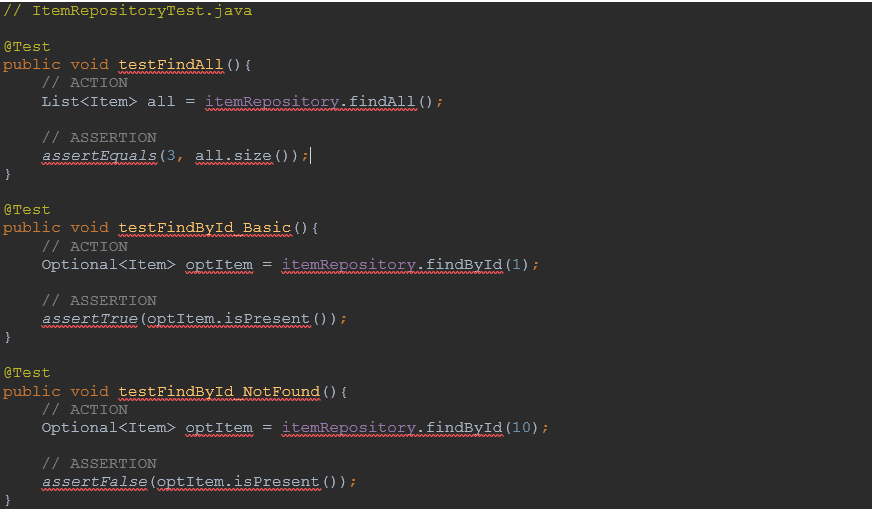
Here we only need a two-part test method, using Action and Assertion.
Please remember this is only an example, and we never usually need to test another person’s implementation.
Summary
We have shown how to test the Service, Controller and Repository layer. We hope that using this example, you will now be able to do simple unit testing using SpringBoot in Java.


