
Introduction
In the world of web development, we often encounter two popular front-end frameworks: React.js and Angular. React.js is known for its flexibility and freedom in creating user interfaces, while Angular is known for its stability and reliability in building web applications. Front-end development is driven by user experience, making it understandable that front-end developers are attracted to the freedom and agility provided by front-end libraries like React.js.
However, when it comes to back-end development, the focus shifts to data and logic, with security becoming the most crucial aspect. This is where NestJS comes in. It combines the best of both worlds by drawing strength from Angular’s opinionated nature and providing features that help us efficiently organize our code with its modular architecture. Additionally, NestJS allows us to define pipes to manipulate data and incorporates controllers to handle various requests effectively. With NestJS, we can create secure and efficient server-side applications.
In this introduction, we will explore the key features of NestJS.
What is NestJS and Why Should We Choose It for Development?
NestJS is a robust framework specifically designed for creating server-side applications using TypeScript. It takes inspiration from Angular and adopts principles of well-organized code, cleanliness, and efficient management of dependencies. TypeScript’s strong typing and extensive features make it the primary language used in NestJS, while it still enables developers to code in pure JavaScript.
NestJS is built on top of Node.js, Express, and TypeScript, which allows it to inherit the performance and scalability of JavaScript applications while avoiding the complexities often associated with back-end development. It incorporates elements of Object-Oriented Programming (OOP) and Aspect Oriented Programming (AOP) in its core, primarily focusing on addressing a crucial aspect that many other back-end libraries for Node.js fail to tackle: Architecture.
NestJS has a solid foundation for building efficient, reliable, scalable server-side applications. Rapidly gaining popularity, it has become a favorite in Enterprise circles.
Core Fundamentals
NestJS relies heavily on decorators to organize the codebase. These decorators serve as markers that define different components within the application.
- @Controller decorator, which handles incoming requests and returns responses to the client. It allows for the creation of multiple endpoints triggered by standard HTTP requests.
- @Catch decorator, also known as exception filters. This decorator provides a simple and generic approach to handling specific exceptions thrown by the controllers. Using this decorator, developers can effectively manage and handle application errors.
- @Injectable decorator is another key component in NestJS. It marks components that can be injected into other classes, allowing for better code organization and reusability. For example, a service that is used in multiple controllers can be marked as @Injectable, making it easier to manage dependencies between various parts of the application.
- To ensure a modular architecture, NestJS utilizes the @Module decorator. This decorator is used to group related components together so that developers can easily manage and maintain their codebase.
In addition to decorators, NestJS follows the Inversion of Control (IOC) design principle through Dependency Injection. This principle plays a crucial role in connecting the different layers of the application and managing dependencies throughout the codebase. By implementing Dependency Injection, NestJS enhances the framework’s maintainability, flexibility, and overall ease of development.
NestJS is primarily structured based on OOP principles, yet it integrates specific AOP principles to improve code modularity and segregate cross-cutting concerns from the core business logic. This is often achieved through the utilization of decorators and middleware.
The Request-Response Lifecycle in NestJS
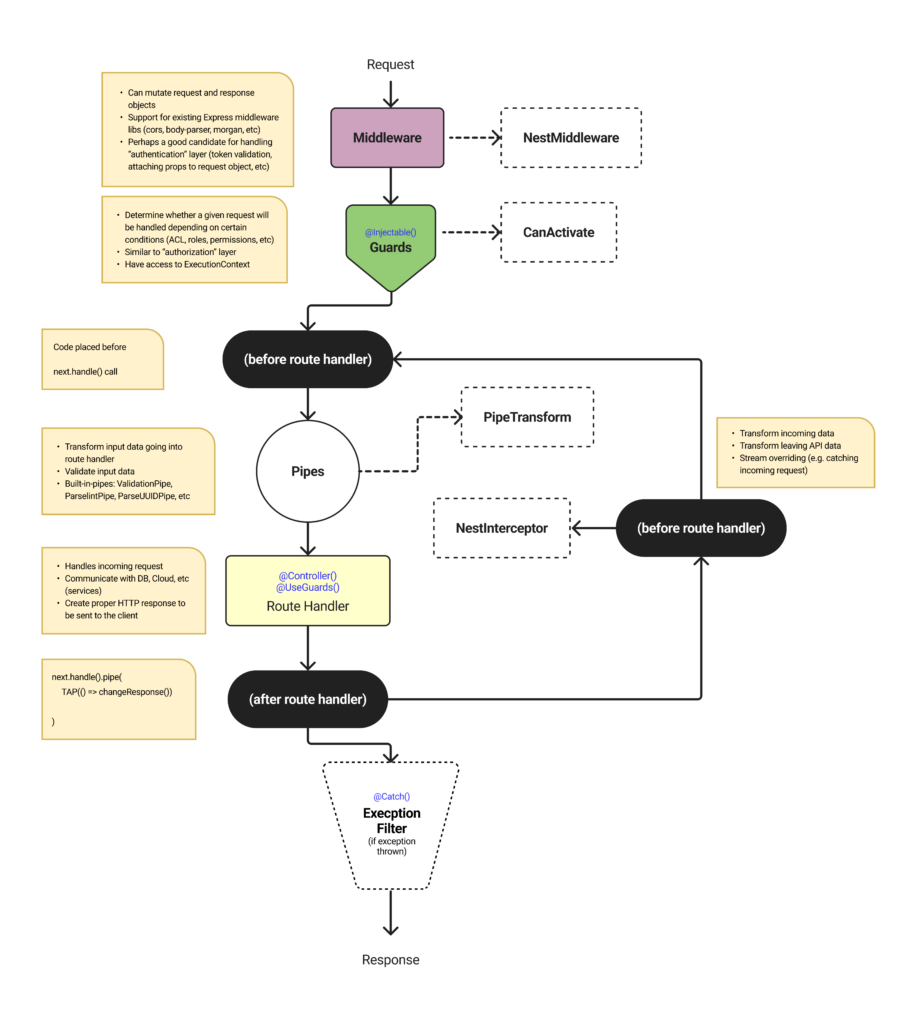
The Request-Response Lifecycle in NestJS involves several steps to ensure the effective processing of client requests and sending back responses.
- First, the client makes a request.
- Then, classes implementing the NestMiddleware interface are executed to process the request. These middleware classes can modify request/response objects or set contextual values. They can also integrate with existing Express middleware libraries. This layer is commonly used for tasks like reading a JSON Web Token (JWT) token from a header and setting user data on the request.
- After the middleware phase, classes that implement the CanActivate interface, known as “guard” interfaces, determine whether a request should be accepted or rejected. For example, in JWT Authentication, these interfaces access the user data set by the middleware and check if the request is authorized for the specific endpoint. If the request is denied, it will be rejected; otherwise, it will proceed to the next step.
- Next, classes that implement the NestInterceptor interface are executed. Interceptors have callbacks that run before and after the response from the handler. They are helpful for tasks like logging, metrics collection, or transforming the input/output shape of the request and response. Interceptors provide access to the request/response context and can perform actions before and after the main handler’s response.
- Before the actual request handler is called, classes that implement the PipeTransform interface are executed. These classes transform arguments into the request. Built-in pipes like ValidationPipe and ParseIntPipe are used for formatting and validating input arguments given to the controller route handler.
- Finally, the @Controller route handler is called. This is where the typical Application Programming Interfaces (API) endpoint handling occurs. The route handler may interact with databases, persistence methods, or other service APIs to process the request and prepare the response.
- Once the route handler has prepared the response, it is sent back to the client. If there are any registered NestInterceptors “after” handlers, they will also process the response if necessary. This allows for additional operations to be performed before the final response is delivered to the client.
Creating a Basic Prototype for Managing Products using NestJS
To fully understand the integration of these concepts, we will create a basic prototype for managing products using NestJS. This prototype will provide an API that includes the standard Create, Read, and Delete operations, all utilizing traditional HTTP methods.
The architecture of the module we will be constructing is outlined below. If you do not immediately grasp the entire concept, do not worry. We will carefully examine each component of the code step-by-step, ensuring a thorough understanding.
Throughout this tutorial, we will break down the process and analyze each section of the code together. By the end, we will have a clear comprehension of how NestJS components interact and how to construct a functional product management service.

Setting Up a NestJS Project
To begin the project, it is assumed that we have already installed node and npm on our computer. The NestJS CLI is then used to create the project by running the command “npm i -g @nestjs/cli”
This CLI provides tools for creating both project-level and component-level scaffolding. In this case, a new project called “nest-quick-intro” is created using the command “nest new nest-quick-intro“
During this process, the user may be asked for some information about the project, but the choice of package manager is the most important thing to note. For this demonstration, npm is used as the package manager.
Before moving on to creating new components, it is crucial to understand the project structure that is set up with the execution of the previous command. If the user has experience working on front-end projects, this structure will be familiar.
┌── node_modules
|── src
│ |── app.controller.spec.ts
│ |── app.controller.ts
│ |── app.module.ts
│ |── app.service.ts
│ └── main.ts
|── test
│ |── app.e2e-spec.ts
│ └── jest-e2e.json
|── .eslintrc.js
|── .gitignore
|── .prettierrc
|── nest-cli.json
|── package-lock.json
|── package.json
|── README.md
|── tsconfig.build.json
|── tsconfig.json
Creating Components for Products’ Back-end Service
To create our products’ back-end service, we need to establish the structure of its components and modules. This process begins by generating the product module using the NestJS Command Line Interface (CLI). By running the command “nest generate module products” in the project’s root directory, we can create this new module and connect it to the base app module, which is responsible for starting the application.
Once the module is set up, we can proceed to create the individual components within it. The first component we will generate is the product service. This can be done by running the command “nest generate service products”. Following the same approach, we will then create the remaining components of our app:
• nest generate class create-product.dto
• nest generate class update-product.dto
• nest generate class product.entity
• nest generate class product.exception
• nest generate controller products
By following these steps and creating the necessary components and modules, we can establish the foundation of our products’ back-end service. This structured approach ensures that each component is properly connected and organized, allowing for efficient development and maintenance of the application. However, to make it simple, we just need to run the command “nest generate resource products“, and CLI will generate all those required components in a single step.
The final product module structure should look like this:
┌── dto
│ |── update-product.dto.ts
│ └── create-product.dto.ts
|── entities
│ └── product.entity.ts
|── exceptions
│ └── product.exception.ts
│── products.controller.ts
│── products.module.ts
│── products.service.ts
Now, the next step is to populate all of the placeholder classes with actual content, except for the *spec.ts files, as they pertain to test definitions and are beyond the scope of this brief introduction.
Let us start by focusing on the first component, our entities, product.ts. We will make necessary edits to include both ‘id’ and ‘name’ fields.
export class Product {
    id: number;
    name: string;
}
Then, add create-product.dto.ts.
export class CreateProductDto {
    name: string;
}
Next, add update-product.dto.ts. If the content is exactly the same, we can use one single dto, product.dto.ts for example.
import { PartialType } from '@nestjs/mapped-types';
import { CreateProductDto } from './create-product.dto';
export class UpdateProductDto extends PartialType(CreateProductDto) {}
Now, let’s proceed to implement our custom exception class, ProductException, which will extend the HttpException class.
import { HttpException, HttpStatus } from "@nestjs/common";
export class ProductException extends HttpException {
    constructor() {
        super('Product is not found.', HttpStatus.NOT_FOUND)
    }
}
Then, we are going to create our product service, products.service.ts. This service will efficiently manage the products we send to our API and handle any unexpected behavior by raising appropriate exceptions.
import { Injectable } from '@nestjs/common';
import { CreateProductDto } from './dto/create-product.dto';
import { UpdateProductDto } from './dto/update-product.dto';
import { Product } from './entities/product.entity';
import { ProductException } from './exceptions/product.exception';
@Injectable()
export class ProductsService {
  private products = [
    { id: Date.now(), name: 'Chocolate' }
  ]

  create(createProductDto: CreateProductDto) {
    const newProduct = {
      id: Date.now(),
      ...createProductDto
    };
    this.products.push(newProduct);
    return newProduct;
  }

  findAll(name?: string) {
    if (name) {
      return this.products.filter(product => product.name === name);
    }
    return this.products;
  }

  findOne(id: number): Product {
    const product = this.products.filter(product => product.id === id);
    if (product.length === 0) {
      throw new ProductException();
    }
    return product[0];
  }

  update(id: number, updateProductDto: UpdateProductDto): Product {
    const indexToUpdate = this.products.findIndex(product => product.id === id);
    if (indexToUpdate === -1) {
      throw new ProductException();
    }
    this.products[indexToUpdate] = { ...this.products[indexToUpdate], ...updateProductDto };
    return this.products[indexToUpdate];
  }

  remove(id: number) {
    const indexToRemove = this.products.findIndex(product => product.id === id);
    if (indexToRemove === -1) {
      throw new ProductException();
    }
    this.products.slice(indexToRemove, 1);
  }
}
Finally, it is time to craft our controller – the heart of our application. Serving as the point of entry, products.controller.ts holds the essence of our API for seamless product management.
import { Controller, Get, Post, Body, Patch, Param, Delete, Query } from '@nestjs/common';
import { ProductsService } from './products.service';
import { CreateProductDto } from './dto/create-product.dto';
import { UpdateProductDto } from './dto/update-product.dto';
@Controller('products')
export class ProductsController {
  constructor(private readonly productsService: ProductsService) {}

  @Post()
  create(@Body() createProductDto: CreateProductDto) {
    return this.productsService.create(createProductDto);
  }

  @Get()
  findAll(@Query('name') name: string) {
    return this.productsService.findAll(name);
  }

  @Get(':id')
  findOne(@Param('id') id: string) {
    return this.productsService.findOne(+id);
  }

  @Patch(':id')
  update(@Param('id') id: string, @Body() updateProductDto: UpdateProductDto) {
    return this.productsService.update(+id, updateProductDto);
  }

  @Delete(':id')
  remove(@Param('id') id: string) {
    return this.productsService.remove(+id);
  }
}
In this part of the application, we learn about a special technique called Constructor-based Dependency Injection. The application also uses decorators to create different ways to access HTTP methods through the product link.
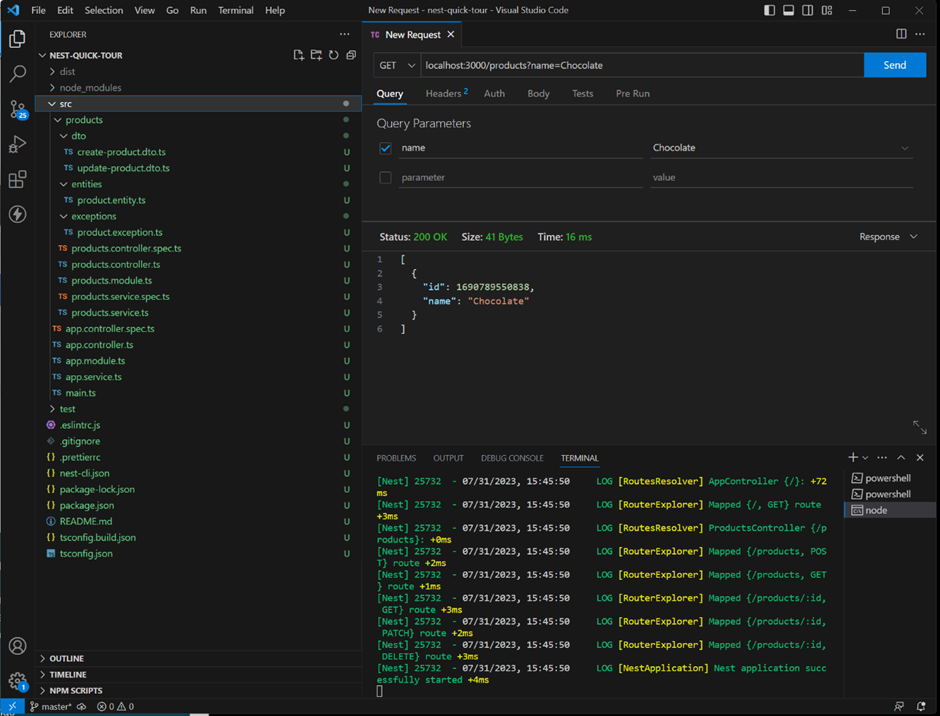
Once everything is set up, the last step is to test what we have created. We can do this by running “npm run start” and using tools like the Thunder Client plugin on Visual Studio Code to explore our new API at http://localhost:3000/products. It is exciting to try it out!
Closing Thoughts
NestJS is a powerful framework that builds upon Node.js, Express, and TypeScript. It goes beyond simply teaching developers syntax and instead emphasizes best practices in back-end development. By using decorators and dependency injection (DI), NestJS encourages clean, modular, and maintainable code, promoting a scalable and robust codebase.
This framework becomes really useful when building complex applications because it uses methods that help organize things neatly and keep different parts separate from each other.
One of the key strengths of NestJS is its ability to enhance the request-response workflow. It introduces important components such as Middleware, Pipe, Guard, Interceptor, and Controller, which assist developers in handling various aspects of the application. These elements enable tasks such as validation, authentication, logging, and error handling, resulting in comprehensive and well-structured application architectures.
Unlike other back-end libraries for Node.js, NestJS focuses specifically on solving architecture-related challenges. While other libraries may primarily teach developers syntax, NestJS prioritizes the creation of high-quality applications by promoting best practices.
In conclusion, NestJS is a powerful framework that combines the strengths of Node.js, Express, and TypeScript. By emphasizing best practices in back-end development and providing important components for handling various aspects of the application, NestJS enables the creation of comprehensive and well-structured application architectures. Its focus on solving architecture-related challenges sets it apart from other back-end libraries for Node.js, making it an excellent choice for developers and industry organizations aiming to build complex and robust applications.
Author: Kerisnarendra, Mitrais Technology Evangelist


