
Web development is moving so fast nowadays; technology is rapidly improving, and many innovations are being developed to help us get our work done more quickly and efficiently. We can use many libraries – such as ReactJS, Redux, and Redux ToolKit – to build web-based applications and tools
What is ReactJS?
Building interactive user interfaces with many development platforms is a challenging undertaking. Creating each website component demands ongoing effort, dedication, and absolute concentration. But ReactJS is a JavaScript library that enables developers to build user interfaces more quickly and easily. ReactJS has already become mainstream and is used by powerful platforms such as Facebook, Netflix, Airbnb, DropBox, IMDb, PayPal, Tesla Motors, and Walmart.
ReactJS is a remarkable JavaScript library that makes the development process much more manageable. Plus, it provides quality-assured ReactJS applications with apt interfaces. ReactJS is considered a much sought-after alternative for developing user-friendly and highly compelling websites & applications that offer several possibilities to the developers to make them more creative.
What is Redux and Redux Toolkit?
Redux is a predictable container that holds JavaScript application state information. It assists when writing applications that behave reliably in client, server, and native environments and are easy to test. In addition, it provides a superior experience for developers, such as live code editing and a time-traveling debugger.
Redux is one of the most commonly used libraries in front-end development, but developers are often confused about what it is and its benefits. Redux assists in writing applications that act persistently, run in different client, server, and native environments, and are easy to test. The Redux Toolkit enables you to focus on the core logic your app needs so that you can do more work with less code.
As the documentation states, “Redux is a predictable state container for JavaScript apps.” ReactJS developers usually work with Redux, although it can be used with other Javascript languages such as Angular, AngularJS, Vue.js, Polymer, Ember, Backbone.js, and Meteor.
Redux is a JavaScript library to manage applications’ states. Redux keeps the state of our application in a store. Each component can access any form from this store. However, configuring the Redux store is complicated and makes us write a lot of boilerplate. Fortunately, we don’t need to worry about it anymore. We can now simplify the complexity of Redux by using Redux Toolkit.
Redux Toolkit is the officially recommended approach for writing Redux logic. Redux Toolkit will help us to simplify Redux development. Redux Toolkit also includes a robust data fetching and caching capability called RTK Query. It’s included in the package, but it’s optional.
Why Should We Use Redux Toolkit?
The Redux Toolkit package is designed to be the standard way to write Redux logic.
With Redux Toolkit, writing Redux is easier and speeds up development. In common Redux, we need to define the state, reducer, and action separately. However, in Redux Toolkit, we define it together inside createSlice. It’s cleaner and more straightforward. It saves a lot of time because we have to write less boilerplate code with Redux Toolkit than with common redux.
Redux Toolkit starts with two key APIs that simplify the common things we do in Redux.
- configureStore: to setup Redux store with a single function call
- createSlice: lets us write reducers that use an Immer library, enabling us to write immutable updates.
export const themeSlice = createSlice({
  name: "theme",
  initialState: intialState,
  reducers: {
    changeTheme: (state, action: PayloadAction<string>) => {
      state.value.activeTheme = action.payload;
    }
  }
 });
Using just a few lines of code, we already have the state, action, and reducer in the same file.
An Example of How We Can Use the Redux Toolkit
1. Install the dependencies in React Application
npm install @reduxjs/toolkit react-redux2. Create a Redux State Slice
Add a new file src/features/themeSlice.ts. Redux requires us to write the state update immutably. However, in Redux Toolkit, we don’t need to do that because Redux Toolkit uses Immer to allow us to write mutating when updating the logic. In this example, we create this Redux state slice to change the theme of a ReactJS application.
export const themeSlice = createSlice({
 name: "theme",
 initialState: intialState,
 reducers: {
   changeTheme: (state, action: PayloadAction<string>) => {
     state.value.activeTheme = action.payload;
   }
 }
});
3. Create a Redux Store
Add a new file src/store/store.ts and add a slice reducer to store.
import { configureStore } from "@reduxjs/toolkit";
import themeSlice from "../features/themeSlice";

export const store = configureStore({
  reducer: {
    theme: themeSlice,
  },
});
4. Provide the Redux Store to React
To allow all the components to access the store in our application, we must pass the store as a prop into the Provider imported from ReactJS Redux.
root.render(
 <StrictMode>
   <Provider store={store}>
     <App />
   </Provider>
 </StrictMode>
);
5. Use Redux State and Action in React Components
We can read the state and update it using the UseSelector and UseDispatch provided by ReactJS-Redux Hook
const Page = () => {
 const theme = useSelector(
   (state: ReturnType<typeof store.getState>) => state.theme.value
 );

 const dispatch = useDispatch();

 const isDark = theme.activeTheme === "dark";

 const handleChangeTheme = () => {
   if (isDark) {
     dispatch(changeTheme("light"));
   } else {
     dispatch(changeTheme("dark"));
   }
 };

 const style = {
   background: isDark ? theme.dark.background : theme.light.background,
   color: isDark ? theme.dark.foreground : theme.light.foreground
 };

 return (
   <div className="container" style={style}>
     <div className="d-flex justify-content-between">
       <button className="btn btn-primary" onClick={handleChangeTheme}>
         {isDark ? "Light Theme" : "Dark Theme"}
       </button>
       <p className="mt-3">Current theme is {theme.activeTheme} </p>
     </div>
     <Post />
 </div>
 );
};

export default Page;
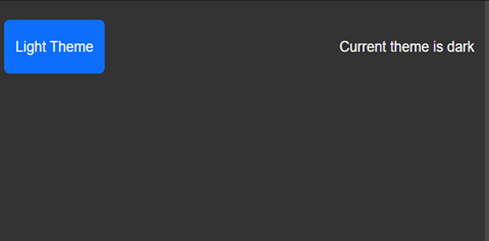
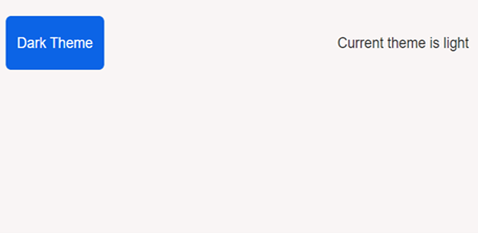
As mentioned earlier, the example code above uses Redux Toolkit to change the theme of a ReactJS application. The images below are the result of the execution. In these images, we can handle state management easily with Redux Toolkit.
When we click the “Light Theme” button, it will dispatch an action and trigger the reducer function “ChangeTheme” to update the state of “ActiveTheme” from “dark” (which is the initial value) to “light.” The reducer method “ChangeTheme,” a string type, takes an action payload. We pass it as an argument to that function. When the state is changed, the component will be re-rendered. Therefore, in the UI, the light theme is applied.
Conclusion
Redux Toolkit eliminates the need to write logic by hand, prevents common mistakes, and simplifies the standard Redux tasks. Using the Redux Toolkit removes some of the complexity in setting up Redux in our React Application. We don’t need to write repetitive code. Moreover, the state, action, and reducer are placed in the same file. When we code in the same file with fewer lines of code, it will be more efficient and make maintenance much easier.
To find out more, please check out the official page here https://redux-toolkit.js.org/
You can find the source code and demo here https://codesandbox.io/s/react-redux-toolkit-6604hz.
References
Author: Sufita Septriana, Software Engineer – Programmer


