
Have you ever tried to create a React app? Then you will remember all the time it takes to set up our environment and optimization, right? That’s a lot of hassle!
Of course, you can set up templates to skip this process each time you create a React app. But how about someone who has just started to develop React apps (like myself)? Or maybe you don’t have time to maintain your template to satisfy all the dependency requirements?
In this post, we will introduce you to Next.js, a JavaScript framework to create React apps that handle the hassle for you!
What is Next.js?
First things first, let’s discuss what Next.js is. As mentioned before, Next.js is a JavaScript framework. More precisely, it is a framework for creating server-side rendering apps. Maybe some of you are wondering, what is a server-side rendered page? To make it simple, it renders all of your JavaScript and creates a React app on the server. In fact, it converts Javascript to static assets which contain HTML, CSS, and JavaScript for an interactive view. This way, the user’s browser does not need to render React script to open the actual page. The benefit of server rendering apps is faster page loading.
Still confused? Let’s use this analogy. Imagine you want to produce a chart showing the company’s financials for August 2020. You go to the archive collector section and ask, “Can I get the financial report for August 2020 in a chart?”. And here’s the scenario:
First, without server-side rendering (full client-side rendering), the handler will give you all the financial reports for 2020 because it’s in one document, and it is still in table format (it will not create the chart for you!). Then, we add server-side rendering. The handler will look at the document, but because you only asked for the August 2020 report, it will separate it from the rest of the document and give it to you in chart form.
The document is all of the constructors of the website (HTML, CSS, and all scripts). The table format is what it looks like before we have processed the script (it’s in a raw format). What we wanted was only the information related to our request and a nice visual of the data. If we only use client rendering, we will receive React script (whole document), which will need to be rendered first to produce the visuals for our website. Server rendering will create the react script so we can immediately see the page itself. This will speed up our web app loading process.
We’ve covered the concept of server-side rendering. Now, let’s dive in and see what Next.js is capable of!
Why use Next.js?
Creating a simple React app from a template is simple, but creating an optimized React app is more complex. Let’s say we want to reduce the size of our JS and CSS file. We need some plugins for that. And sometimes, the plugin is not plugged nor played, so you need to configure some settings before it works as intended (with the help of your DevOps team!).
Furthermore, some optimization is needed as we are coding. For example, routing, pre-fetching, code splitting, and even security. The good news is that all of this configuration is already handled by Next.js! That’s why Next.js is advertised as a zero-configuration framework.
Now let’s take a look at some Next.js features:
- Hot Code Reloading Server
As a developer, we usually run our app on a local server to check our code implementation. to avoid using a wrongly configured server, we need to reload our development server whenever we make some changes! But in Next.js, this is already handled and provided with a hot swap development server configuration! Way to go! - Automatic Routing
Have you ever developed a React app? You know how inconvenient it is to manage routing from one page to another, right? For those who are unfamiliar with the React Router concept, you need to declare the route name and the targeted page you want. If you have misspelled or forgotten to declare, then you need to check the routing path and destination. With Next.js, we only need to create a file inside a folder to create a routing path! Better for visualization and declaration. - Automatic code splitting
Imagine you created an app with rich features. And now the user wants to load the app! If we do not split our code, it will take time to load everything! No problem; Next.js has already split the code for you! Next.js will load only code that is necessary to make your app work and will load additional code when other functions are called. - Prefetching
Prefetching can make our app load faster. But implementing prefetching needs effort, and sometimes, we forget to do it. Next.js already prefetches everything by default when we use component by Next.js! - Prevent inject HTML
Secure software is important to our software. And the best practice to implement secure software is by using secure by default in our software development. Next.js gives us many secure by default implementations! Some examples:
• we cannot load images other than from a specified domain
• we cannot manipulate HTML from API, and many more.
How to Install Next.js
Before we create the Next JS Project, we need to install NPM first. You can go to https://nodejs.org/ and download Node’s installer with the LTS version.
After we install Node JS, we can use NPM to create a Next Project. There are 2 methods to install Next JS:
1. Automatic Setup
Next.js can be installed with an automatic setup that will set up everything automatically for you. The steps are:
- Create a new folder for your project
- Open your terminal inside your folder and type npx create-next-app, or if you want to start a project with Typescript, you can type npx create-next-app –typescript
- Wait for NPM to install the Next.js Project
- After installation is complete, you can type npm run dev to run the Next App and go to the link shown on your terminal (by default, it will be http://localhost:3000)
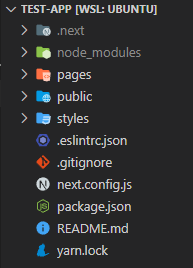
Now, if you look at the folder structure, Next JS has already set up some folders for you to use. You can start by opening a file inside a page and editing the index.js file.
2. Manual Setup
Now you are wondering, “Can I create a Next App from scratch?”. Yes, you can!
Using npx command will give you a template that has been provided by Next. But if you prefer to set up all by yourself (not recommended), then this is the way:
- Create your project folder.
- Initialize with npm or yarn by npm init
- Fill out the form to initialize the project
- Now install these dependencies: react, react-dom, next by using: npm i react react-dom next
- For consistency and clean code, we can add eslint in dev dependencies: npm i -D eslint eslint-config-next
This way, you have already set up everything as Next does (in terms of dependencies)!
But as you can see, this manual installation has no project structuring. Therefore, the automatic setup is much preferable! In the next section, we will get into Next Project structuring so we can understand more about how to use Next.
Next Project Overview
I hope you have already created a Next project by completing the installation above. If you are still facing problems, try to use the other method of installation.
When you have finished initializing the Next.js app using the automatic setup, you will see this structure:
Or, if you try to build from scratch, you will need to supplement what we missed from the Next.js template!
First, let’s look at the config file that the Next.js template provides for us:
1. .eslinterc.json
This file contains eslint configuration, to ignore some rules, plugins, etc. The default configuration should be like this:
1.	{
2.	  "extends": "next/core-web-vitals"
3.	}
This configuration gets a pre-set linter configuration from next to make it a zero-config project! For more information about eslint and how to set up “your own rules”, you can visit the eslint documentation here.
2. .gitignore
I assume you already know what git is, right? So, you must be familiar with this! If you do not know about this, learn about version control.
3. next.config.js
As we mentioned before, Next.js is a zero-configuration framework. Why is there this config file? If you do not like the Next.js default config, you can change it here! Furthermore, there are a lot of useful configurations to improve your project! Let’s start with the template that Next.js provides, shall we?
1.	/** @type {import('next').NextConfig} */
2.	const nextConfig = {
3.	  reactStrictMode: true,
4.	}
5.
6.	module.exports = nextConfig
7.
To add configurations, we need to import the NextConfig library from Next. And in the template, change the strict mode to true and leave the rest as it is. Here’s a sneak peek at what you can do with the Next config:
- Environment variable
- Basepath
- Allowed Image Domains
- PWA settings
- Webpack config
It is an advanced topic that I will not cover here, but if you are interested, then go to the Next.js documentation here.
Other than the configuration file, the structure of a Next.js project can be divided into these folders:
- .next: This is where the build output goes. You do not need to create this file!
- node_modules: This is where our dependencies are installed. Again, you do not need to create this file!
- pages: This is where you mainly develop the app and where Next shines! This folder contains pages you want to create and handle the routing by structuring the hierarchy. More of this topic will be covered in the Next Routing section. To initialize, we need an _app.js file that will be the entry point to our React app. You can create this file manually and add this basic structure, so the Next.js routing will work as intended:
1.	import '../styles/globals.css'
2.
3.	function MyApp({ Component, pageProps }) {
4.	  return <Component {...pageProps} />
5.	}
6.
7.	export default MyApp
8.
And now, our Next.js app is ready to go! We can add other files (like index.js for our “/” directory) to the pages folder, and all is good to go.
- public: This is where our static asset goes! You know static assets, right? Like when you want to add pictures or icons directly from your server. And for more advanced configurations, you can define your index.html (not recommended). And yes, another file like manifest.json (for PWA) goes here too!
- style: The same as other web app projects, this folder contains every styling (CSS) file. Thus, our code structure will be more organized.
- components: The best practice is to create a react app by dividing it into smaller components. The components folder contains every component we create for good structure. This folder is not initialized by default, so even if you use automatic installation, you still need to create it!
That’s it! This is the basic structure of the Next project. In conclusion, all config folders are located in the root. And the folders we need to take care of are pages, public, style, and components.
Next Routing
When you create a React app, you need to use React Router, a third-party library for routing inside the React app. You need to declare every route of the pages that will be used inside your app with targeted elements that will be rendered.
Routing in Next is easier than using React Router on a basic react app. Next has a filesystem-based router that allows you to declare your file route, based on their names. When you add a new file inside the pages folder, you create a new route for your app.
There are several configurations for the router, including:
Index Routes
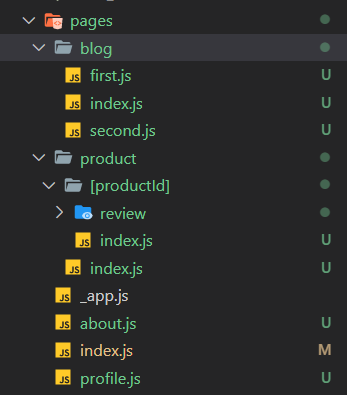
Next.js will automatically make a route of the directory if there is a file named index, for example, on the picture Figure 3:
- “pages/index.js” will be declared as “/”
- “pages/product/index.js” will be declared as “/product”
- “pages/blog/index.js” will be declared as “/blog”
Nested Routes
Next.js also supports nested files, if there is another file beside the index, it will automatically route with the names of the files. For example, in Figure 3:
- “pages/about.js” will be declared as “/about”
- “pages/blog/first.js” will be declared as “/blog/first
Dynamic Routes
For dynamic routes, you can use bracket syntax to allow you to name the parameter. For example, in Figure 3, there is a folder inside the product folder named [productid]. You can call it with the route, for example, “/product/1”, and it will render the index file inside [productid] folder. If you want to find out about dynamic routes, you can read more here.
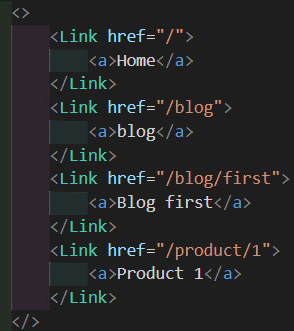
You can link between pages using the Link component that is already provided by Next. This method is a client-side route transition that is similar to a single-page application. As an example, you can see Code 4 below.
Other Next.js Features
Other Next.js features we consider worth mentioning are:
- Next Auth
One of the most complex services to handle in either the front end or back end is authentication and authorization. Next already provides some libraries to handle this hassle. Next Auth support from credential login (authentication) and OAuth or only JWT (authorization). The best practice to implement auth is by using the optimum library, and Next Auth already implements this! For more information about Next Auth, you can read the Next Auth documentation here.
- Next Image
Next image is a component from Next with optimization for images. It has props that you can define like: src, layout, width, height, etc. And for security, Next Image provides allows lists of URL images, so our images can only come from a trusted domain, which means secure by default. And this is a good practice for security! For further information, you can read here.
- Next Router
The same as Next Link, Next Router can be used for client-side navigation through the route. Usually, we use Next Router for something that needs action, like a push button, redirection page, etc. You can read more here.
Conclusion
The main reason to choose the Next.js framework when creating a React app is because of zero configuration. It helps us, as developers, to accelerate the creation of a new app. Furthermore, Next already does a lot of optimization in the background, so our apps will be faster to load in the browser.
References
- Flavio’s Next JS Handbook – The Next.js Handbook (flaviocopes.com)
- Next JS Documentation – Getting Started | Next.js (nextjs.org)
- Next Auth Documentation – Introduction | NextAuth.js (next-auth.js.org)
Author: Naufal Takbir Ibrahim (Junior Programmer) and Faris Adam Gunawan (Junior Programmer)


