
Introduction
Over a decade, Laravel has become the most widely used PHP framework to create small to large projects that require better performance.
In terms of designing and building an application, deployment is one of the crucial things to consider. I want to take Laravel to a more advanced level in this tutorial. First, we will learn how to make zero-downtime deployment with Laravel and GitHub actions.
What is CI/CD or Zero Downtime Deployment
Continuous integration and delivery/continuous deployment are abbreviated as CI and CD. Organizations may use CI/CD to ship software rapidly and efficiently. CI/CD enables an efficient procedure for bringing products to market faster than ever before, sending code into production, and ensuring a continuous flow of new features and bug fixes via the most efficient delivery.
Zero downtime deployment is where your website or application is never down or in an unstable state during the deployment process. For this to happen, the webserver doesn’t start serving the changed code until the entire deployment process is complete.
Why Use Github Actions
I will show you how to implement Zero Downtime Deployment using GitHub Actions and a deployment tool called Deployer. I will not explain the function of the two in detail, but one of the reasons I chose Github Actions is because it offers 2000 minutes free per month for private and public repositories. Others only provide free shared storage. In addition, this offer can last on small and middle projects that require 15-30 minutes each run.
Preparations
• Github Account
• Use PHP 8.0
• Your Laravel Project. In this article, I’m using Laravel 8.
• Web Hosting that can access through SSH (e.g., DigitalOcean)
• Domain name
• Git Bash as primary terminal (optional)
Install and Setup Deployer on Project
Install Deployer
First, open your Laravel Project and run the following command:
composer require deployer/deployer:v7.0.0-rc.4Next, let’s create bash alias to make shortcurt dep instead of vendor/deployer/deployer/bin/dep
- Open bash terminal
- type: nano ~/.bashrc
- type: alias dep=”vendor/deployer/deployer/bin/dep”
- save and exit
- type: source ~/.bashrc to reload configuration
After installing and configuring our bash, we can type:
dep init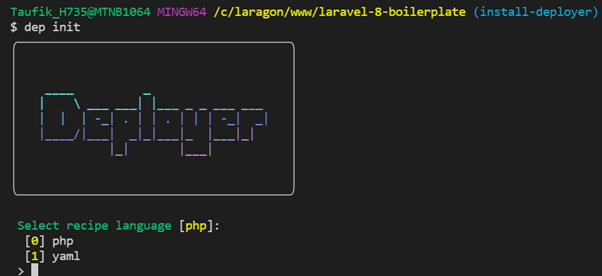
The deployer will ask you a few questions, and after finishing, you will have a deploy.php or deploy.yaml file, but we will continue with deploy.php. This is our deployment recipe. It contains hosts, tasks, and requires other recipes. All framework recipes that come with Deployer are based on the standard formula.
To save time, you can copy and paste the below configuration and replace your deploy.php
 <?php

namespace Deployer;

require 'recipe/laravel.php';
require 'contrib/npm.php';
require 'contrib/rsync.php';

///////////////////////////////////
// Config
///////////////////////////////////

set('application', 'Your Project Name');
set('repository', 'git@github.com:change-with-your-repo-url.git'); // Git Repository
set('ssh_multiplexing', true);  // Speed up deployment
//set('default_timeout', 1000);

set('rsync_src', function () {
    return __DIR__; // If your project isn't in the root, you'll need to change this.
});

// Configuring the rsync exclusions.
// You'll want to exclude anything that you don't want on the production server.
add('rsync', [
    'exclude' => [
        '.git',
        '/vendor/',
        '/node_modules/',
        '.github',
        'deploy.php',
    ],
]);

// Set up a deployer task to copy secrets to the server.
// Grabs the dotenv file from the github secret
task('deploy:secrets', function () {
    file_put_contents(__DIR__ . '/.env', getenv('DOT_ENV'));
    upload('.env', get('deploy_path') . '/shared');
});

///////////////////////////////////
// Hosts
///////////////////////////////////

host('prod') // Name of the server
->setHostname('xxx.xxx.xxx') // Hostname or IP address
->set('remote_user', 'root') // SSH user
->set('branch', 'main') // Git branch
->set('deploy_path', '/var/www/project-path'); // Deploy path

after('deploy:failed', 'deploy:unlock');  // Unlock after failed deploy

///////////////////////////////////
// Tasks
///////////////////////////////////

desc('Start of Deploy the application');

task('deploy', [
    'deploy:prepare',
    'rsync',                // Deploy code & built assets
    'deploy:secrets',       // Deploy secrets
    'deploy:vendors',
    'deploy:shared',        //
    'artisan:storage:link', //
    'artisan:view:cache',   //
    'artisan:config:cache', // Laravel specific steps
    'artisan:migrate',      //
    'artisan:queue:restart',//
    'deploy:publish',       //
]);

desc('End of Deploy the application');
Please notice you should change this line within your own server configuration:
->setHostname('xxx.xxx.xxx') // Hostname or IP address
->set('remote_user', 'root') // SSH user
->set('branch', 'main') // Git branch
The code above is self-explanatory. I believe you can read and understand it. Please go to Deployer documentation and search the syntax you do not understand.
Add GitHub Workflow
Create a new folder and file on your project root.
touch .github/workflows/push_workflow.yml*note: This file later will be triggered by GitHub Actions
After creating the file above, you need to copy and paste the below code:
on:
  push:
    branches:
      - main

jobs:
  build-js-production:
    name: Build JavaScript/CSS for Production Server
    runs-on: ubuntu-latest
    if: github.ref == 'refs/heads/main'
    steps:
      - uses: actions/checkout@v1
      - name: NPM Build
        run: |
          npm install
          npm run prod
      - name: Put built assets in Artifacts
        uses: actions/upload-artifact@v1
        with:
          name: assets
          path: public
          retention-days: 3
  deploy-production:
    name: Deploy Project to Production Server
    runs-on: ubuntu-latest
    needs: [ build-js-production ]
    if: github.ref == 'refs/heads/main'
    steps:
      - uses: actions/checkout@v1
      - name: Fetch built assets from Artifacts
        uses: actions/download-artifact@v1
        with:
          name: assets
          path: public
      - name: Setup PHP
        uses: shivammathur/setup-php@master
        with:
          php-version: '8.0'
          extension-csv: mbstring, bcmath
      - name: Composer install
        run: composer install -q --no-ansi --no-interaction --no-scripts --no-progress --prefer-dist
      - name: Setup Deployer
        uses: atymic/deployer-php-action@master
        with:
          ssh-private-key: ${{ secrets.SSH_PRIVATE_KEY }}
          ssh-known-hosts: ${{ secrets.SSH_KNOWN_HOSTS }}
      - name: Deploy to Production
        env:
          DOT_ENV: ${{ secrets.DOT_ENV_PRODUCTION }}
        run: php vendor/bin/dep deploy prod --branch="main" -vv
If there is any push on the “main” branch, it will run “build-js-production” that will build and compile our front end using commands “npm install” and “npm run prod,” then upload the compiling assets to Artifacts. Next, after the second step finishes, it will run the second job, “deploy-production,” which will deploy our code to the server and trigger the “deploy.php” that we’ve already prepared.
We still need to fill in some credentials of our server so it can access the server. The credentials we are looking for in the above code to add are:
- ${{ secrets.SSH_PRIVATE_KEY }}
- ${{ secrets.SSH_KNOWN_HOSTS }}
- ${{ secrets.DOT_ENV_PRODUCTION }}
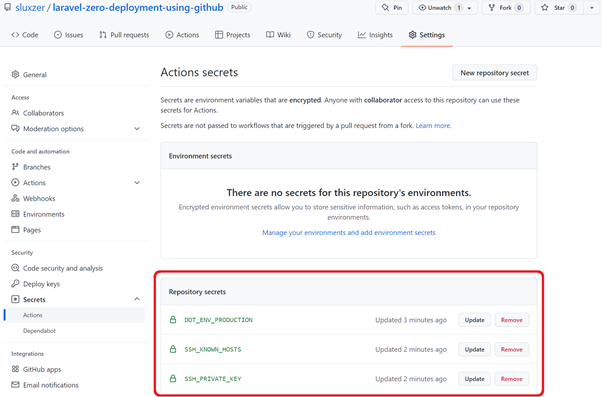
Add Credentials to GitHub Secrets
- SSH_PRIVATE_KEY
- SSH_KNOWN_HOSTS
- DOT_ENV_PRODUCTION
Open your GitHub repository and then follow these steps:
- Click “Settings”
- Check sidebar menu and click “Secrets” > “Actions”
- Click the button “New Repository Secret.” You need to create this three times, fill the title precisely like above, and fill the value with temporary text such as ‘test.’
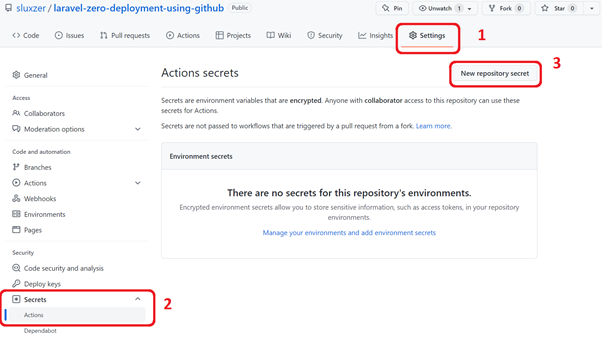
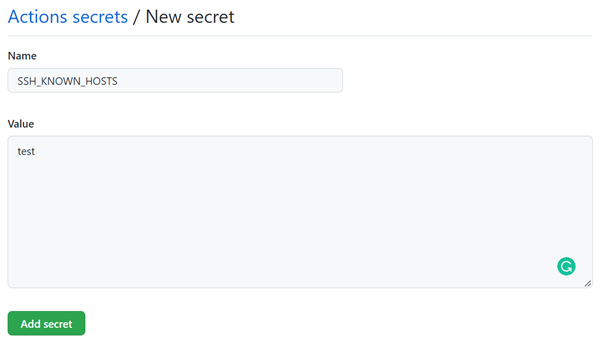
If you follow these steps, you’ll have three data under Repository secrets, like the image below:
Next, we need to update all the secrets with the actual value.
SSH PRIVATE KEY
First, open your server using the terminal, and paste the text below.
ssh-keygen -t ed25519 -C "your_email@example.com"When prompted to “Enter a file in which to save the key,” press Enter. This accepts the default file location, and if you are asked to input a passphrase, leave it blank and just hit enter.
Next, check your generated key with the text below.
ls ~/.sshThen, we need to copy the key without a .pub extension
cat ~/.ssh/id_rsaThe output is similar to this:
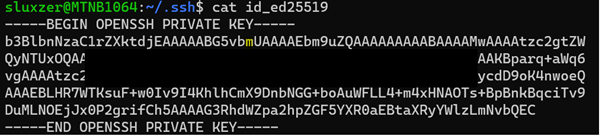
Update your GitHub secret and paste the data.
SSH_KNOWN_HOSTS
Next, we need the KNOWN_HOSTS value. This will later prevent GitHub Actions from asking you if you want to connect to your server. (Without the known_hosts value, the workflow will timeout, as you can’t manually interact with the workflow run. To get this value, execute the following command from your local CLI.
ssh-keyscan <name_of_your_host (eg. example.com)>The output might look like this:
<name_of_your_host> ssh-rsa AAAABBBCCCDD...DOT_ENV_PRODUCTION
We need to copy and paste our Laravel .env data here and update all the connections, such as database, mail, etc. We need to update here because, in the end, this .env will be pushed to our server.
Push the Code
Finally, we can push all the changes we’ve made to the main branch. After that, you need to look at Actions on GitHub.
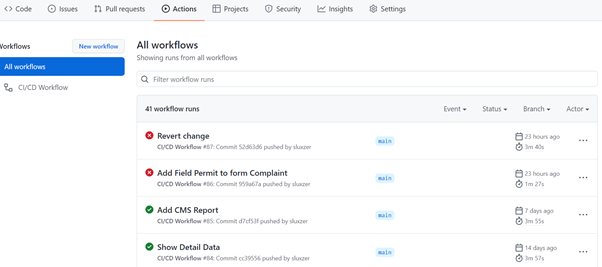
In the image example, the workflow can have the status Success indicated with a green checkmark, and the status Failed marked with a red checkmark. Just click the title for the details.
Conclusion
Let me recap what we’ve done. After doing all the steps above, our code will be automatically published to the server and go live. You can separate the server with “Staging” & Production” and run your test right on this workflow.
Author: Taufik Hidayat, Software Engineer


