
Introduction
GraphQL makes APIs quick, easy, and developer-friendly. Users can deploy it within an integrated development environment (IDE) known as GraphiQL. As an alternative to REST, GraphQL allows developers to create requests that pull data from multiple data sources in a single API call. There were a lot of discussions among developers, and it dragged us closer to having our hands on it. This article will discuss implementing authorization using JSON Web Token (JWT) in a Node.js GraphQL service.
Let’s assume that you are familiar with the following subjects:
- Node.js
- Apollo Server
- Curl
- Querying in GraphQL. For more details about GraphQL, you can find https://rb.gy/rp7fno
- OAuth. If Oauth is new to you, please visit OAuth 2.0 website
- Secret key cryptography. You can find a reference here
GraphQL Service
In this step, we will create an easy GraphQL service, it will use the following technology:
- Node.js
- Apollo Server, which is a GraphQL server
- Jsonwebtoken, which is a JavaScript library of JWT implementation
Prerequisites
Please install the following software before getting started:
- An IDE. You can use Visual Studio Code
- Node.js. Download it here
- Install GraphQL. npm i graphql -s
- Install Apollo Server. npm i apollo-server -s
- Install Jsonwebtoken. npm i jsonwebtoken -s
After successfully initiating a new Node.js application folder, add index.js as the main program. For simplicity, we will put all codes into this file. Let’s get started with type, as below:
const { ApolloServer, gql } = require('apollo-server');

// Type definition
const typeDefs = gql`
type Item {
  id: ID
  itemName: String
  color: String
  weightGr: Int
}

type Query {
  itemCollection: [Item]
}
`;
itemCollection returns an array of Items. An array is indicated by “[ ]”.
Next, add resolver, Resolver is an object that interconnects a schema to data. For more details about resolvers, visit Resolvers documentation.
...

const resolver = {
    Query: {
      itemCollection: async (parent, args, context, info) => {
        return [
            {
                id: 'item_001',
                itemName: 'Towel',
                weightGr: '200'
            }, {
              id: 'item_002',
              itemName: 'Pillow',
              weightGr: '170'
            }
        ];
      }
    }
  };
...
Now we have schema and resolver. It is almost ready for the first run. It should have an AppoloServer to run. Add the following code:
...

const port = 4040;
const serverConfig = {
    port: port,
    cors: true,
    typeDefs,
    resolvers: resolver
};
const server = new ApolloServer(serverConfig);

...
To run the service, run command: node index.js. The following line will show, indicating that the service is running.
Server ready at http://localhost:4040/Then, we can send some requests toward it. In here, we use Curl, but any other tools can work too.
curl -sb -X POST -H "Content-Type: application/json" --data '{ "query": "{ itemCollection { id itemName } }" }' http://localhost:4040/The response will be as below. It is a JSON formatted, returned by the resolver.
{"data":{"itemCollection":[{"id":"item_001","itemName":"Towel"},{"id":"item_002","itemName":"Pillow"}]}}The GraphQL service is now up and running!
Authorization
In a real-world application, we may need to limit access to data by specifying scope or permission. That is what authorization is. As mentioned above, the authorization will be using JSON Web Token (JWT). Before getting further with JWT, let’s look at what it is.
JSON Web Token (JWT)
JWT is a method for representing security information. The server requires the information to verify the client’s request. JWT can contain identity and permission that tells the server whether the client is authorized for the requested resource. JWT is secure because it has a signature that requires a key to verify, either a public key or a secret.
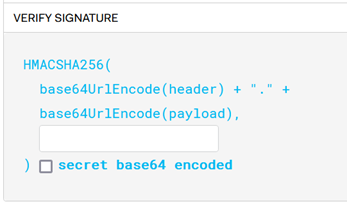
In this article, we will need a JWT. To generate one, we can visit JWT.io, then follow the steps below:
- Set Algorithm to HS256
- Set Header to:
{
  "alg": "HS256",
  "typ": "JWT"
}
- Set Payload to:
{
  "sub": "1234567890",
  "name": "John Doe",
  "iat": 1516239022,
  "userId": "uid_123123",
  "orgId": "default_store",
  "permissions": ["read:items"]
}
- Generate a 256 bit secret key; you can use any generator. Then, enter here:
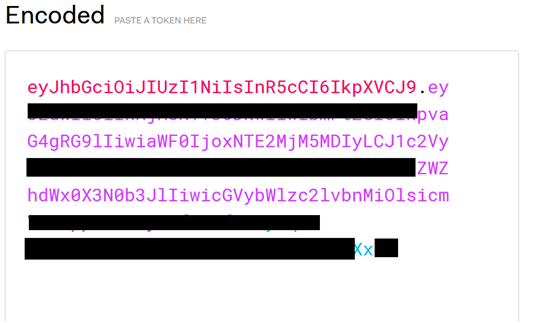
- Then, copy the generated token from Encoded field
Authorization Resolver
There are some methods for authorization in the GraphQL server. In this article, the authorization will be handled in resolver. To allow the resolver to validate, the permission list should be passed to it. For passing any object to the resolver, we use the Context object. Context object verifies, extracts, and returns JWT payload of permissions. In a case of verification failure, we can use AuthenticationError from the Apollo Server library. See the modification in index.js.
...

// Get AuthenticationError from Apollo Server
const { ApolloServer, gql, AuthenticationError } = require('apollo-server');

// Add jsonwebtoken library
const jwt = require('jsonwebtoken');

...

// Don't harcode! this is just a demo
const jwtSecret = '<your_generated_secret_string>';

...
As in the code above, there is a constant of jwtSecret. That is the secret generated earlier when generating JWT. Since this secret is used for verifying JWT, it should be the same secret string.
The generated token will be used as a bearer token and included in the Authorization header. The context object must take the token from the Authorization header and verify it. The complete logic will be as below:
- Get token from Authorization header
- Verify JWT using jsonwebtoken library
- Extract payload, get permissions list from the token, and
- Forward the permission list to resolver
This is how context added into index.js
...

// Function for verifying JWT
const verifyJwt = (jwtToken, secret) => {
    return new Promise((resolve, reject) => {
        jwt.verify(jwtToken, secret, function(err, decoded) {
            if (err) {
                reject(err);
            } else {
                resolve(decoded);
            }
        });
    });
};

// Context object declaration
const contextObject = async ({ req }) => {
    const values = req.headers.authorization.split(' ');
    let verified = null;

    try {
        verified = await verifyJwt(values[1], jwtSecret);


    }
    catch (err) {
        console.log(err);
        throw new AuthenticationError(`INVALID_TOKEN`);
    }

    return {
        permissions: verified.permissions
    };
}
...
As the context forward permission list to the resolver, the permission can be validated in a particular query (or mutation). Change the resolver to this:
...

const resolver = {
    Query: {
      itemCollection: async (parent, args, context, info) => {
        if (context.permissions.includes('read:items')) {
            return [
                {
                    id: 'item_001',
                    itemName: 'Towel',
                    weightGr: '200'
                }, {
                  id: 'item_002',
                  itemName: 'Pillow',
                  weightGr: '170'
                }
            ];
        }

        return [];
      },
      item: async (parent, args, context, info) => {
        if (context.permissions.includes('read:items')) {
            return {
                id: 'item_002',
                itemName: 'Pillow',
                weightGr: '170'
            };
        }
        return null;
      }
    }
};
...
See the full source code in Github graphql-jwt-demo.
Now, rerun the service and run the following Curl command:
curl -sb \ -X POST -H "Content-Type: application/json" -H "Authorization: Bearer <your_JWT_token>" --data '{ "query": "{ itemCollection { id itemName } }" }' http://localhost:4040The response will be as below, and the authorization works now.
{"data":{"itemCollection":[{"id":"item_001","itemName":"Towel"},{"id":"item_002","itemName":"Pillow"}]}}But what if the request is sent with an incorrect token? It will give an error of invalid token as below:
{"errors":[{"message":"Context creation failed: INVALID_TOKEN","extensions":{"code":"UNAUTHENTICATED","exception":{"stacktrace":["AuthenticationError: Context creation failed: INVALID_TOKEN","    at ApolloServer.contextObject [as context] (…\\index.js:44:15)","
at processTicksAndRejections (internal/process/task_queues.js:95:5)","    at async ApolloServer.graphQLServerOptions (…\\node_modules\\apollo-server-core\\dist\\ApolloServer.js:466:23)","
at async resolveGraphqlOptions (…\\node_modules\\apollo-server-core\\dist\\graphqlOptions.js:6:16)","
at async runHttpQuery (…\\node_modules\\apollo-server-core\\dist\\runHttpQuery.js:55:19)"]}}}]}
Conclusion
It is good to have granular authorization in the resolver, but it becomes an issue in terms of tidiness and maintainability as the resolver grows. It is an excellent idea to combine with a service-wide authorization in context. By doing so, we can narrow down authorization to only specific permission toward query or action in resolver. For verifying JWT in real-world applications, it is better to use that is released by an identity provider; some providers switch the key regularly.
GraphQL makes APIs fast, flexible, and developer-friendly. It can even be deployed within an integrated development environment (IDE) known as GraphiQL. As an alternative to REST, GraphQL allows developers to create requests that pull data from multiple data sources in a single API call.
Author: Hendra Pratama, Technology Evangelist


