Many of us are familiar with microservices, which promote dividing large applications into smaller parts. For example, microservices focus on handling a single business process called “service.” Usually, these services must integrate, communicate, and exchange information.
Event-driven architecture is one of the most common methods to achieve seamless integration. In this architecture, event routers or brokers connect the event consumers to the event producers through message brokers. It works like a queue where the events are transmitted as messages.
Operating containerized applications has become the de facto standard when planning and executing a deployment. This article will describe the steps for deploying the message brokers into a Kubernetes cluster.
Getting to Know Kafka
Kafka is an open-source event streaming platform adopted by Apache, capable of handling real-time data, and has become well known as an effective tool to be used as a message broker.
Unlike traditional message brokers that delete the messages after they have been consumed, in Kafka, these messages are retained, so they can be replayed if there is an error or when integrating new services.
The latest release of Kafka supports Kafka Raft (KRaft), a protocol that utilizes the new Quorum controller to manage the metadata of Kafka. It means that if we use KRaft, it no longer needs to depend on Zookeeper.
Understanding Kafka’s Functionality and Operations
Kafka works in the form of clusters. Inside a Kafka cluster, there is at least one broker dedicated to handling messages as topics from the producer and to the consumer. Kafka Topics are used to classify and organize notes. In summary, a producer creates messages and sends them to topics that will later be used by the consumers.
The Importance of Having Multiple Kafka Brokers in Your Architecture
In its simplest form, a Kafka cluster architecture could work with a single broker, but what if that broker somehow became unavailable? It would prevent producers from sending messages and consumers from consuming the messages. To ensure availability, we need spare brokers for backup.
Getting to Know Kubernetes
Kubernetes (K8S) is an open-source container orchestration tool that automates containerized applications’ deployment, management, and scaling.
Why Should You Deploy Kafka on Kubernetes?
Kafka is a stateful application, which means that Kafka needs to persist, store data, and maintain its state. Deploying a stateful application is quite a challenge because of its complexity. The answer is to keep flexibility and scalability while reducing the complexity since Kubernetes supports stateful application and abstraction. Meaning, it can run everywhere with one configuration.
Deploying a Multi-Broker Kafka Cluster in Kubernetes: A Step-by-Step Guide
In this setup, we are going to do the deployment in our local environment. The tools that we are going to use and their versions are as follows:
- Docker v20.10.16 [https://docs.docker.com/get-docker/]
- Kubectl v1.24.0 client and v1.24.4+k3s1 server [https://kubernetes.io/docs/tasks/tools/#kubectl]
- K3D v5.4.6 [https://k3d.io/v5.4.6/]
- Octant (optional) [https://octant.dev/]
The architecture diagram below represents the resources we will deploy to get a general idea of how our Kafka cluster will look in Kubernetes.
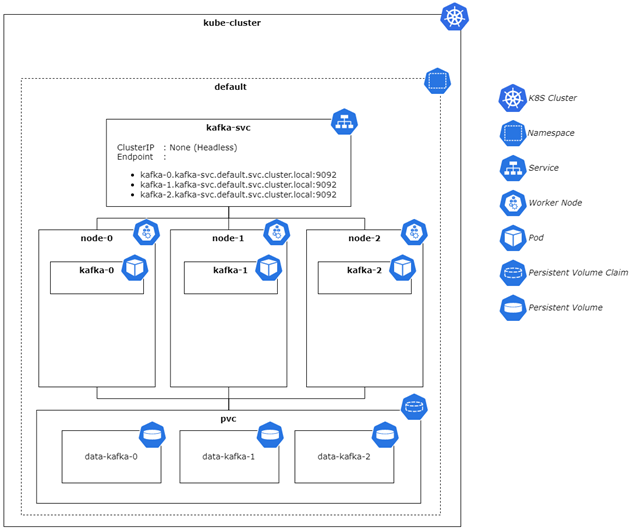
From the architecture diagram above, we can identify the following resources:
- A Kafka cluster with three brokers’ main benefit is the availability of the Kafka cluster. If one of the brokers is down, Kafka can still handle its clients’ (both consumers and producers) needs.
- Given the Kubernetes cluster, Kafka deployed into a Statefulset because we want to maintain the pod’s uniqueness, storage identifier, and name after the restart.
- In combination with Statefulset, we use a headless service, so the pods would have their DNS because we expect the pod’s IP could be changing, so we need to target the correct pod for our Kafka clients to connect to the broker. So even if the pod IP changes, we do not need to change it on the Kafka client’s side.
- Each of the broker pods uses its persistence storage.
Work Steps
The work steps can be divided into three main phases as below:
- Setting up a local K8s cluster
- Creating a K8s manifest file
- Deploying
1. Setting Up a Local Kubernetes Cluster
Make sure Docker is running with Kubectl and K3d installed on your machine. Then, open a new fresh terminal and run the following command.
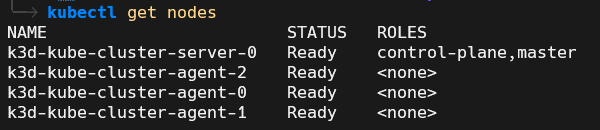
k3d cluster create kube-cluster --agents 3It will create a Kubernetes cluster named kube-cluster with a master node and three worker nodes. To make sure, check with the following command.
kubectl get nodesThe result should look like this:
2. Creating a Kubernetes Manifest File
Create a new file called kafka.yaml and open it with your favorite code editor, and paste the following code.
apiVersion: v1
kind: Service
metadata:
  name: kafka-svc
  labels:
    app: kafka-app
spec:
  clusterIP: None
  ports:
    - name: "9092"
      port: 9092
      protocol: TCP
      targetPort: 9092
  selector:
    app: kafka-app
---
apiVersion: apps/v1
kind: StatefulSet
metadata:
  name: kafka
  labels:
    app: kafka-app
spec:
  serviceName: kafka-svc
  replicas: 3
  selector:
    matchLabels:
      app: kafka-app
  template:
    metadata:
      labels:
        app: kafka-app
    spec:
      containers:
        - name: kafka-container
          image: doughgle/kafka-kraft
          ports:
            - containerPort: 9092
            - containerPort: 9093
          env:
            - name: REPLICAS
              value: "3"
            - name: SERVICE
              value: kafka-svc
            - name: NAMESPACE
              value: default
            - name: SHARE_DIR
              value: /mnt/kafka
            - name: CLUSTER_ID
              value: kb-WV7dt8Au9ixOk4YbRm5tL
            - name: DEFAULT_REPLICATION_FACTOR
              value: "3"
            - name: DEFAULT_MIN_INSYNC_REPLICAS
              value: "2"
          volumeMounts:
            - name: data
              mountPath: /mnt/kafka
  volumeClaimTemplates:
    - metadata:
        name: data
      spec:
        accessModes:
          - "ReadWriteOnce"
        resources:
          requests:
            storage: "1Gi"
In the block of codes above, we have two Kubernetes resources in one file: the Kubernetes Service and Statefulset for Kafka.
The Service is headless, which means using ClusterIP rather than specifying the IP address. It is useful later to connect with the brokers using the Kubernetes core DNS provided instead of directly through a dynamic IP address.
Through the Statefulset, the Kafka brokers will be replicated into three pods. We need an odd number of services to run because of network control. Aside from setting up pod replication on Statefulset, we must also specify the Kafka replication factor in the environment file. We will use the environment file to map the Apache Kafka server properties file configuration later, which includes the volume.
Because the goal is to have a Multiple Broker Kafka cluster, we need to set the replication factor to three. Using odd numbers is common practice in this situation because of network control. Therefore, we must select the pod, and Kafka replicates to three. We use a persistent volume to store the Kafka state, so if there are problems that require Kafka to restart, the information state persists.
3. Deploying
Save the file, open the terminal in the same directory as the file, and execute the command below.
kubectl apply -f kafka.yamlAfter that, execute the command below.
kubectl get pods -o wide --watch
If all of them are running, then you have successfully deployed them. You can also use Octant to monitor the Kubernetes cluster from UI.
Conclusion
Deploying Kafka in Kubernetes benefits us by offering flexibility, scalability, reduced complexity, and automation. We can then quickly deploy our Kafka in any environment that supports Kubernetes and scale it based on our needs.
The latest version of Kafka introduces Raft Protocol (KRaft) which removes the dependency on Zookeeper. With KRaft, we do not need to deploy other instances for Zookeeper, making Kafka deployments simpler, lightweight, and less expensive. As KRaft is relatively new (unlike Zookeeper), we recommend careful consideration when using it for production. In KIP-833, KRaft is marked as production ready though, so with future releases, we expect to see growing use of Kraft for production purposes.
References:
https://developer.confluent.io/learn/kraft/
https://www.redhat.com/en/topics/integration/why-run-apache-kafka-on-kubernetes
https://learnkube.com/kafka-ha-kubernetes
Author: I Putu Augi Oka Adiana, Software Engineer Junior Programmer


