

Swagger is a suite of tools that helps developers understand RESTful Web Services. It uses the OpenAPI Specifications as a standard.
Did you know that Swagger can be easily integrated into various web frameworks such as .NET Core, Flask, Laravel, etc? This article will show how to implement it in the .NET Core framework. We will also talk about the following four tools:
- Swagger Codegen: Code generator to create server stubs based on the API with the OpenAPI specifications created.
- Swagger Editor: API editor for designing APIs to the OpenAPI specification.
- Swagger UI: UI for visualizing OpenAPI definitions in the browser.
- Swagger Inspector: Allows for easy performance of tests in the cloud
In Visual Studio, create a new project with the following steps:
- Create New Project.
- Select ASP.Net Core Web API.
- Define Project’s name and project location.
- Select framework .NET Core 3.1.
Install Swagger
After a new project is created, Swagger can be installed in two ways in Visual Studio, using the Package Manager Console or through the NuGet Package Manager, as follows:
Package Manager Console
In the Package Manager Console tab, enter the following command:
Install-Package Swashbuckle.AspNetCoreNuGet Package Manager
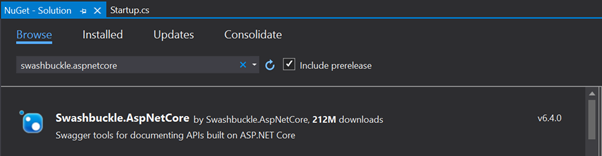
Inside Visual Studio, select the Tools menu, select the NuGet Package Manager menu, and click Manage NuGet Packages for Solution. Next in the search field, enter the keyword Swashbuckle, (don’t forget to select Package source nuget.org). Select the package with the name Swashbuckle.AspNetCore and install.
Demo
To enable Swagger, add the Swagger service to the ConfigureServices method in the startup.cs class file as follows:
services.AddSwaggerGen(); Then activate Swagger in the Configure method in the Startup class file as follows:
app.UseSwagger();
app.UseSwaggerUI();
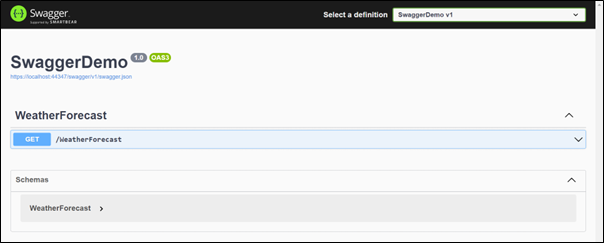
Once added, run the application, and access the browser’s http://localhost/[port]/swagger page. The ASP.NET Core Web API with the .NET Core framework with version 3.1 and above already provides a default controller, namely WeatherForecastController, with the following code:
using Microsoft.AspNetCore.Mvc;
using Microsoft.Extensions.Logging;
using System;
using System.Collections.Generic;
using System.Linq;
using System.Threading.Tasks;

namespace SwaggerDemo.Controllers
{
    [ApiController]
    [Route("[controller]")]
    public class WeatherForecastController : ControllerBase
    {
        private static readonly string[] Summaries = new[]
        {
            "Freezing", "Bracing", "Chilly", "Cool", "Mild", "Warm", "Balmy", "Hot", "Sweltering", "Scorching"
        };

        private readonly ILogger<WeatherForecastController> _logger;

        public WeatherForecastController(ILogger<WeatherForecastController> logger)
        {
            _logger = logger;
        }

        [HttpGet]
        public IEnumerable<WeatherForecast> Get()
        {
            var rng = new Random();
            return Enumerable.Range(1, 5).Select(index => new WeatherForecast
            {
                Date = DateTime.Now.AddDays(index),
                TemperatureC = rng.Next(-20, 55),
                Summary = Summaries[rng.Next(Summaries.Length)]
            })
            .ToArray();
        }
    }
}
Then Swagger will display the API documentation on the Swagger UI as follows:
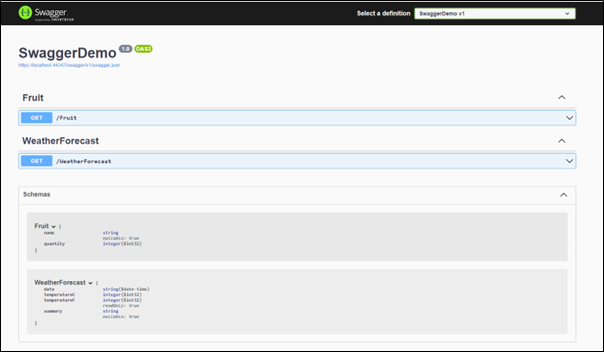
As another example, we will add another API that will be stored in the Fruit class in FruitController with the following code:
using Microsoft.AspNetCore.Http;
using Microsoft.AspNetCore.Mvc;
using Microsoft.Extensions.Logging;
using System;
using System.Collections.Generic;
using System.Linq;
using System.Threading.Tasks;

namespace SwaggerDemo.Controllers
{
    [Route("[controller]")]
    [ApiController]
    public class FruitController : ControllerBase
    {
        private static string[] Fruits = new[]
        {
            "Apple", "Orange", "Watermelon", "Lemon", "Coconut", "Cherry"
        };

        private readonly ILogger<FruitController> _logger;

        public FruitController(ILogger<FruitController> logger)
        {
            _logger = logger;
        }

        [HttpGet]
        public IEnumerable<Fruit> Get()
        {
            var range = new Random();
            return Enumerable.Range(1, 5).Select(index => new Fruit
            {
                Name = Fruits[range.Next(Fruits.Length)],
                Quantity = range.Next(1, 10)
            }).ToArray();
        }
    }

    public class Fruit
    {
        public string Name { get; set; }
        public int Quantity { get; set; }

    }
}
If we run the application again, then Swagger UI will automatically display the API above as follows:
Interesting, isn’t it?
Then we can do some other things, for example setting up the JSON endpoint for our API, in the Configure method in the Startup class. Where we have previously added the Swagger middleware, we can set the JSON endpoint as follows:
app.UseSwaggerUI(options => {
                options.SwaggerEndpoint("/swagger/v1/swagger.json", "Demo API v1");
            });
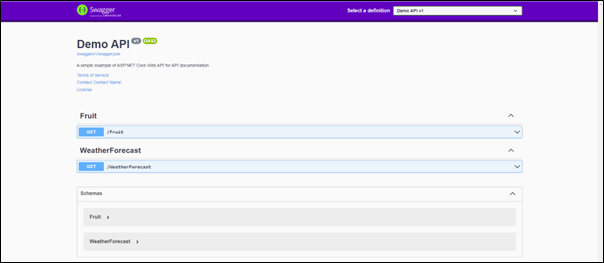
If we access this URL, then we will get a JSON endpoint. We can also add other information such as terms, contacts, or licenses to the ConfigureServices method in the Startup class, using the OpenApiInfo class as follows:
services.AddSwaggerGen(options => {
                options.SwaggerDoc("v1", new OpenApiInfo{
                    Version = "v1",
                    Title = "Demo API",
                    Description = "A simple example of ASP.NET Core Web API for API documentation",
                    TermsOfService = new Uri("https://example.com/terms"),
                    Contact = new OpenApiContact {
                        Name = "Contact Name",
                        Email = "contactname@mail.com",
                    },
                    License = new OpenApiLicense {
                        Name = "License",
                        Url = new Uri("https://example.com/license")
                    }
                });
            });
Then the Swagger UI will look like this:

Then, we can change the appearance of the Swagger UI by adding app.UseStaticFiles() and InjectStylesheet to the Configure method as follows:
app.UseStaticFiles();

app.UseSwagger();

app.UseSwaggerUI(options => {
    options.SwaggerEndpoint("/swagger/v1/swagger.json", "Demo API v1");
});
To use a custom stylesheet, create a wwwroot folder and add a CSS Stylesheet file.
In the following example, we create a swagger-ui folder in the wwwroot folder, and the CSS Stylesheet file is custom.css with the following contents:
.swagger-ui .topbar {
    background-color: rgb(98 0 192);
    border-bottom: 6px solid rgb(53 0 101);
}
Finally, add options.InjectStylesheet for custom stylesheet reference
app.UseStaticFiles();

app.UseSwagger();

app.UseSwaggerUI(options => {
    options.SwaggerEndpoint("/swagger/v1/swagger.json", "Demo API v1");
    options.InjectStylesheet("/swagger-ui/custom.css");
});
Then the Swagger UI will display as follows:
How To Do Simple API Tests
Using Swagger Inspector, we can double-check if the APIs and endpoints are working when developing. We can initiate Swagger Inspector and submit the endpoint with any options provided, such as parameters, body, and authentication.
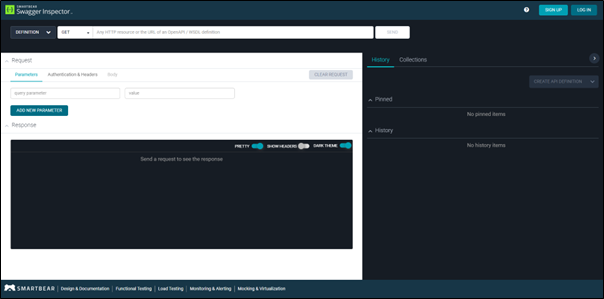
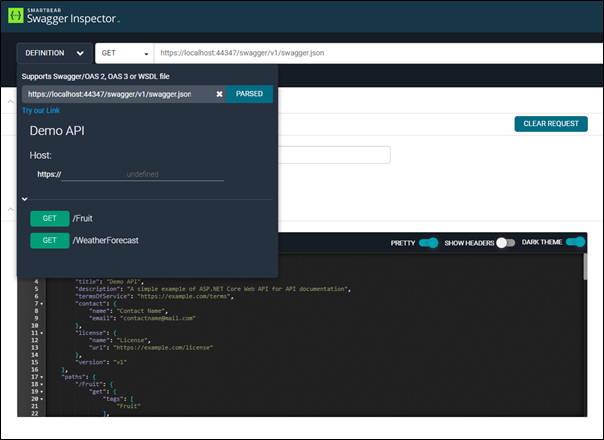
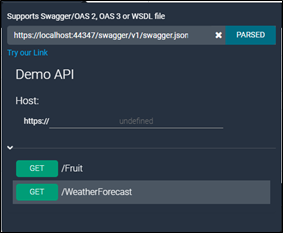
In the URL input text field, insert the web service URL and choose the HTTP method we’d like to use. In this example, we will insert https://localhost:[port]/swagger/v1/swagger.json and use the GET method. Then Swagger Inspector will generate a list of APIs that we could call as below:
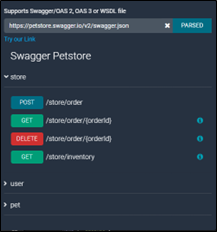
Also, Swagger Inspector provides their example of Swagger Petstore Definition by accessing Try our link in the definition box.
For reference, visit the Swagger documentation https://swagger.io/docs/.
Conclusion
Documentation is important for developers. If the documentation is easy to read and has a clear format, it can make it easier for other developers to understand the functionality of RESTful APIs without having access to the source code.
References
Swagger documentation: https://swagger.io/docs/
Microsoft Documentation: Get started with Swashbuckle and ASP.NET Core
OpenAPI website: https://www.openapis.org/
Author: Yudhi Septian Rahman, Programmer


