
There are several ways to process message in a Service Bus Messages Queue. One way is by using a console application and then running the messages in a virtual machine (VM), but this approach is costly and difficult to maintain. Fortunately, we have another approach to handle the Azure Service Bus Messages Queue that is cost-effective, easy to maintain, and includes powerful functionality.
What is Azure Service Bus?
Azure Service Bus allows you to group operations against multiple messaging entities within the scope of a single transaction. There are three capabilities of Azure Service Bus:
- Queues
- Topics
- Subscriptions
Queues allow for message processing by a single consumer; topics and subscriptions provide for a one-to-many communication process. This post will focus on Service Bus Queue.
What is Azure Functions?
Azure functions is a serverless application allowing you to maintain less code or infrastructure rather than a common development application. There are several capabilities or triggers of Azure Functions, such as HTTP Trigger, Timer Trigger, Service Bus Trigger, etc. Each trigger has specific functionality.
Step 1: Preparation
1. Azure Service Bus
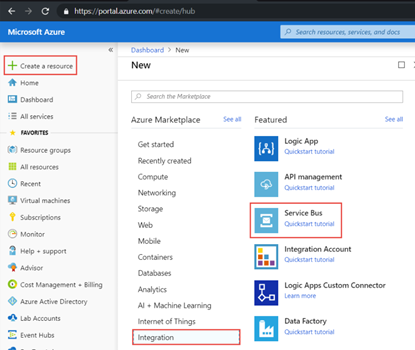
We need to sign in to the Azure portal, Create a Resource, select Integration, and then select Service Bus.
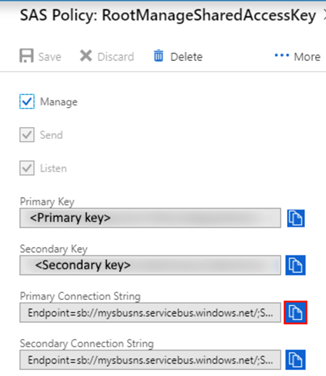
After filling in some information and completing the creation process, you will get the connection string by accessing All Resource, selecting the created namespace, and then accessing the RootManageSharedAccessKey in the Shared Access Policies menu. You may need to copy and keep the connection string from the RootManageSharedAccessKey.
2. Visual Studio 2019
Install Visual Studio 2019 and select the Azure Development during the installation.

3. Service Bus Explorer
As we need to focus on how to handle the message using Azure Functions, we can use an open-source third party tool to monitor and maintain the Service Bus messages. The tool can be downloaded from this link.
Step 2: Service Bus Queue Message Setup
1. Connect Service Bus Explorer to an Azure Service Bus
- Open the Service Bus Explorer tool, and open File menu and select Connect.
- Choose the Enter Connection String in the Service Bus Namespaces field, and input the connection string. You may hit the Save button to save the connection locally, and press OK to connect to the Service Bus.

2. Create a Message Queue
- Right click to the Queues and select Create Queue.

- Fill in the Relative URI and any other configuration that you wish. Then click the Create button.
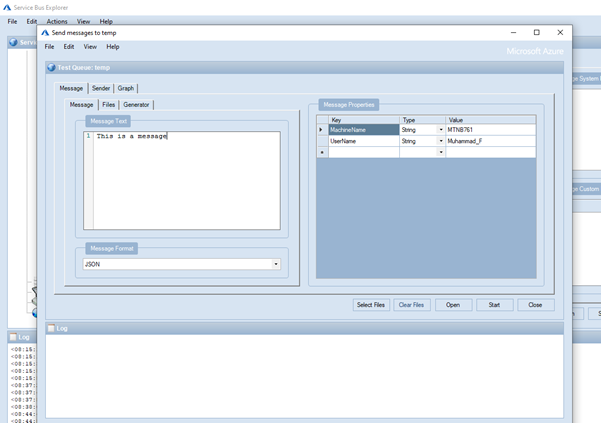
3. Create some Sample Messages
- Expand the Queue, and right-click on your Queue that has been created.
- Select Send Message.

- Fill in the message text and select JSON as the message format, in this case, we may try with the JSON format. Below is the JSON Example:
{
    "Id": "93da1afa-a61a-4a8e-921d-ad8263679d3c",
    "Message": "This is a message",
    "Score": 10,
    "CreatedDate": "2021-02-14T18:14:24.8770000+07:00"
}
- You may need repeat this to insert several messages with different contents to fill up the Queue with messages.
Step 3: Azure Functions
1. Create a New Azure Functions Project


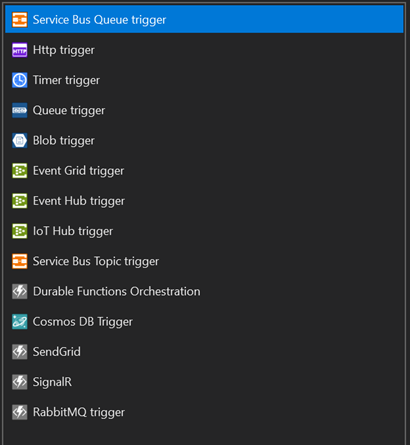
2. Select the Runtime and Azure Functions Trigger
The Azure Functions already has a several functionality with a different trigger. The Service Bus Queue Trigger is a functionality that consumes the Service Bus with less code.

The Visual Studio will generate a project with a template code of functions as the following:

You may need to rename the File Name, Class Name, or the Function Name as you wish. I update the Function as the following.
public static class MyServiceBusFunction
    {
        [FunctionName("MyServiceBusFunction")]
        public static void Run([ServiceBusTrigger("myqueue ", Connection = "")]string myQueue Item, ILogger log)
        {
            log.LogInformation($"C# ServiceBus queue  trigger function processed message: {myQueue Item}");
        }
    }
3. Update the Settings Json
The Service Bus connection string and the Queue name can be set in the function code directly or in the local.settings.json. We can use the local settings.json for tidier code. Let register the settings value as below:
{
  "IsEncrypted": false,
  "Values": {
    "FUNCTIONS_WORKER_RUNTIME": "dotnet",
    "ServiceBusConnectionString": "", //put your conenction string here
    "MessageQueue Name": "" //put your message queue  name here
  }
}
4. Use the settings in the code
Since the settings has been configured, we can use it in the code as below:
public static void Run([ServiceBusTrigger("%MessageQueue Name%", Connection = "ServiceBusConnectionString")]string message, ILogger log)5. Run, Debug and inspect the code
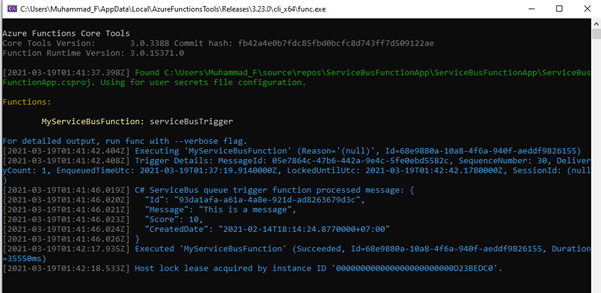
Set a breakpoint and run the project, we should get the message as string. Messages in the Queue will be processed and if the message has been processed, by default it will be disappeared from the service bus.


6. Receive message as Message object.
If we need to access the message as Service Bus Message object, we can update the queue item string with the Message object from Microsoft.Azure.ServiceBus library to receive the message on object instead of string.
[FunctionName("MyServiceBusFunction")]
public static void Run([ServiceBusTrigger("%MessageQueue Name%", Connection = "ServiceBusConnectionString")]Message message, ILogger log)
        {
            log.LogInformation($"C# ServiceBus queue trigger function processed message: {message.Body}");
        }
By using the Service Bus Message object, we can access another property of the Message.

In this case, we will catch the message content in the Message’s Body, but the format will be in byte array. So, we need to parse it to string.

We also can parse the message to our defined object.
Sample Object:
using System;

namespace ServiceBusFunctionApp
{
    public class MyMessageModel
    {
        public Guid Id { get; set; }
        public string Message { get; set; }
        public int Score { get; set; }
        public DateTimeOffset CreatedDate { get; set; }
    }
}

Full Code:
public static class MyServiceBusFunction
    {
        [FunctionName("MyServiceBusFunction")]
        public static void Run([ServiceBusTrigger("%MessageQueue Name%", Connection = "ServiceBusConnectionString")]Message message, ILogger log)
        {
            string payload = Encoding.UTF8.GetString(message.Body);
            log.LogInformation($"C# ServiceBus queue trigger function processed message: {payload}");

            MyMessageModel model = JsonConvert.DeserializeObject<MyMessageModel>(payload);

            //Do your things, such as Some Actions or Calls Some Service or Another Method
        }
    }
Step 4: Handle Messages
By default, Service Bus message that has been processed in Azure Functions will be completed automatically and disappear from the Service Bus Queue. Sometimes we want to complete the message only if it is successful and does something to the message when the process gets an error.
On that condition, we can handle the messages by using the following steps:
- Update the host.json to set the Service Bus autocomplete to be false, you can also set the maximum concurrent calls here if necessary.
{
  "version": "2.0",
  "logging": {
    "applicationInsights": {
      "samplingExcludedTypes": "Request",
      "samplingSettings": {
        "isEnabled": true
      }
    }
  },
  "extensions": {
    "serviceBus": {
      "messageHandlerOptions": {
        "autoComplete": false,
        "maxConcurrentCalls": 1
      }
    }
  }
}
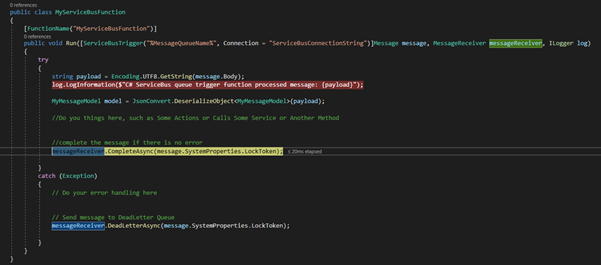
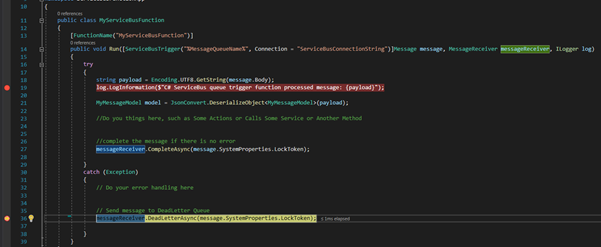
- Add MessageReceiver from Microsoft.Azure.ServiceBus.Core library in the parameter.
- Update the class to non-static class since we will use async method from MessageReceiver.
- Use method CompleteAsync from MessageReceiver when all process is done to complete the message if there is no error.
- Use method DeadLetterAsync from MessageReceiver when we found an error or exception. This method will send the message to Deadletter Queue You can see the Deadletter messages by using the Service Bus Explorer.
Final Code
MyServiceBusFunction.cs
using Microsoft.Azure.ServiceBus;
using Microsoft.Azure.ServiceBus.Core;
using Microsoft.Azure.WebJobs;
using Microsoft.Extensions.Logging;
using Newtonsoft.Json;
using System;
using System.Text;

namespace ServiceBusFunctionApp
{
    public class MyServiceBusFunction
    {
        [FunctionName("MyServiceBusFunction")]
        public void Run([ServiceBusTrigger("%MessageQueue Name%", Connection = "ServiceBusConnectionString")]Message message, MessageReceiver messageReceiver, ILogger log)
        {
            try
            {
                string payload = Encoding.UTF8.GetString(message.Body);
                log.LogInformation($"C# ServiceBus queue  trigger function processed message: {payload}");

                MyMessageModel model = JsonConvert.DeserializeObject<MyMessageModel>(payload);

                //Do your things here, such as Some Actions or Calls Some Service or Another Method


                //complete the message if there is no error
                messageReceiver.CompleteAsync(message.SystemProperties.LockToken);

            }
            catch (Exception)
            {
                // Do your error handling here


                // Send message to DeadLetter Queue
                messageReceiver.DeadLetterAsync(message.SystemProperties.LockToken);

            }
        }
    }
}
MyMessageModel.cs
using System;

namespace ServiceBusFunctionApp
{
    public class MyMessageModel
    {
        public Guid Id { get; set; }
        public string Message { get; set; }
        public int Score { get; set; }
        public DateTimeOffset CreatedDate { get; set; }
    }
}
Local.settings.json
{
  "IsEncrypted": false,
  "Values": {
    "AzureWebJobsStorage": "UseDevelopmentStorage=true",
    "FUNCTIONS_WORKER_RUNTIME": "dotnet",
    "ServiceBusConnectionString": "Endpoint=;SharedAccessKeyName=;SharedAccessKey=", //put your conenction string here
    "MessageQueue Name": "myqueue " //put your message queue name here
  }
}
Host.json
{
  "version": "2.0",
  "logging": {
    "applicationInsights": {
      "samplingExcludedTypes": "Request",
      "samplingSettings": {
        "isEnabled": true
      }
    }
  },
  "extensions": {
    "serviceBus": {
      "messageHandlerOptions": {
        "autoComplete": false,
        "maxConcurrentCalls": 1
      }
    }
  }
}
Summary
We can handle Service Bus messages Queue by using Azure Functions, we can set the message as complete when it’s successfully processed, or we can put it to Deadletter Queue when it’s an error. Below are the execution results and the expectation:
Success Scenario
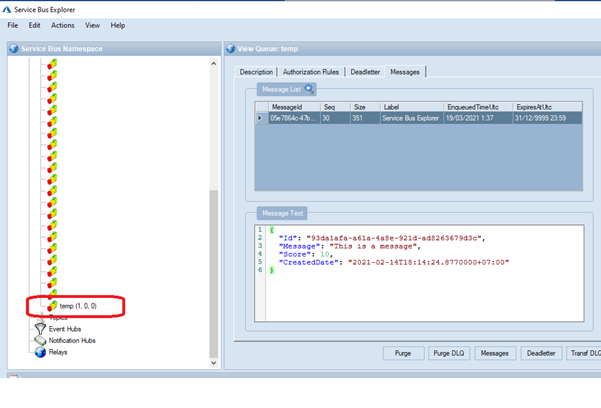
Sample message in Service Bus Queue that we can inject with Service Bus Explorer:
{ "Id": "93da1afa-a61a-4a8e-921d-ad8263679d3c", "Message": "This is a message", "Score": 10, "CreatedDate": "2021-02-14T18:14:24.8770000+07:00"}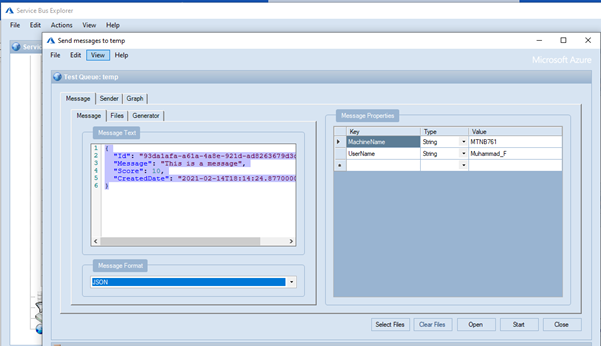
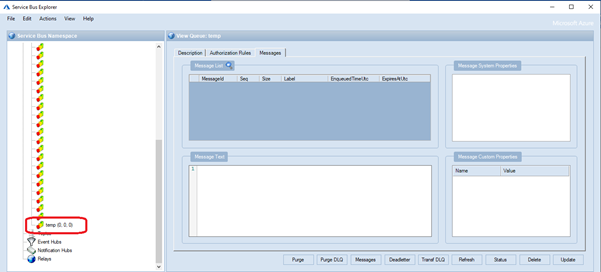
We can see that we have 1 message in the Queue.

When you start the application, you can see there is no error, and the message has been successfully completed and removed from the Queue.
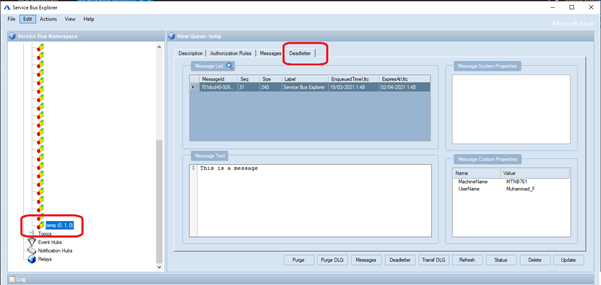
Error Scenario
We can use message that is not in json format since the code I have created is expect a json to parse, and it will be error in the following code:
MyMessageModel model = JsonConvert.DeserializeObject(payload);There is a sample wrong message in Service Bus Queue that we can inject with Service Bus Explorer:
We can see that we have 1 message in the Queue.
Start the application, and we can see there is an error, and the message is moved to Deadletter Queue.
You may find the code in the following git repository.
Based on the two scenarios above, we can see that Azure Functions give us the functionality to handle Azure Service Bus Messages with less effort, less code, and a cost-effective environment.
Author:
M Salman Al Farisi – Analyst Programmer


