
Prerequisites
- Installed Dart SDK
- Installed PostgreSQL
If you are new to the Dart language, you can read the Dart basics here: https://dart.dev/. Also, if you are new to Aqueduct Framework, you can read about Aqueduct here: https://aqueduct.io/.
In this tutorial, we will review a simple case about managing commerce API and functionality features listed below:
- Login And Auth Using JWT
- CRUD Functionality
Dart
Dart is a very robust language. Google created it to leverage C-based Object-Oriented Programming languages like C# and Java. As a general-purpose programming language, it compiles quickly and concisely. It’s a programming language optimized for building user interfaces with features such as sound null safety, the spread operator for expanding collections, and collection if for customizing UI for each platform. It’s a programming language with familiar syntax and easy to learn.
Dart is an open-source, purely object-oriented, optionally typed, and class-based language that has excellent support for functional and reactive programming.
Unlike C# or Java, Dart is a relatively simple, modern, and highly efficient language. It’s a compiled language like C and is approximately 2x faster than Javascript. It’s type-safe and compiled with both AOT and JIT compilers.
Aqueduct
Aqueduct is similar to Spring in Java in both functionality and purpose. It’s an object-oriented, multi-threaded HTTP server framework. Written in Dart, it is one of the most popular frameworks that promises faster development, experimentation, and testing without losing power.
Aqueduct’s memory-isolated threads leverage every CPU without writing any code. There is no complicated synchronization logic to consider. The familiar higher-order functional syntax makes the application simple to flow and easy to read. Also, tested command-line tooling for database migrations enables easy data management.
Project Structure
In this example, we want to understand the objects that comprise an Aqueduct application and how they work to serve HTTP requests. Let’s take a look at the Project Structure on the filesystem.
Below is an example of creating a Project Structure based on common users who are using Aqueduct.
To activate Aqueduct on Dart, you can just run it on your CLI (Shell or Command Line)
pub global activate aqueductThis command resolves any dependencies on Aqueduct located in your Dart package
Check to see if Aqueduct has successfully downloaded by running this command
aqueduct --versionAfter successfully resolving the dependencies, if you look next to create Backend Application regarding Aqueduct Framework, you can create it with this command
aqueduct create <your project name>This command will automatically generate your Project Structure such as:
- Config.yaml
- Pubspec.yaml
- /bin/Main.dart
- /lib/channel.dart
- /lib/<your project name>.dart
Let me explain all generated Class and Properties from the Aqueduct Framework
- Config.yaml consists of your configuration, including a database source, listening IP, project name, author, description, and project profile.

- Pubspec. yaml is the configuration of your dependency. The SDK version will be used on your project.
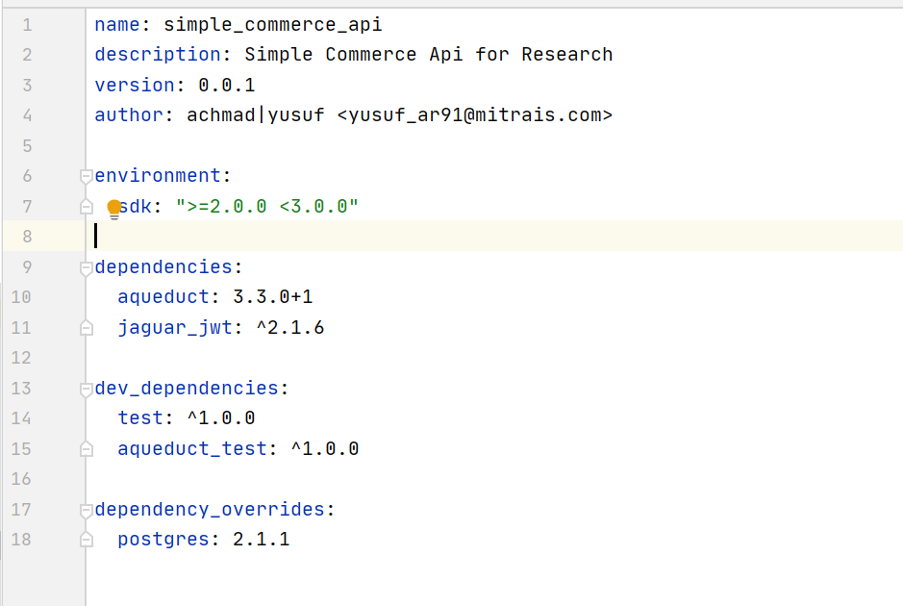
For this project, I used Aqueduct 3.3.0+1, or you can use the most updated version. For handling JWT, I used Jaguar JWT ^2.1.6 because it’s from a light source. You can use another library instead of JWT, but in this tutorial, I will explain Jaguar JWT.
Dependency Overrides is used to override the Postgres driver because the latest version of Postgres 2.2 still has a few bugs to work out. But you don’t need to override the dependency if you won’t have this problem.
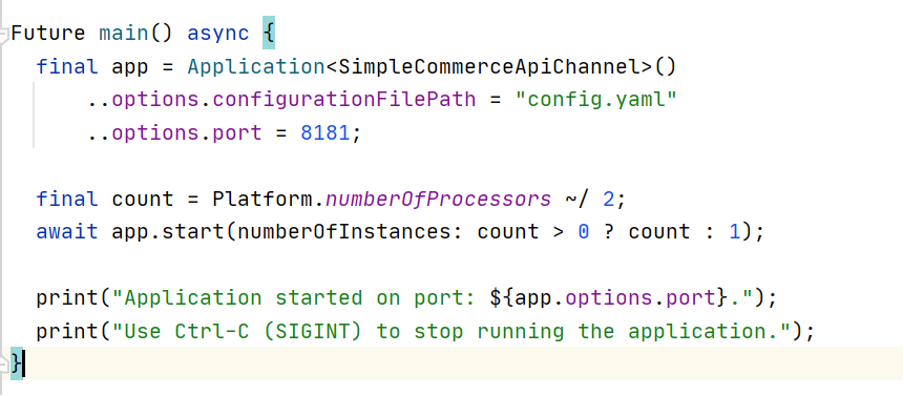
- Main. Dart
It consists of your class runner and reads the configuration from config.yaml. By default, this class will count the number of processors needed to serve your client.
- Channel. Dart
The primary function of this class is to map out the route with the controller, who will take responsibility for serving a request from this client. If you are familiar with servlet in Java, it is a servlet-dispacther.xml. Besides that, this class can be used to set up connectivity with your data sour. It will also scan all data models that you will develop in your project.

There is one essential thing in this class. If you have to protect your service, you can set up your authentication directly in the entry point you already mapped out here.
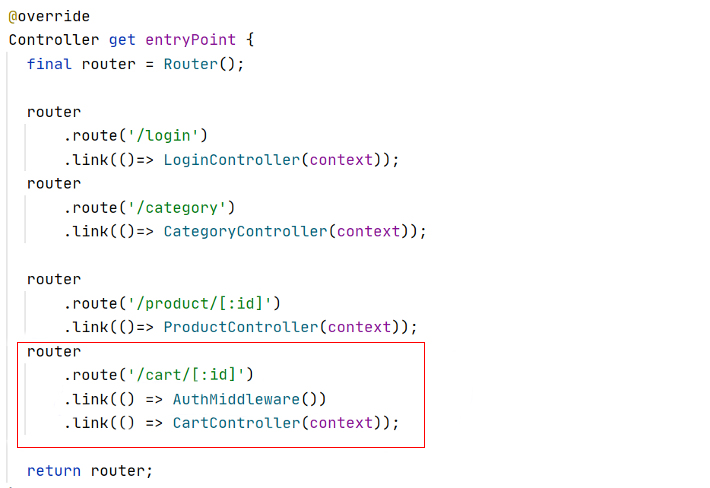
AuthMiddleware is the class that will verify the client. In this case, I will check the token in the header request. If confirmed, the request will submit or dispatch to the controller. If there are none, then I will respond quickly with “Unauthorized” (HTTP 401). I will explain this in detail in the next section.
Case
For a simple commerce API, it covers some of the functions below:
- Create and Get List of Category (Accessible for Public)
- Create, Update, Delete and Read Product (Accessible for Public)
- Add to Cart and Get My Cart (Protected by JWT)
Data Modelling
Table
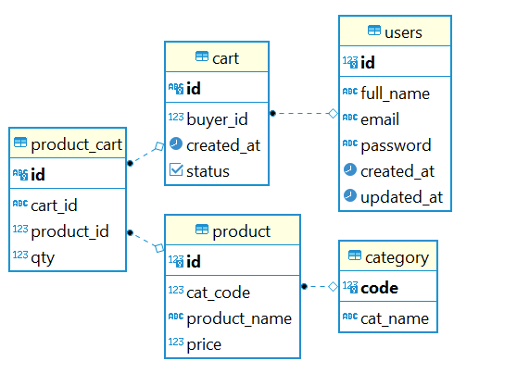
Based on the use case, I have to create some of the data models below:
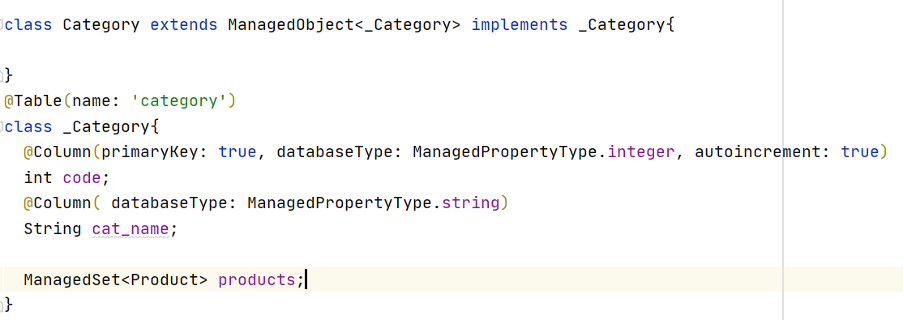
- Category: Code and Category Name
- Product: ID, name, price, and Category (One to Many Relationship with Category)
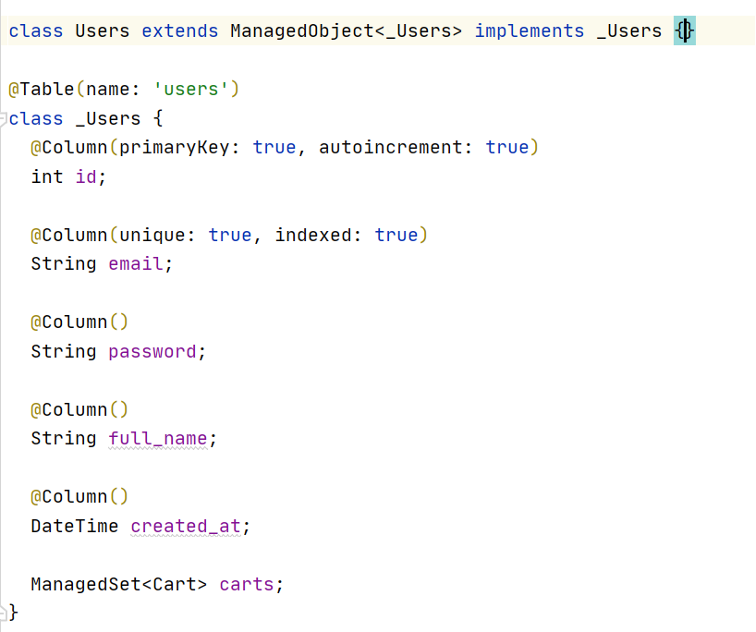
- Users: ID, email, password, and name
- Cart: ID, Users, and Status (One to Many Relationship with Users)
- Product Cart: ID, cart ID, and product ID(Many to Many Relationship between Cart and Product)
Property in Class
To map the table to your Property Class, I used the Aqueduct framework approach. You can see more explanation in https://aqueduct.io/docs/db/modeling_data/
Category
Product
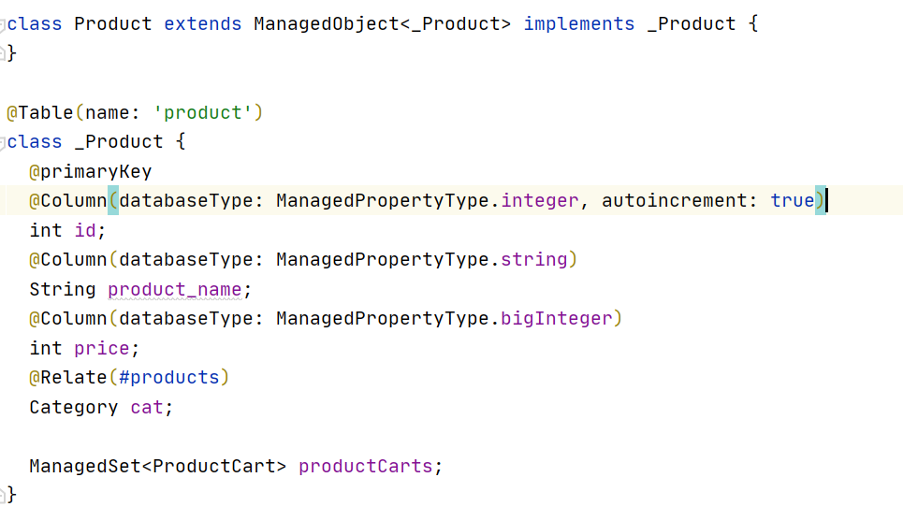
There are one-to-many relationships in the Aqueduct Framework (figured on Product and Category class) that are translated by inverse property. In this example, a product must always have a category (@Relate)—vice versa. One Category can have multiple product sets or none at all (ManagedSet). Inversion relation names between two classes must match each other, or an Error warning will appear when the project is compiled.
Usersor
Cart
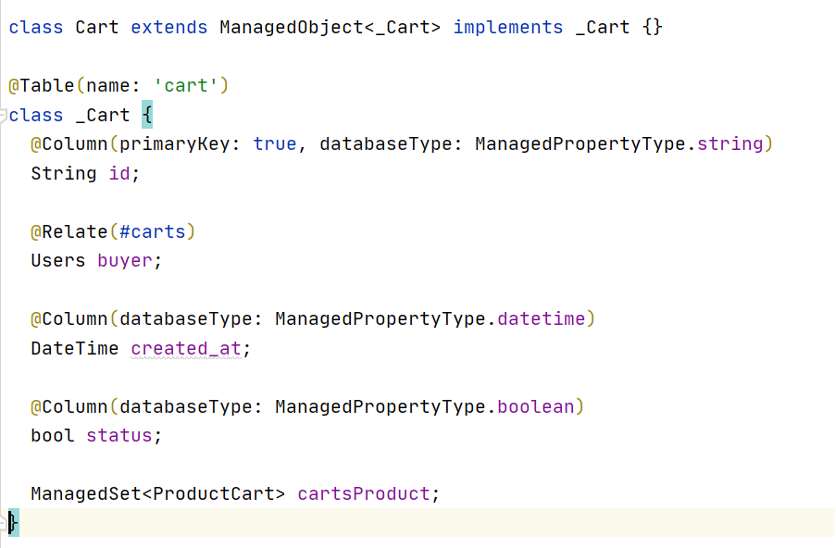
Conceptually, the relationship between Cart and Users Is like the relationship between Product and Category. A single cart must always have one user (a buyer), while a buyer can have multiple carts or none at all.
Product Cart
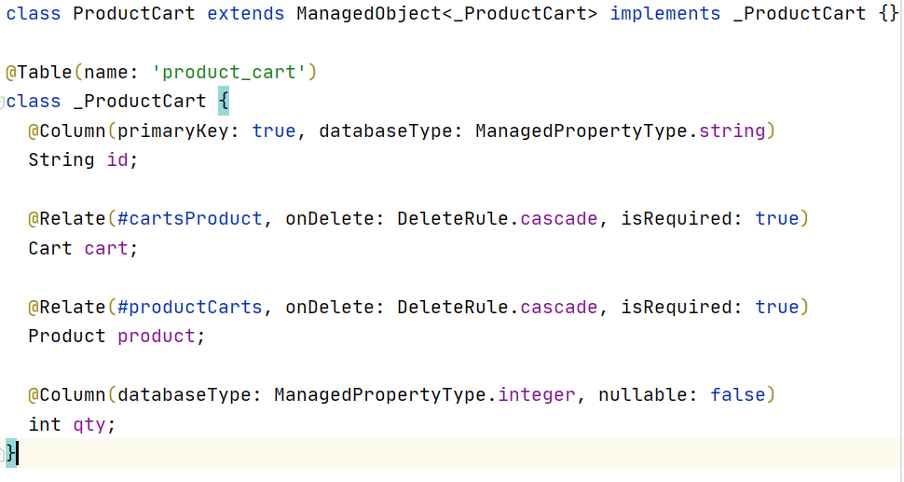
The Product Cart is a Joined Table between Cart and Product and identifies what products are in the cart.
Controller
Like RestController in Spring MVC or Spring Boot Project, Controller in Dart also served the business logic process mapped on the entry point in the Dart channel. Most class functionality is about command and query operation to database. For every RestController should extend the ResourceController. The Resource Controller function and habits are like @RestController annotation in Spring annotation.
Login Controller
Login controller will handle all requests to User Services like findUsersByID or findUsersByEmail. In this case, I used email and password to authorize Users Login and bind it to the request body. The stored password in the database used SHA256. Fortunately, Dart core libraries have it on their package crypto. Dart.
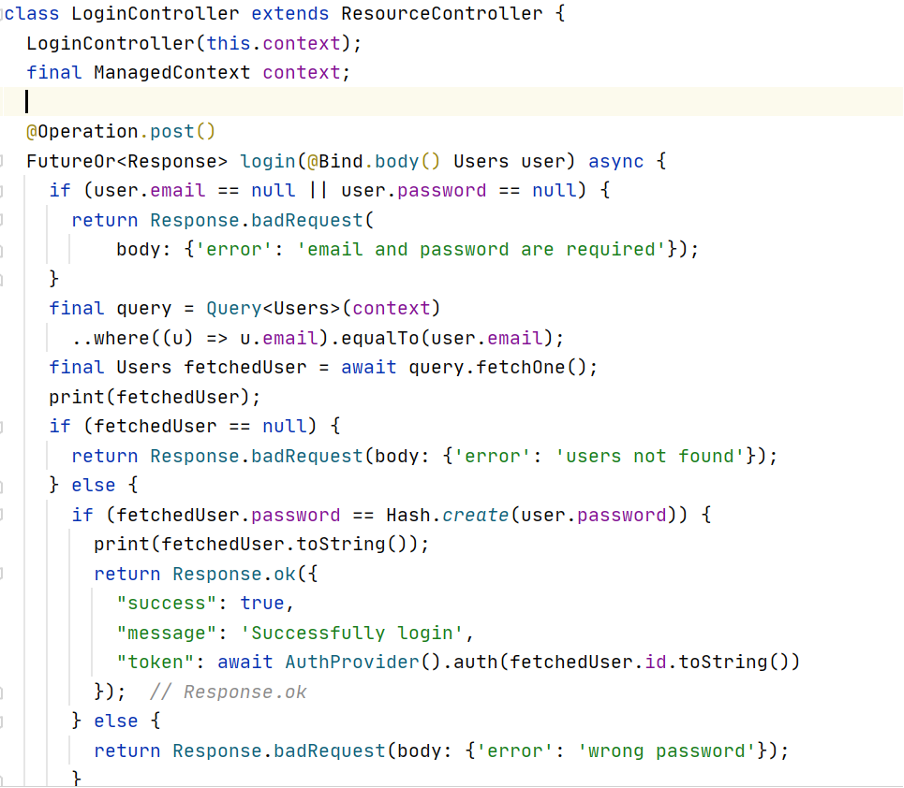
If the Users Login is valid, I will create the JWT token using the AuthProvider class, which will be used to access restricted entry points (Cart Operation) until it has expired. If no, return Bad Request (HTTP 400).

From now on, let’s make a quick test through postman
- Success Scenario
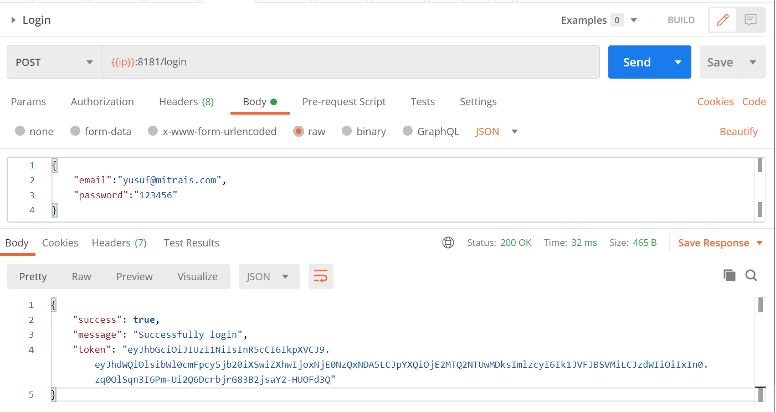
When Logon Success, API will have a response token inside the response body with the status HTTP 200
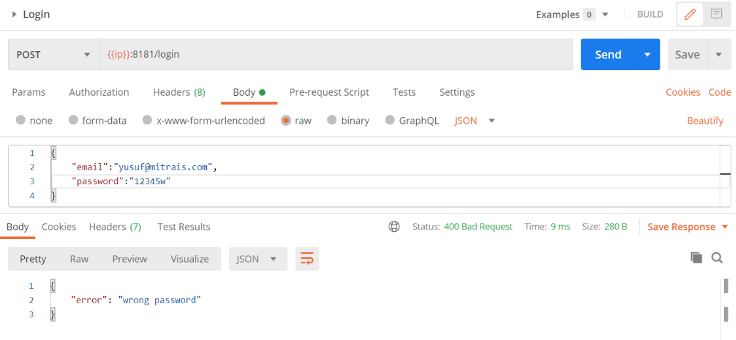
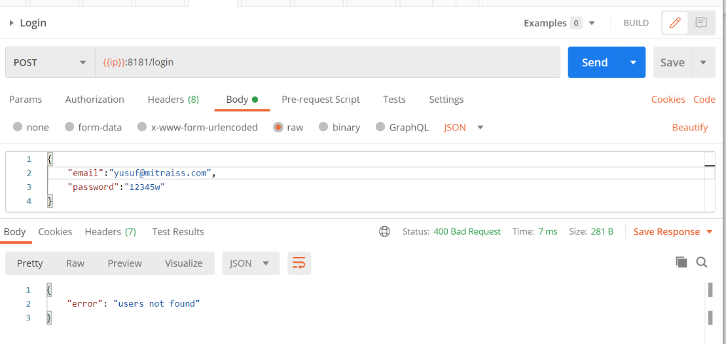
- Invalid Password
- Users/Email Not Found
Voila, the login scenario has succeeded, so let’s take a quick step to develop another controller.
Category Controller
In this controller, I have only two methods, for example, to ADD and GET Category. I will Leave the method PUT and DELETE blank so that you can try by your own will.
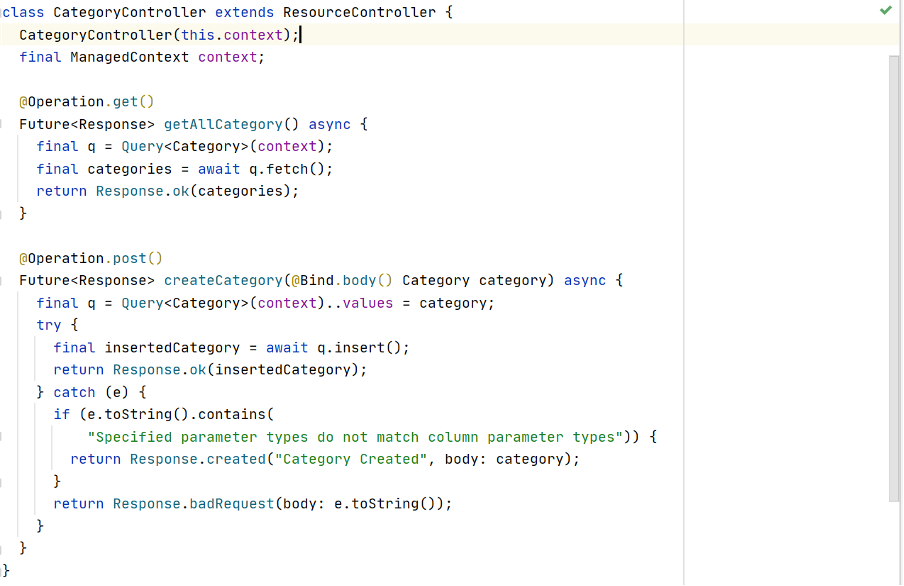
Maybe you will face an error when operating a query using Aqueduct, like what happened to me. I searched how to resolve this issue and found a reference at the official GitHub community. “Specified parameter types do not match column parameter types,” it could happen if your Postgres version is below 9.6. But, after I tried several times to configure the Aqueduct and Postgres versions, an error still occurred. The good news is, the query operation still succeeds. But I have no idea why Aqueduct responded as an error since it was marked as a warning from Postgres. So, my quick solution is to put in try-catch, and if this exception still occurs, I will respond, calling this a success because the object successfully created a table.
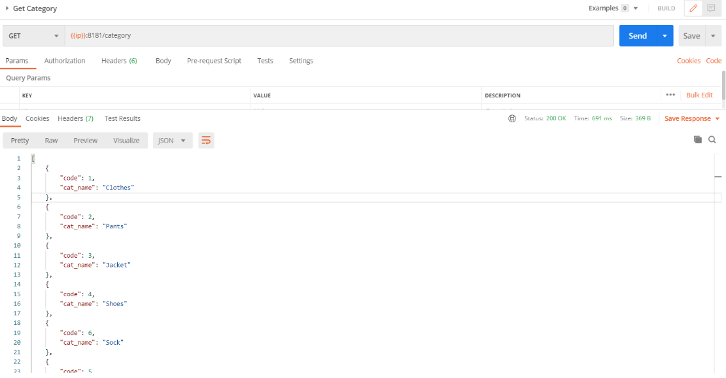
- Get All Category (return in list)
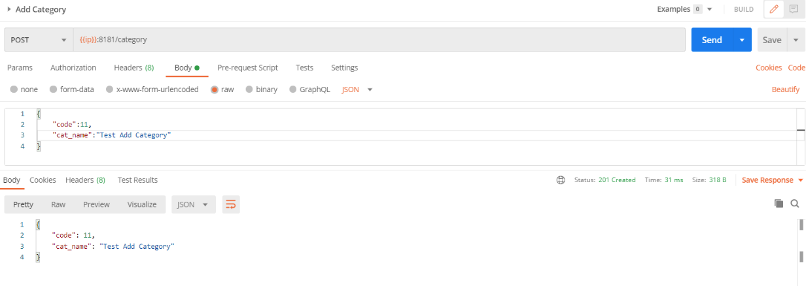
- Add Category

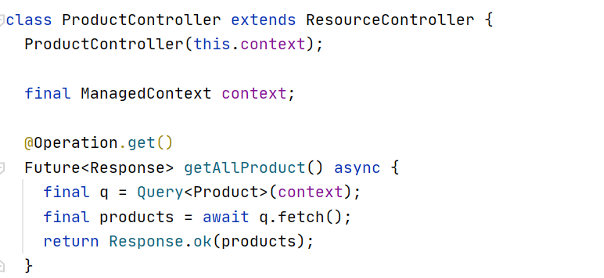
Product Controller
Product Controller will handle all query operations Create, Update, Read and Delete and it’s accessible for public permission.
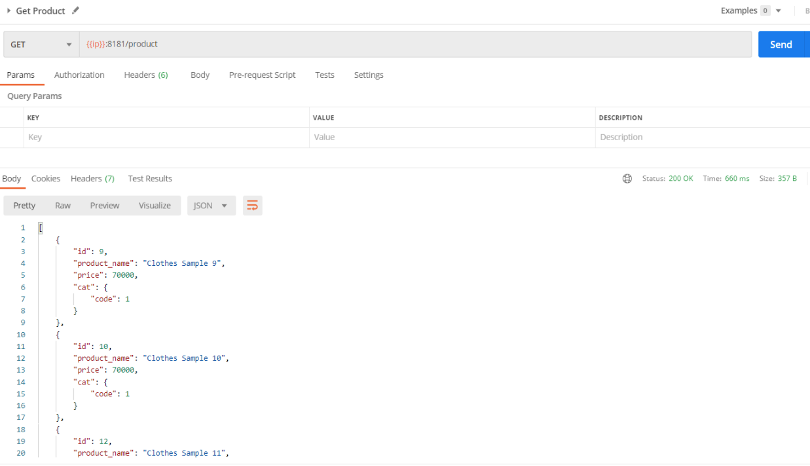
- Get All Product
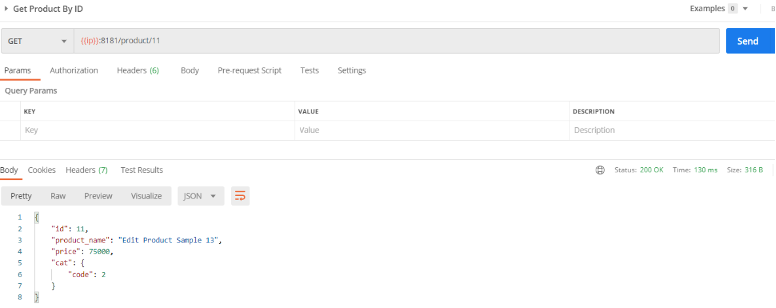
- Get Product By ID
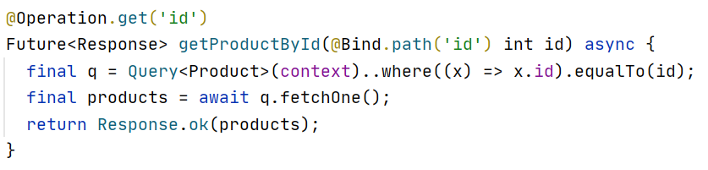
As we see that getProductById method need a parameter from a path, bind from the request URL. In Spring we are already known as @PathVariable. Id means Product ID.
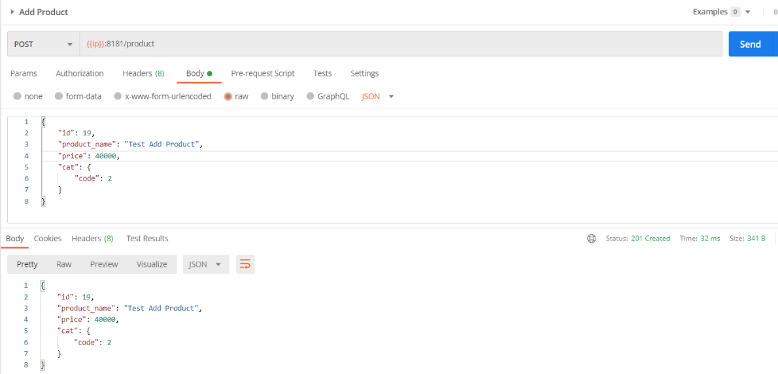
- Create Product
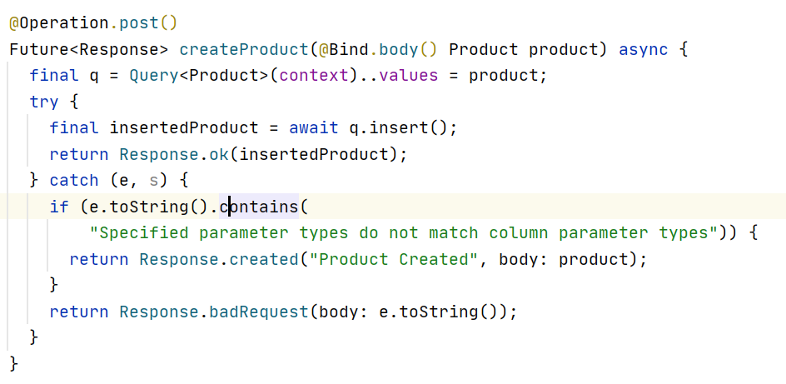
To create product, we need to POST Product Parameter in Request-Body. In Spring we are already known as @RequestBody.
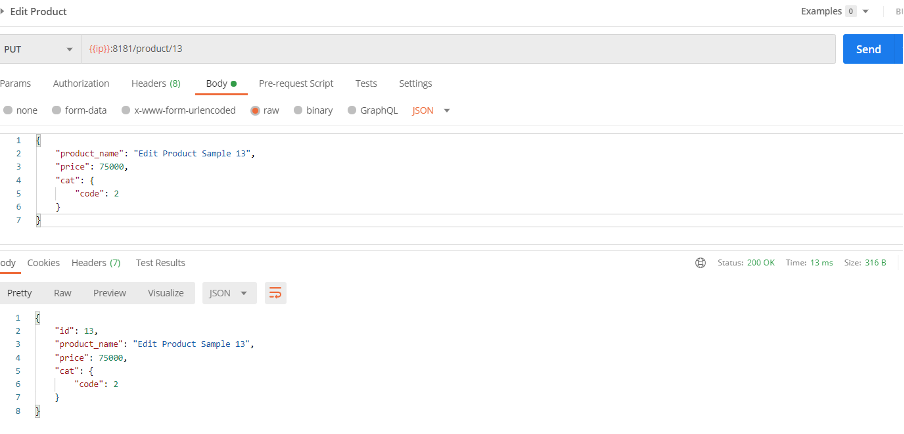
- Edit Product
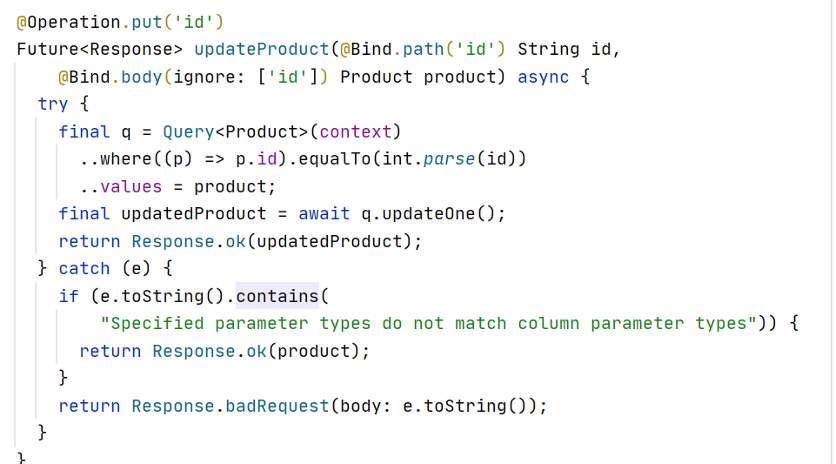
In Edit Product, I used PUT Method with 2 parameters needed. Path Variable (‘id product’) and another property to update in request-body. In @Bind.body(ignore: [‘id]) it means, if the request body contains property id, it will be ignored. I only used the id from a fetched column in the query result to update the record.
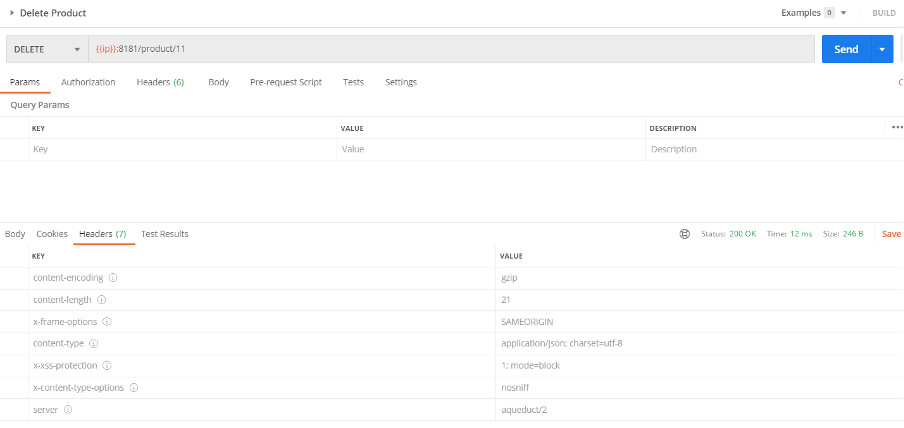
- Delete Product

In Delete Product, I assume that API only need the ‘Product ID’, bind in the path.
Cart Controller
Cart Controller is quietly different from the other controller because it is joining 2 objects from the cart itself and the product cart. It is an excellent example to show you how to use join query using Aqueduct. This class also discusses how to get the object from JWT on Header.
- Get Cart
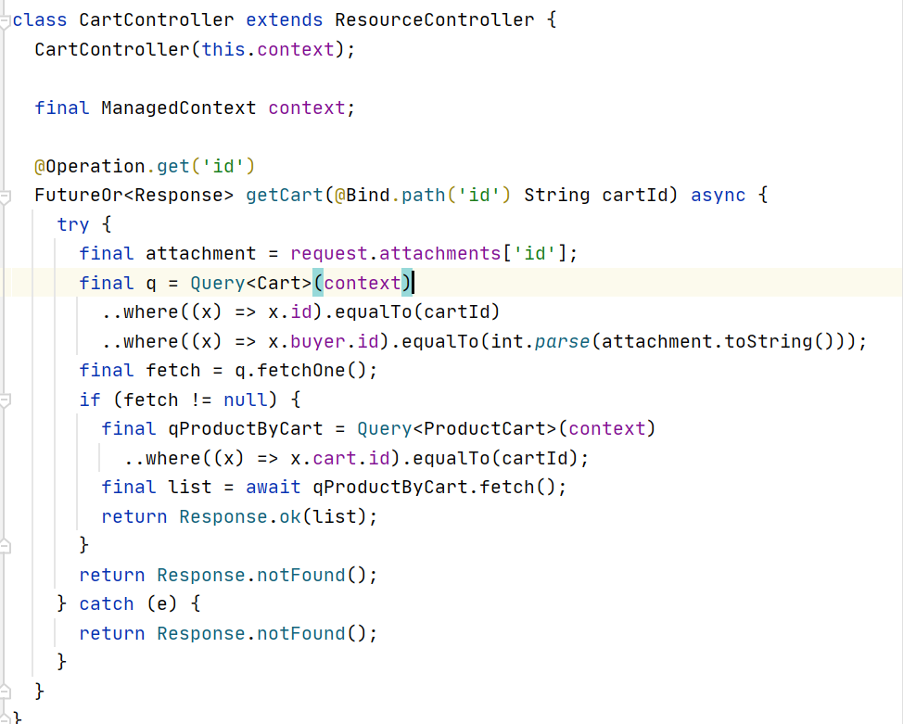
To get the value from attachment (in spring it is called Principal). We can simply get by this command:
final attachment = request.attachments['id']id it means, the id that you already put in your ‘subject’ when the program generated token in Login Succeed Process. Let me explain in detail.
if (fetchedUser == null) {
  return Response.badRequest(body: {'error': 'users not found'});
} else {
  if (fetchedUser.password == Hash.create(user.password)) {
    print(fetchedUser.toString());
    return Response.ok({
      "success": true,
      "message": 'Successfully login',
      "token": await AuthProvider().auth(fetchedUser.id.toString())
    });
  } else {
    return Response.badRequest(body: {'error': 'wrong password'});
  }
}
Focus on the “token” part. The token is consumed from AuthProvider class and what we passed into that method is users.id that represents the user’s id. You can use email or username to pass into that parameter, depending n your behaviour and business logic. But in this sample, I used user.id because I don’t want to make a query to findByEmail or findByUsername to get Users.Id. Since id it’s a key to get Users record, it’s going to be good for query performance rather than using another column, even if it’s an index.
Let’s jump to Auth Provider
class AuthProvider {

  FutureOr<String> auth(String userId) async {
    final JwtClaim claim = JwtClaim(
      subject: userId,
      issuer: JWTConstant.ISSUER,
      audience: [JWTConstant.AUDIENCE],
    );

    final String token = issueJwtHS256(claim, JWTConstant.SIGNATURE);
    return token;
  }
}
Look to the subject what we passed into subject is usersId. Since JwtClaim needs String type, when we pass it to AuthProvider.auth(), we need to parse the Integer to String (id defined as int in property user class). If you want to know more about issuing JWT HS256, you can refer to the Jaguar JWT library.
Back to the Cart Controller, now we have users id and the cart id that we can use to query operation in the joined table cart and see the list of products in the cart at the product_cart table. In this example, I use two steps:
- Query to Cart table by cart id and users id.
- If Found in step one, I query to Product Cart Table by cart Id, to get all products in the cart.
Alternatively, you can simplify the process with join query as below:
@Operation.get('id')
FutureOr<Response> getCart(@Bind.path('id') String cartId) async {
  try {
    final attachment = request.attachments['id'];
    final q = Query<Cart>(context);
    q.where((x) => x.id).equalTo(cartId);
    q.where((x) => x.buyer.id).equalTo(int.parse(attachment.toString()));
    final Query<ProductCart> pcq = q.join(set: (c) => c.cartsProduct);
    final productCarts = pcq.fetch();
    return Response.ok(productCarts);
  } catch (e) {
    print(e.toString());
    return Response.notFound();
  }
}- Add Product
@Operation.post('id')
FutureOr<Response> addToCart(@Bind.path('id') String cartId,
    @Bind.body() ProductCart productCart) async {
  try {
    final attachment = request.attachments['id'];
    final q = Query<Cart>(context)
      ..where((x) => x.id).equalTo(cartId)
      ..where((x) => x.buyer.id).equalTo(int.parse(attachment.toString()));
    final cart = await q.fetchOne();
    if (cart != null) {
      final qProductByCart = Query<ProductCart>(context)
        ..values.id = Uuid().v1()
        ..values.cart = cart
        ..values.product = productCart.product
        ..values.qty = productCart.qty;
      print(qProductByCart.values.toString());
      final productCartCreated = await qProductByCart.insert();
      return Response.created("Product Added to Cart",
          body: productCartCreated);
    } else {
      return Response.notFound();
    }
  } catch (e, s) {
    return Response.notFound(body:e.toString());
  }
}
In this POST Operation, I assume that cartId must include in path variable, and in the other side, the product and quantity to be added post in request-body. And the user’s owned cart already obtained from the attachment in JWT Header.
That’s all, everything is set up and ready to test.
Testing
Since we already test Login, Generate Token and CRUD process in Category. Let’s we test the part in product and cart controller via postman.
Product Test
- Get All Product
- Get Product By Id
- Create Product
- Edit Product
- Delete Product
All good for Product Controller, let’s quickly move to Cart Controller
Cart Test
- Get Cart without Token
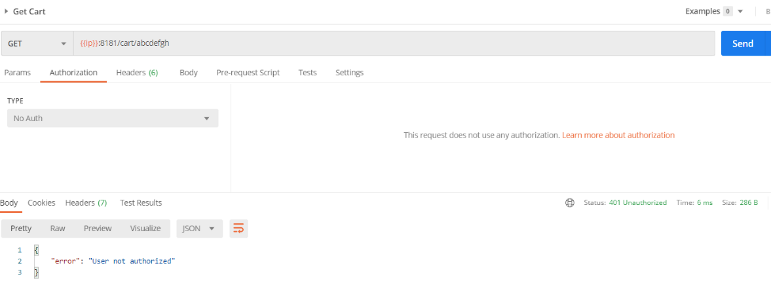
If the users don’t have a token or invalid token, the application automatically responds as not authorized. It could be happening because of AuthMiddleware class that already define in the Dart channel. Let me flashback and see what happened in AuthMiddleware class.
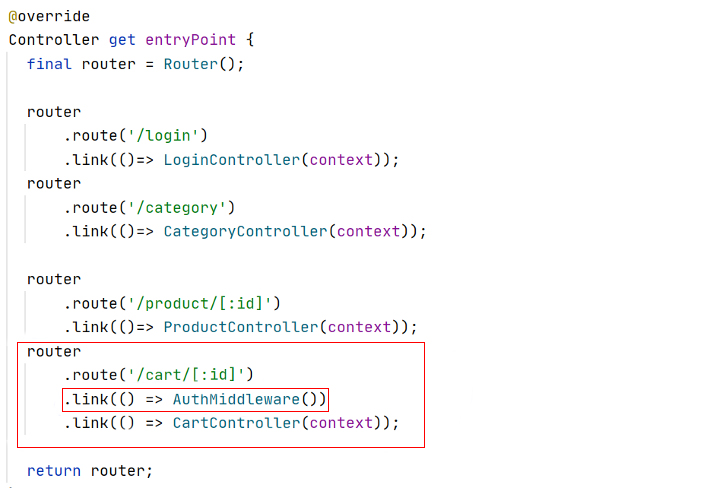
This code means that if the client tries to consume information from the cart entry point, the request will be checked by AuthMiddleware. Different from the other that no need to check from AuthMiddleware.
class AuthMiddleware extends Controller {
  @override
  Future<RequestOrResponse> handle(Request request) async {
    try {
      final String token =
          request.raw.headers['authorization'][0].replaceAll('Bearer ', '');
      final JwtClaim claim =
          verifyJwtHS256Signature(token, JWTConstant.SIGNATURE);
      print(claim);
      claim.validate(
          issuer: JWTConstant.ISSUER, audience: JWTConstant.AUDIENCE);
      request.attachments['id'] = claim.subject;
      return request;
    } catch (e) {
      return Response.unauthorized(body: {"error": 'User not authorized'});
    }
  }
}
AuthMiddelware will verify the token that the client must include in the request header with key ‘Authorization’. Some of the applications contain ‘Bearer’ at the beginning of the token. That’s why we need to pull out those words, in case they are included in token header. As you’ve seen before, in Cart Controller Section, AuthMiddleware will put the request attachment from subject that was already generated.
- Get Cart with Invalid Token
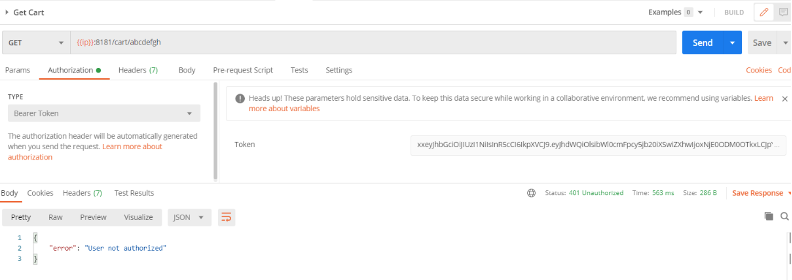
It will response as not authorized user.
- Get Cart with valid token
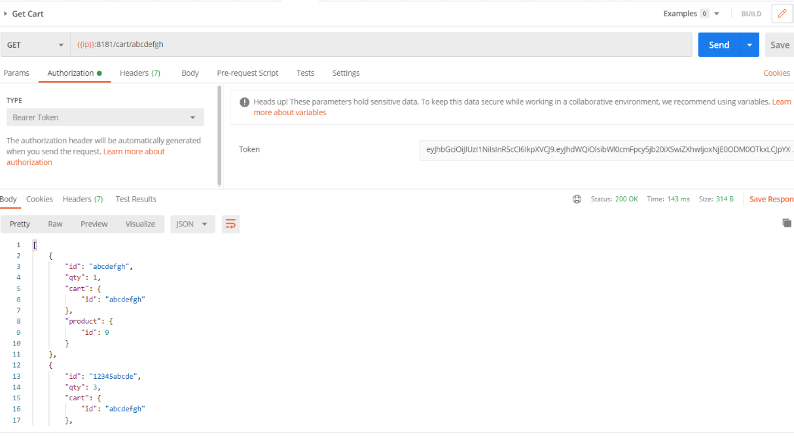
The response is the list of product and cart and all of the property that is already defined in ProductCart class. For more information about JWT, go to Quick Word, for the secret knowledge has been hashed and encrypted, such as organization, audience, and subject.
That’s all for developing dart API using Aqueduct. Let me summarize, Dart is a new language, and Aqueduct is a new framework. As far as I’ve seen, there is a similarity in Project Structure, syntax code, annotation, define class, extend, and implementation with Java Language.
However, there is a major bug that happened with Aqueduct, but it is almost impossible to happen in Spring Boot. For example, if we defined String in property class and Varchar in the column definition, it could be possible to make your program throw an error in Aqueduct. It is something that has already been handled by Spring for many years. I have no idea why I should declare String as Text using Aqueduct.
Author:
Achmad Yusuf Ramadhan – Analyst Programmer


