
Microsoft Azure, commonly referred to as Azure, is a cloud computing service created by Microsoft for building, testing, deploying, and managing applications and services through Microsoft-managed data centre. It provides software as a service (SaaS), platform as a service (PaaS), infrastructure as a service (IaaS), and supports many different programming languages, tools, and frameworks, including both Microsoft-specific and third-party software and systems. On this post, we are going to take a look at few of Azure services that help up to rapidly deploy any web application with a minimum configuration in the process.
Today, most web application projects commonly use a client-server approach for its architecture, with code being pushed to an online repository for ease of collaboration. This method also comes in handy to enable continuous integration and delivery (CI/CD) of our app and our server. In this kind of project, Azure does offer a complete package from deploying an application to managing our CI/CD pipeline. To maximize our learning and understanding, let’s get our hands dirty and start deploying a very simple web app with the help of Azure App Service and Azure DevOps.
What is Azure App Service?
From the official product description, Microsoft Azure App Service is a fully managed platform for building, deploying, and scaling web apps. It is a PaaS (Platform as a service) that enables us to quickly deploy our app without worrying about infrastructure and performance. We can develop our favourite language, be it .NET, .NET Core, Java, Ruby, Node.js, PHP, or Python. Applications can be run and scaled with ease in both Windows and Linux-based environments. Azure App Service does not only add the power of Microsoft Azure to your application (security, load balancing, autoscaling, and automated management), but it also takes advantage of its DevOps capabilities, such as continuous deployment from Azure DevOps.
What is Azure DevOps?
Azure DevOps is a Software as a service (SaaS) platform from Microsoft that provides an end-to-end DevOps toolchain for developing and deploying software. It has many inbuilt functionalities that allow teams to get up and running with managing projects and automating the workflows. Some key features in Azure DevOps are creating Build and Release pipelines for CI/CD automation, project board, organization, and code repository capabilities.
Before we start, please have a look at the architecture diagram shown below. This diagram is probably the simplest form of any client-server architecture suited for smaller projects or exercise projects. We are using it only to demonstrate the deployment of any web application with the minimum configuration.

Without further ado, let’s have a look at the requirement of the exercise:
Requirement:
– Any Git Repository
– Microsoft Account
Step 1: Preparation
- Code Repository.
In this post, I am using Gitlab as my git repository and using a Vue project starter template (any would do) for the sample project. - Microsoft Azure account.
We need an account for accessing the Azure service. You can register on the official website using a Microsoft account. I recommend signing up for the free version first by following this link. You can also look at the service for the free version offered here. After creating an account, go to the Azure portal to start using their service. To be specific, we are going to use Azure App Service for our server host. - Microsoft Azure DevOps.
For CI/CD, we are using Azure DevOps. You can use the Microsoft account as you have used on Microsoft Azure’s user registration. First of all, we will make a provision for an Azure App Service to host our website. Then, we will build a CI/CD pipeline using Azure DevOps.
Step 2: Deploying an App to Azure App Service
1. Open Azure portal, log in, and create a new App Service (you can type ‘App Service’ in the search bar).
2. Click Add and then fill in the required details.

| Subscription | Choose your subscription. |
| Resource group | Choose Resource Group (if you don’t have one, you can click create new and specify the name). |
| Name | Name of your app (we will use this name on the app URL). |
| Publish | We do not use Docker Container, so we choose Code. |
| Runtime stack | Specify the app service language. In this example, we choose Node 12 LTS because we want to deploy a Vue.js App. |
| Operating systems | The OS for App service. |
| Region | Specify where you want your app to be hosted. |
| Windows Plan | Choose windows plan (if you don’t have one, you can create a new one and specify the name). |
| SKU and Size | Choose the right size of your app service depending on your app, for this example, we select free F1 (Shared infrastructure, 1 GB Memory). |
3. Click Review + Create button, and wait until the app is deployed successfully.

Go to your resource and click the URL to ensure your app is running.

From this point, there are many ways to deploy your app to the App service (as you can see on the deployment centre menu below).

Step 3: Building a CI/CD Pipeline with Azure DevOps
As shown in the above step, we are now aware that there are different ways to deploy our app into Azure App Service, including Azure DevOps. This service integrates perfectly with Azure service, in the example of Azure app service that we just created. Follow these steps to start building our CI/CD pipeline:
1. Go to https://devops.azure.com/ and login to your account. Create a new project, then go to Pipeline and Create New Pipeline.
2. Connect your Codebase to Azure DevOps. In the example below, I am using the classic editor to create a pipeline without adding a YAML file to my repository. A YAML file can be used for further customization, but for simplicity reasons, I choose this option over YAML setting.

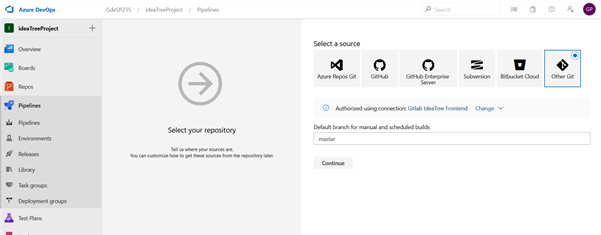
You will then need to specify where your code is. Because I am using GitLab as the code repo, I choose Other Git here. Then, configure a connection with your repo after confirming your credentials. When finished, click Continue.
Next, specify the language of our app (in this example I choose Node JS With Grunt).

| Pipeline | Leave the Agent pool to Azure Pipelines, and Agent specification to Ubuntu-16.04. |
| Get sources | In this setting, you can specify the branch you want to deploy. To enable Continuous Integration to your repo, go to Triggers, then click Enable Continuous Integration. Finally, specify the polling interval and the branch filters. |
| Agent job | 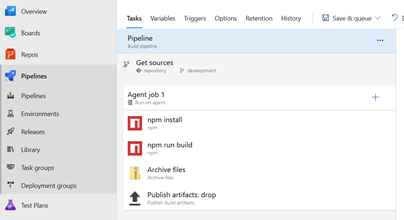 |
| Npm install | Fill in the command field with install. |
| Npm run build | Fill in the command field with custom, then fill in the command and arguments field with run build. |
| Archive file | Fill in the root folder or file to archive field with dist (because the build result will create a folder named dist in the vue setting). |
| Publish Artifacts | I leave it to default. |
Save your build pipeline and queue. You can see the log of the running job on the pipeline detail.
3. When creating Build Pipeline, you can add more steps; for example, adding a SonarQube code analysis or any steps on the pipeline. To be deployed to Azure App Service, we need to create Release Pipeline that will pick the pipeline result from Build Pipeline.
- Go to Pipeline -> Releases -> New Release Pipeline.
- Select a template. Choose Azure App Service deployment.
- Add the build pipeline result that you have created on step B by clicking add on Artifacts.

- After adding the Artifacts, click the thunder icon to enable Continuous deployment. This feature will run a deployment to our server once the latest version on the Artifacts (build pipeline) is available.
- Go to the Tasks tab and choose your App Service.
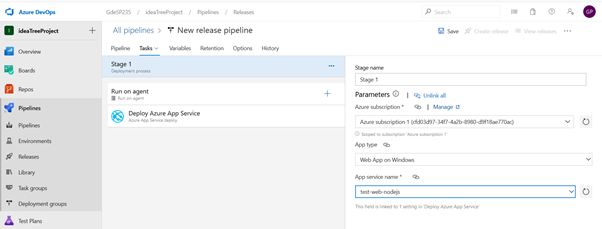
- Save and Create Release. You can see the process log in the pipeline detail, and when it’s completed, try accessing your App service URL. You should see your app is deployed.
4. For another language deployment, you should follow the same step. Pick the language you want to deploy when creating an Azure app service, then create another CI/CD pipeline for that host.
Summary
We have successfully deployed our application on Azure using Azure App service. We also have integrated our repository to the web host with the help of Azure DevOps. Hopefully, this article will give you some insight on using Azure and make your project deployment faster and simpler.
Author:
Gde Surya Pramartha – Programmer


