
Brief Introduction
Apache Kafka was developed by LinkedIn to handle their log files and handed over to the open source community in early 2011. It became the main Apache project in October 2012. Apache Kafka is a distributed streaming platform, and has three key capabilities:
- Publish and subscribe to streams of records, similar to a message queue or enterprise messaging system
- Store streams of records in a fault-tolerant, durable way
- Process streams of records as they occur
What is it used for?
Apache Kafka can be used for various purposes in an organisation, like as a Messaging service, Real-time stream processing, Log aggregation, Commit log service, Event sourcing, etc.
In order to use this technology, we need to first set up our Kafka environment. In this demonstration we will set up a Kafka environment consisting of 1 zookeeper and 3 brokers. We will create a simple Producer and Consumer using Java Spring boot.
System Architecture
- Zookeeper: is used by Kafka to maintain state between the nodes of the cluster.
- Brokers: The “pipes” in our pipeline, which store and emit data
- Producers: Send messages to the topic
- Consumer: Listen and read messages from topic

Installation
We will set up our Kafka cluster in a Centos 7 environment.
I. Prerequisite
- Centos 7 System
- Java 1.8
If you haven’t installed Java 1.8 in your system, please install it first - kafka_2.11-2.3.0.tgz
You can download the file here. - Spring boot application
If you want to know how to build a spring boot application from scratch, you can refer to this link, or if you want to just learn how to create a Kafka Producer and Consumer using spring boot please feel free to clone my project instead.
II. Starting Zookeeper
First, extract kafka_2.11-2.3.0.tgz using this command:
tar -xvzf kafka_2.11-2.3.0.tgz
Inside the extracted kafka_2.11-2.3.0 folder, you will find a bin/zookeeper-server-start.sh file which is used to start the zookeeper and config/zookeeper.properties which provides the default configuration for the zookeeper server to run.
Start the zookeeper by running (inside the Kafka root folder):
nohup bin/zookeeper-server-start.sh config/zookeeper.properties &>zookeper_nohup.out&
This command uses nohup to transfer the output log into a file (zookeeper_nohup.out). You can monitor the log by tailing to that file using this command:
tail -2000f zookeeper_nohup.out
III. Starting Brokers
In the same way that we started Zookeeper, there are 2 files config/kafka-server-start.sh to start the broker and config/server.properties to configure the broker server. From the architecture diagram above we want to start 3 brokers, and all you need to do is create 3 configuration properties files. Let’s create them:
cp config/server.properties config/server1.properties
cp config/server.properties config/server2.properties
cp config/server.properties config/server3.properties
There are, however, 3 properties that must be unique for each broker instance: broker.id, listeners, and log.dirs.
Change the above 3 properties for each copy of the file so that they are all unique.
server1.properties
broker.id=1
listeners=PLAINTEXT://172.19.16.244:9093
log.dirs=/tmp/kafka-logs1
server2.properties
broker.id=2
listeners=PLAINTEXT://172.19.16.244:9094
log.dirs=/tmp/kafka-logs2
server3.properties
broker.id=3
listeners=PLAINTEXT://172.19.16.244:9095
log.dirs=/tmp/kafka-logs3
Important Note: 172.19.16.224 is the host IP address (of your centos 7 system). You must set the IP address or domain name in the listener property or your cluster cannot be accessed from outside of your host.
Now it’s time to run the brokers.
Enter this command to run broker 1
nohup bin/kafka-server-start.sh config/server3.properties &> server3_log.out&
Enter this command to run broker 2
nohup bin/kafka-server-start.sh config/server2.properties &> server2_log.out&
Enter this command to run broker 3
nohup bin/kafka-server-start.sh config/server3.properties &> server3_log.out&
Warning: Don’t forget to open the brokers port in the centos firewall. You can run the following command to open those 3 ports (9093,9094,9095) in the firewall:
firewall-cmd --zone=public --add-port=9093/tcp –permanent
firewall-cmd --zone=public --add-port=9094/tcp --permanent
firewall-cmd --zone=public --add-port=9095/tcp --permanent
firewall-cmd --reload
Now we have our brokers running. Before we can start putting data into the cluster, we need to create a topic to which the data will belong.
Creating a Topic
To create a topic, run this command:
bin/kafka-topics.sh --create --topic bootcamp-topic --zookeeper localhost:2181 --partitions 3 --replication-factor 2
It will create a Kafka topic named ‘bootcamp-topic’. The –partition argument describes how many brokers we will use. Since we set up 3 brokers, we can set this option to 3. The –replication-factor describes how many copies of your data you require. This is handy – in case one of the brokers goes down, you still have your data on the others.
IV. Testing, Connecting and Monitoring our Kafka using Kafka Tools
Now our Kafka is ready to use, we can monitor Kafka traffic using Kafka Tools that can downloaded from http://www.kafkatool.com/download.html
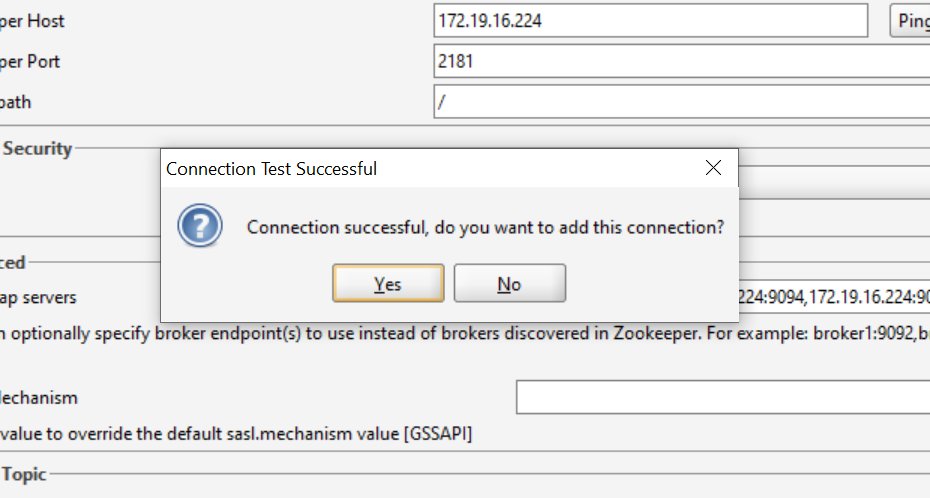
In the Kafka Tools GUI, click File>>Add New Connection

Fill in the following fields:
Cluster Name: You can input anything – it’s just a connection name
Zookeeper Host: IP address or domain name where we installed the Kafka cluster
Bootstrap server: your broker’s instance [IP,port] separated by comma
Click the Test button to test the connection. If it’s a success, you can add the connection by pressing the Yes button on the popup dialog.
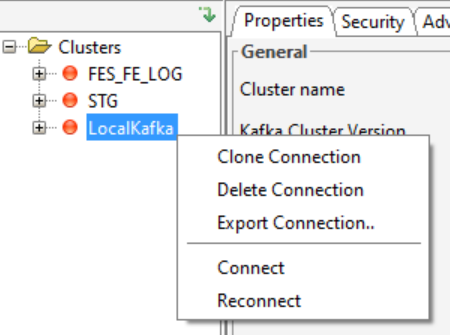
Right click your newly added connection and click Connect.

This is how it should look. There is no data in the topic yet – we will add it later.
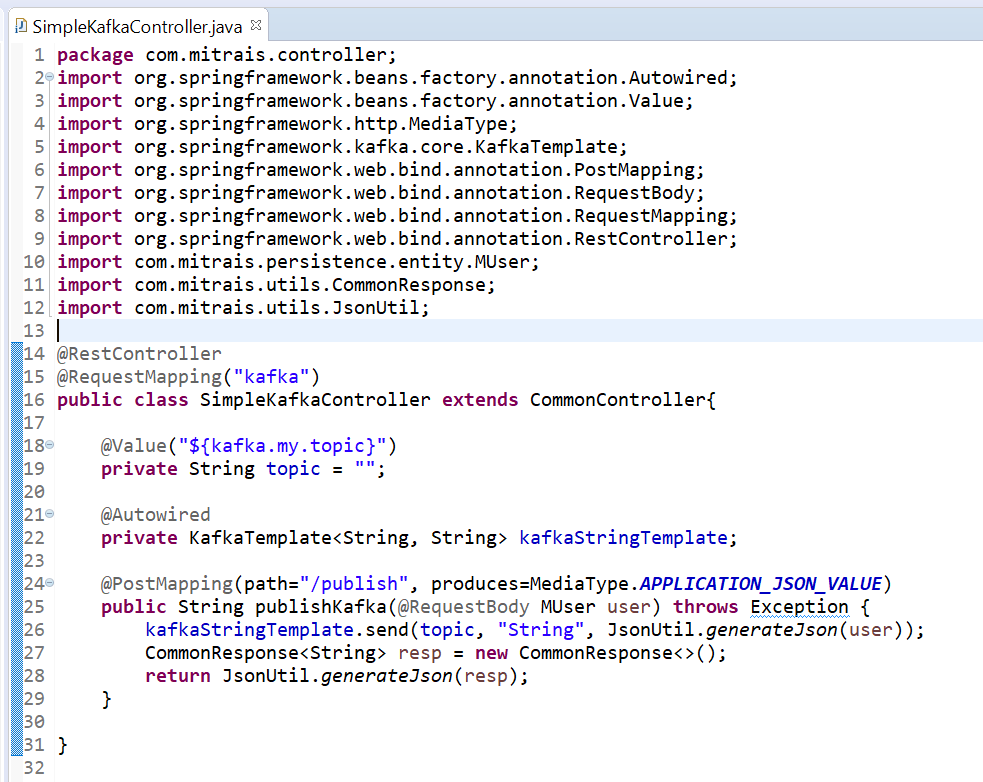
V. Creating a Producer
In this section, we will create the producer within our spring-boot application. You can create and use your own spring boot application from scratch, or clone my spring boot project from github.
First, we need to add the spring-Kafka library. Put this in your build.gradle :

Add the following properties in application.properties:
spring.kafka.bootstrap-servers=172.19.16.224:9093,172.19.16.224:9094,172.19.16.224:9095
kafka.retries=3
kafka.session.timeout=15000
kafka.my.topic=bootcamp-topic
kafka.auto.commit=true
kafka.offset.reset=latest
kafka.security.protocol=PLAINTEXT
spring.kafka.consumer.group-id=jcg-group
Now you can create a simple Restful API that will publish posted request body from the client to Kafka.
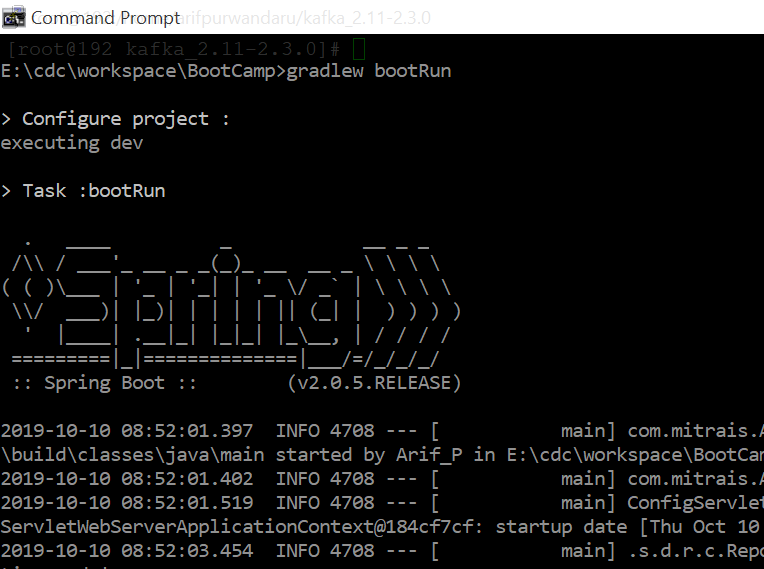
Run spring boot application by using gradlewbootRun command, or you can build the jar file and execute it directly with the java -jar command.
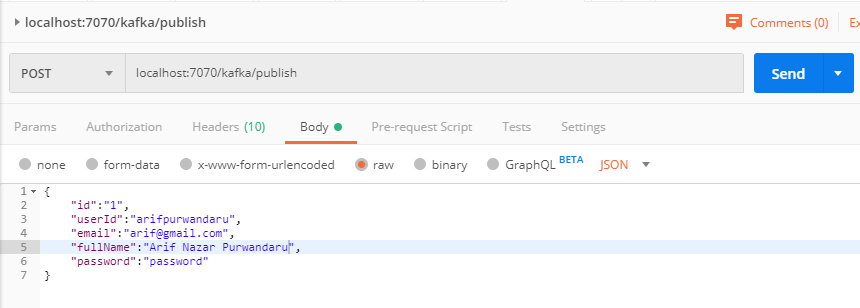
Let’s try to hit our newly created Restful API service using the postman:
Let’s check our message in Kafka tools:

Now we have 1 message in our topic.
VI. Creating a Consumer
We will create the consumer within the spring boot application.
The consumer is a simple spring service that listens to the Kafka topic. Whenever a new message is sent to the topic, the listener captures it and saves to the database.
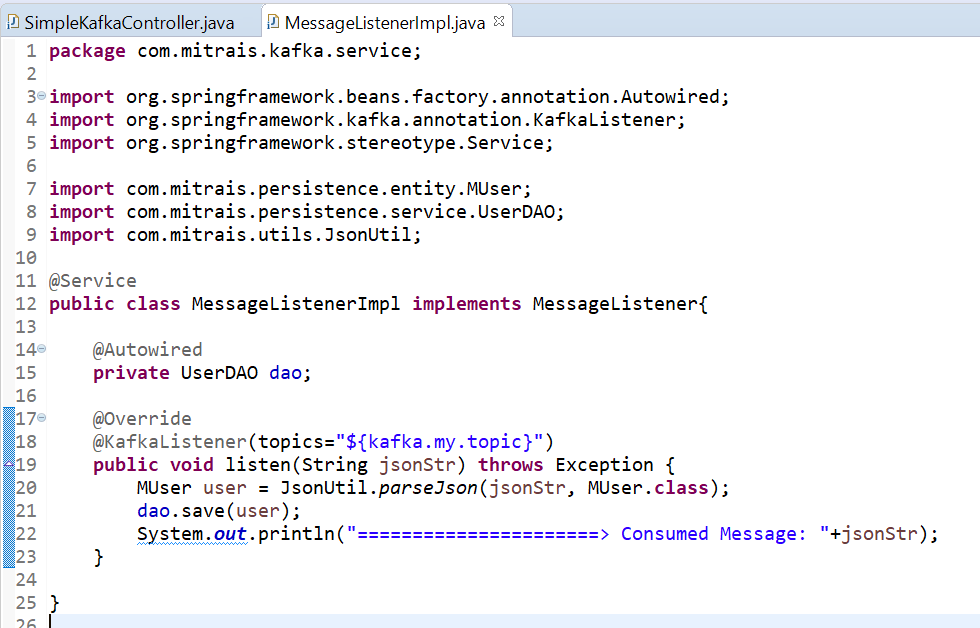

If we run the spring boot, and monitor the log, we will have something like this whenever there is a message sent to the Kafka topic.
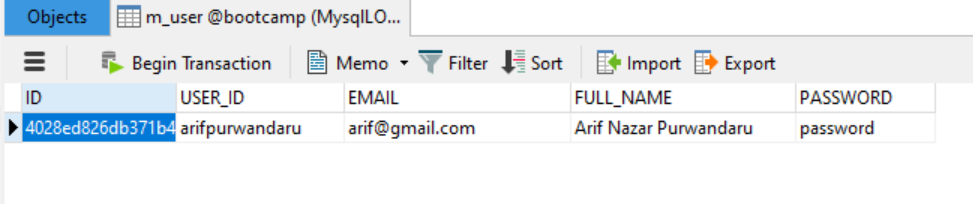
The message is then saved to the database.
Conclusion
Now you have Apache Kafka running on your CentOS server with 3 brokers and 1 zookeeper. You can also produce and consume messages from your spring boot application to your Kafka topic. This makes it much easier to implement asynchronous processes in your next project. To learn more about Kafka, have a look at its documentation.
Author:
Arif Nazar Purwandaru – Analyst Programmer


