IAM (Identity and Access Management) is a critical component in modern software and cloud-based systems. IAM is responsible for managing user identities, authentication, authorization, and access control. Commonly used IAM products include Keycloak, Zluri, Okta, WSO2 Identity Server, Ping Identity, Auth0, Microsoft Azure AD, AWS IAM, etc.
Here are the pros and cons of using IAM:
Pros of using IAM
- User identities are managed centrally, making it easier to add, update, and remove users.
- Authentication is standardized and supports various methods, including social logins, LDAP, and many more.
- Access control is granular and can be enforced consistently across applications.
- SSO is achievable, improving user experience and reducing the need for multiple logins.
- Auditing and compliance reporting are facilitated by built-in features.
- Scalability is improved, and user management is streamlined.
Cons of using IAM
- IAM systems can be complex and require significant expertise to implement and manage.
- Implementing and maintaining an IAM system can be expensive, especially for large or complex organizations.
- IAM systems may require integration with existing systems and applications, which can be time-consuming and challenging.
- IAM systems may require changes to user behavior, which can be challenging to implement and may require significant training and support.
- IAM requires continuous updates, monitoring, and policy management to stay secure.
Managing Access with IAM
In this case, we use Keycloak for IAM applications. Here are some key terms we should know about Keycloak:
- Client: Client is an application that uses Keycloak for authentication and authorization. This is called Application on Zluri, Okta, Ping Identity, and Auth0, called Application Registration on Microsoft Azure AD, called Service Provider on WSO2 Identity Server, and called IAM Entity on AWS IAM.
- User: User is a person who accesses a client application. This is also called User on Zluri, Okta, WSO2 Identity Server, Ping Identity, Auth0, Microsoft Azure AD, and AWS IAM.
- Role: Role is a set of permissions that can be assigned to users and groups. This is also called Role on Zluri, WSO2 Identity Server, Ping Identity, Auth0, Microsoft Azure AD, and AWS IAM, and called Group on Okta. Note: roles can be represented using groups because they serve similar purpose in terms and managing permission and access control. Roles are more focused on defining specific sets of permission while groups are more focused on organizing users.
- Group: Group is a collection of users that share a common set of permissions or roles. This is also called Group on Okta, WSO2 Identity Server, Ping Identity, Auth0, Microsoft Azure AD, and AWS IAM, and Team on Zluri.
- Realm: Realm is a container for your clients or applications. This is also called Realm on Ping Identity, called Organization on Zluri and Okta, called Tenant in WSO2 Identity Server and Auth0, called Directory on Microsoft Azure AD, and called AWS Account on AWS IAM.
Let’s start with installing and running it through docker as in this page.
Create Realm
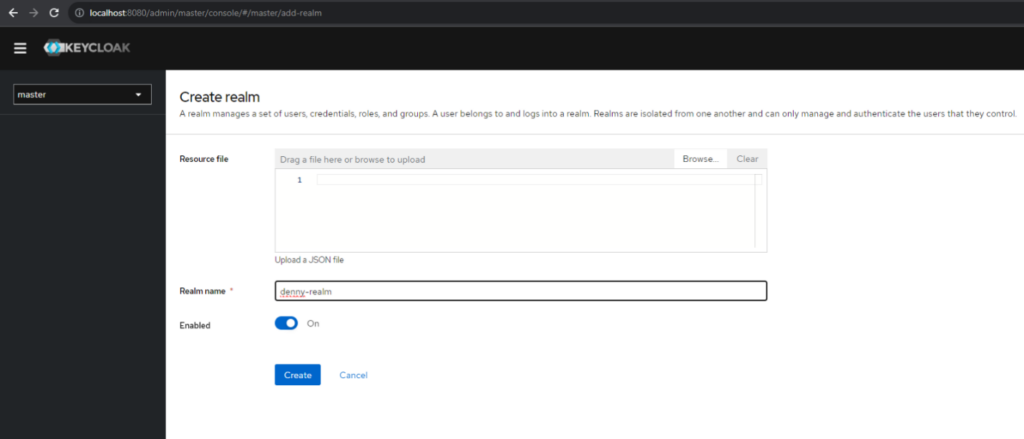
Next, we need to create realm. Realm is a management entity that controls a set of users, their credentials, roles, and groups. All users belong to and logs into a realm. To create a realm, we need to click Add Realm in the Master drop-down menu.

After clicking the menu, we redirect to this page to add new realm. In this case we only need to put a value into Realm Name.
After clicking the Create button, we can redirect back to the main page with a new realm set.
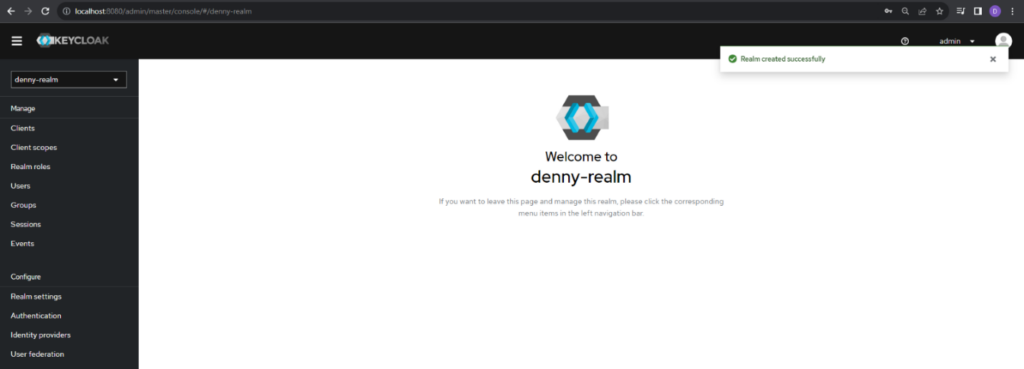
If we succeed to redirect to this page, the new realm has been successfully created.
Create Client
After creating the realm, we need to create a client for the next step. Clients are entities that can request Keycloak to authenticate a user. A client represents a resource that can be accessed by certain users. To create a new client, click on the Clients menu from the left panel and click the Create client button.
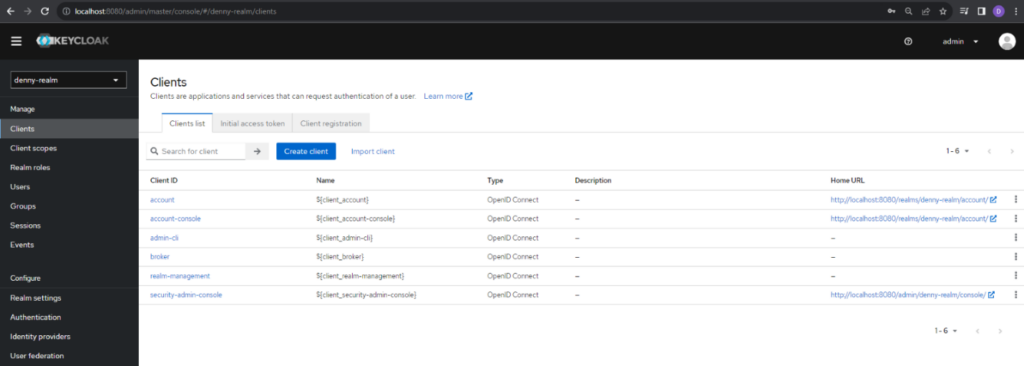
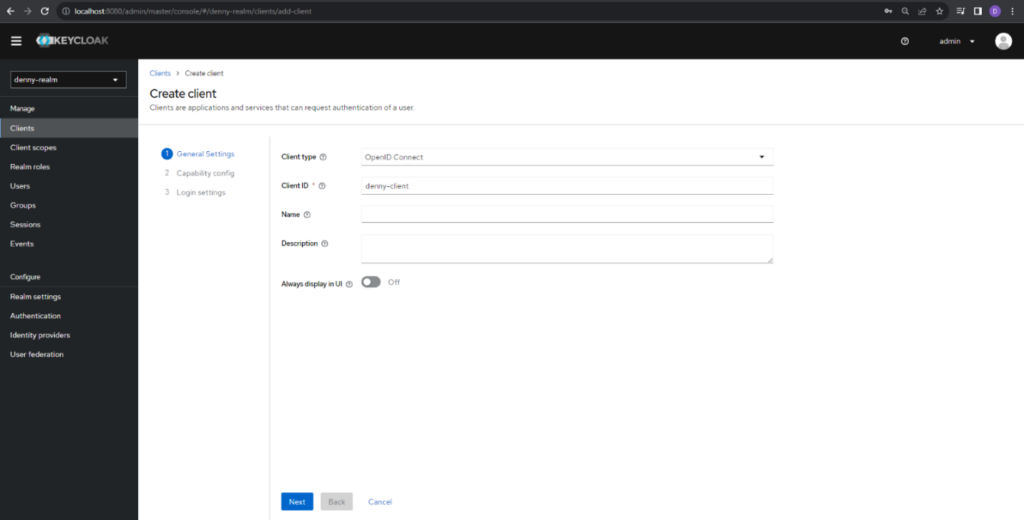
After clicking the Create client button, we are redirected to this page to fill in the client details. In this case, we only fill in the Client ID. And click Next button to the next step.
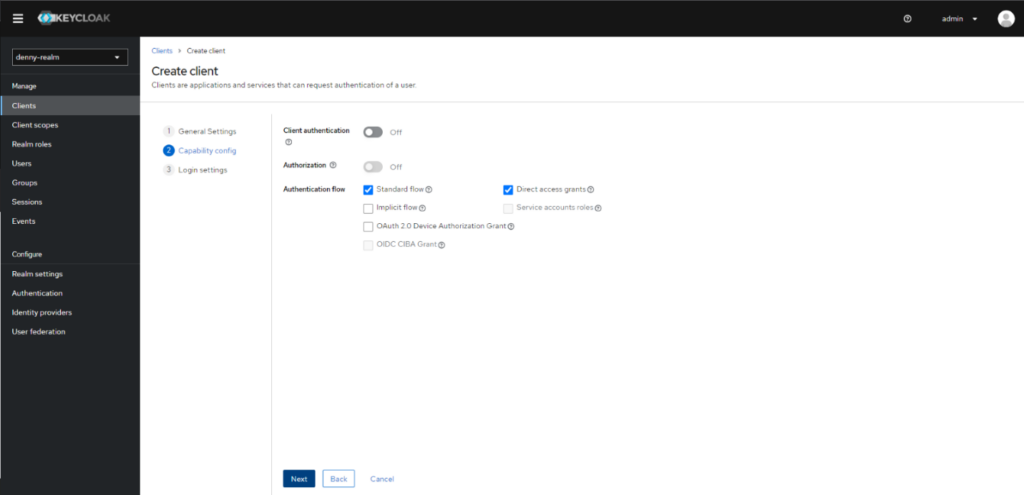
In the next screen, keep the default config and click Next button again to the next screen.
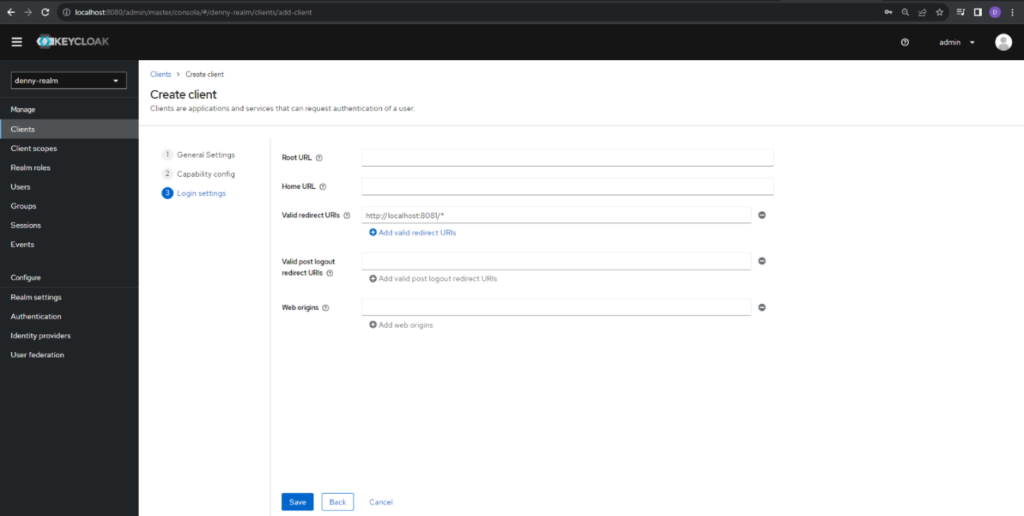
In the next screen, we need to fill the redirect URI to set in our Spring Boot Application. As a default, Keycloak server is running on port 8080. So, we will run Spring Boot application on port 8081. Set http://localhost:8081/* as redirect URIs and click the Save button. Now the client is successfully created.
Create Role
After we successfully create the client, we need to set the roles for the client and realm. Every user must have a role as Keycloak uses Role-Based Access. This allows us to have several types of users with different user permissions. There are 2 role types in Keycloak:
- Realm Role: It is a global role, belonging to that specific realm. This can access any client and map it to any user.
- Client Role: It is a role which belongs only to that specific client. These roles cannot be accessed by a different client.
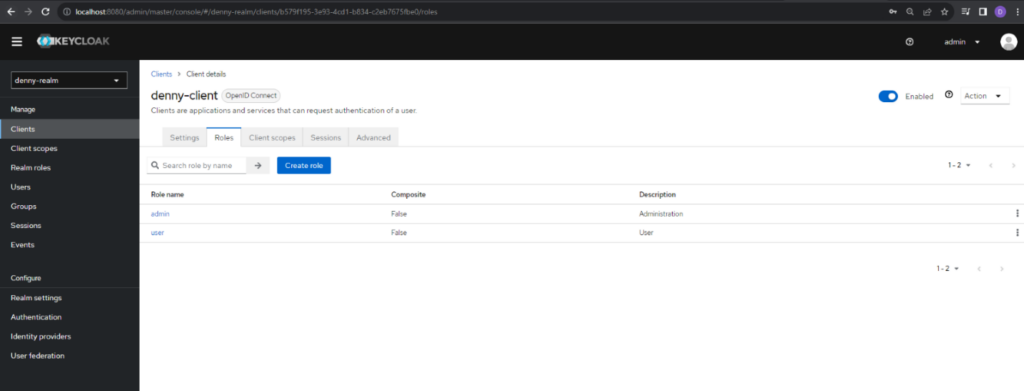
A role can be combined from multiple roles where it will become a Composite Role. To create a role, navigate to clients from the sidebar. Then select the client that we created before. In this case, we create a role using denny-client. After that, click Roles and click the Create role button to create a new role. In this case we create 2 roles namely Admin and User.
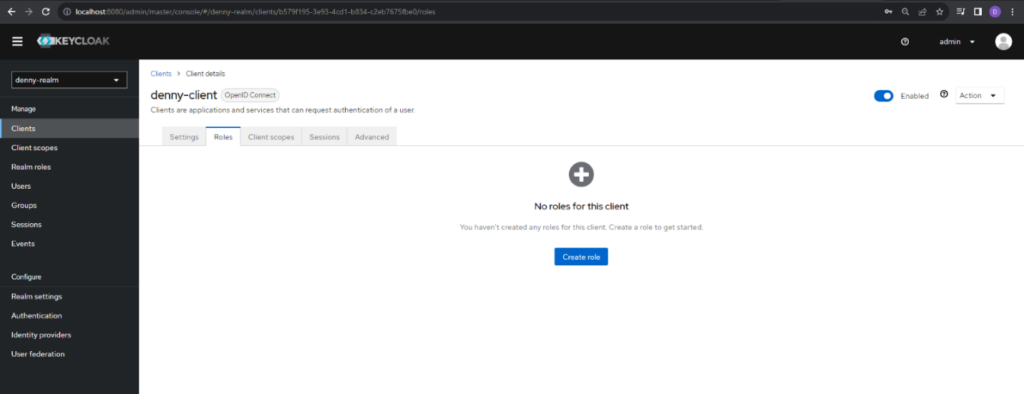
In the next screen, we fill in the Role name and Description to fill a detailed of the role.
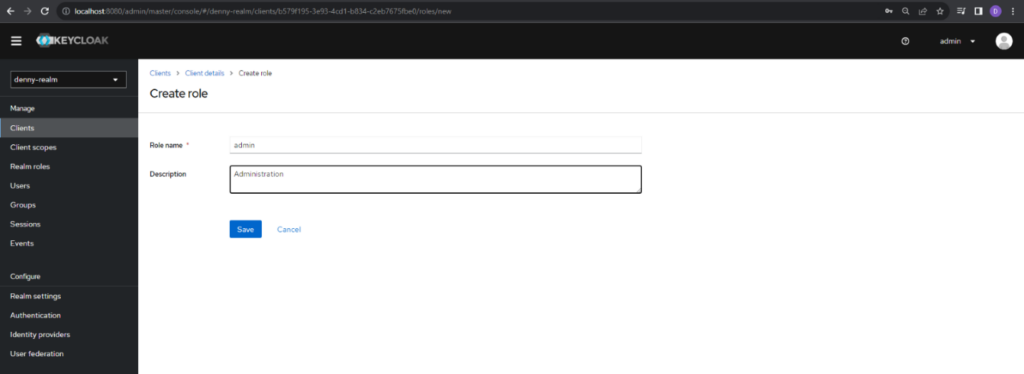
After we filled in the details of the role, click save and the new role was successfully created. And we can go back to the Client details like this page.
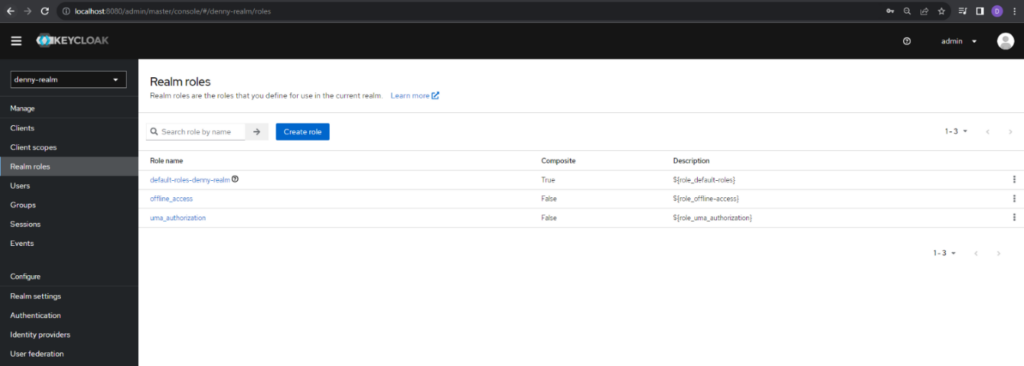
We will then need to create Realms role. To create it, navigate to the Realm Roles page to create roles.
Click the Create role button to create a new realm role. In this case we create 2 roles namely app-admin and app-user refer to roles which we created before at Client Page.
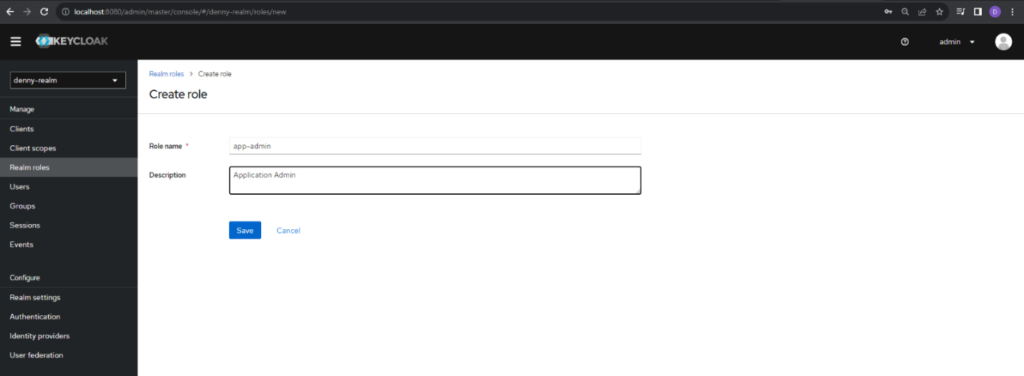
In this screen, we only need to fill in the Role name and Description for detailed role and click Save button and the role successfully created. Still in the same screen, we need to compose the realm role with Client role. In this case, we need to compose the app-user Realm role with user Client role and app-admin Realm role with admin role. To do this, select Add associated roles in the Action drop down.
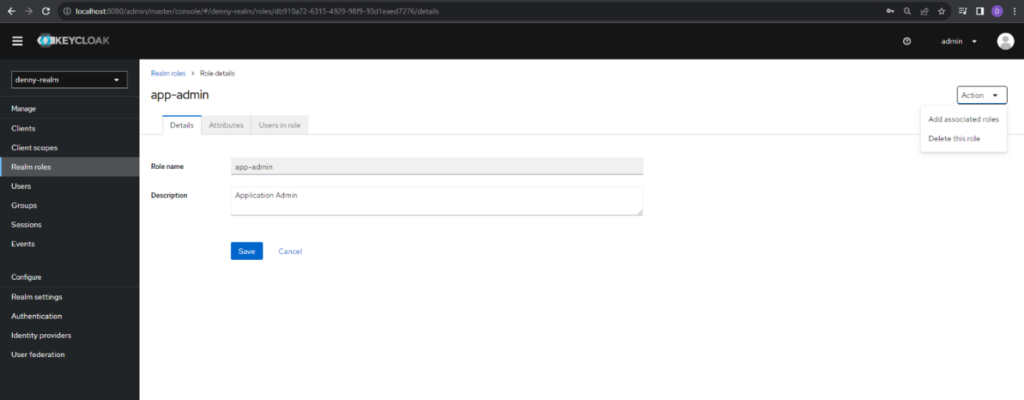
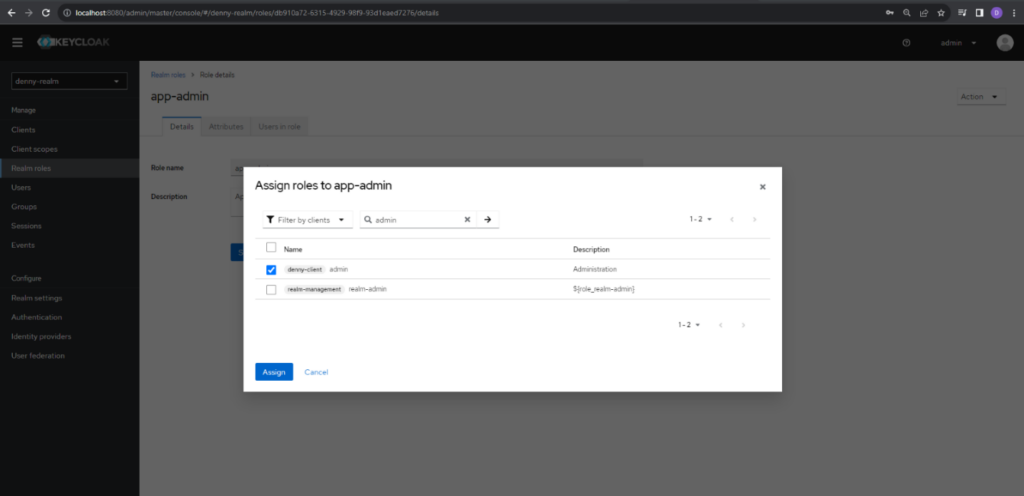
Next, we need to choose Filter by client in the filter dropdown and fill the keyword in the search bar. In this case, we fill admin for keyword because we set for admin role. After that, select the admin from the client which we created before and click Assign button. Repeat the same steps for the role user by selecting the user role on the assign screen.
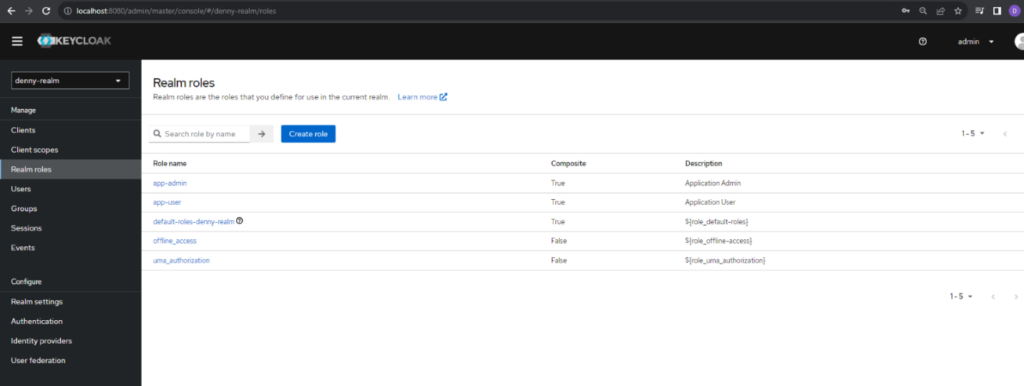
If added those correctly, Realms roles will be composite, and we can go back to Realm roles screen.
Create User
After we successes to create Realms, Clients, and Roles. We need to create user. Users are entities able to log into your system. Users are created in the sign-up process. This can be performed either through API requests or manually. In this case, we add the users manually. We create the following user and grant then app-user and app-admin roles as mentioned.
- admin1 with app-admin realm role.
- user1 with app-user realm role.
- user2 with app-user realm role.
To create a new user, click Users in the left panel.
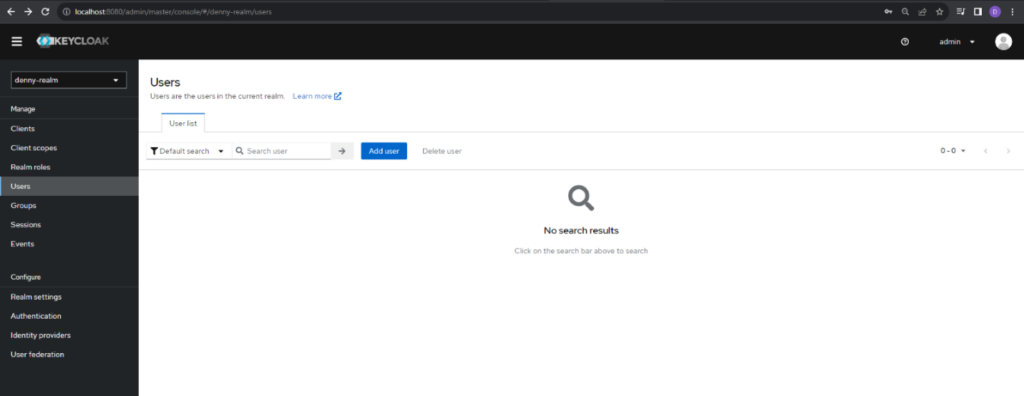
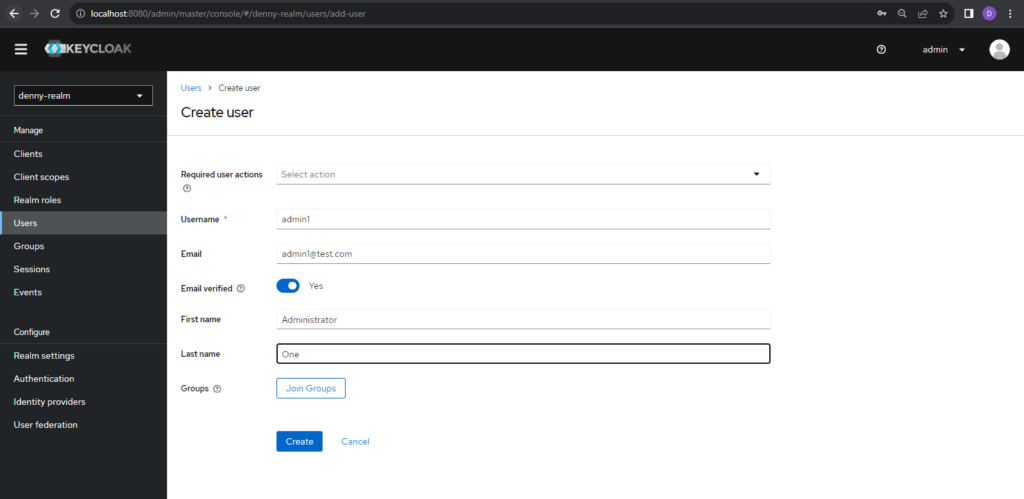
In this screen, click Add user button and fill in the details for user. We need to fill in the Username and email. Also, we need to activate Email Verified in the user details and click Create button to create new user.
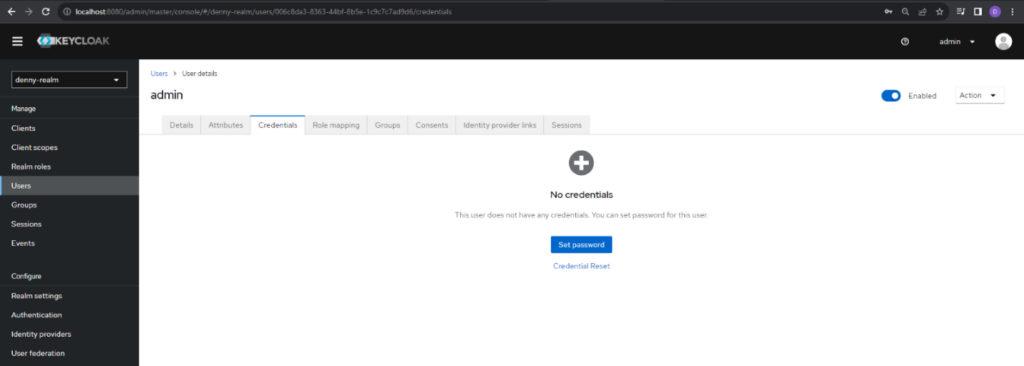
After that, we need to set a password for the user. Click Credentials tab and click Set password button.
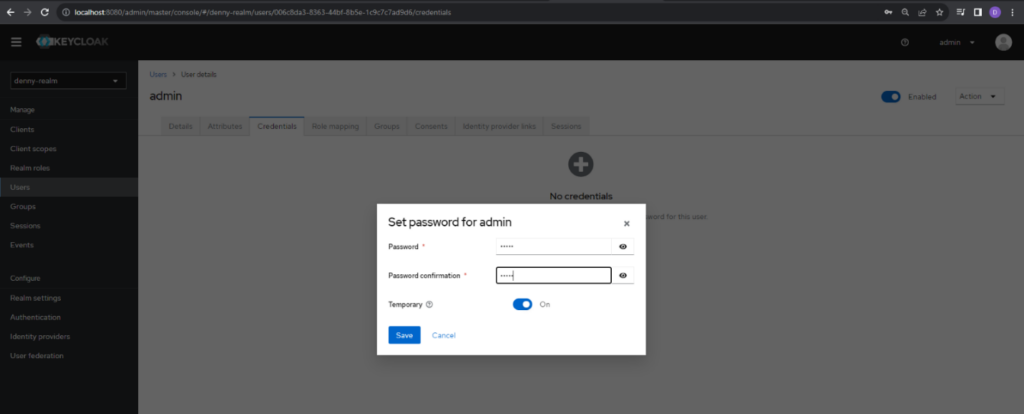
In this screen, fill in the password and confirmation password, uncheck the temporary password to be able to use this password in the future, and click save to set password.
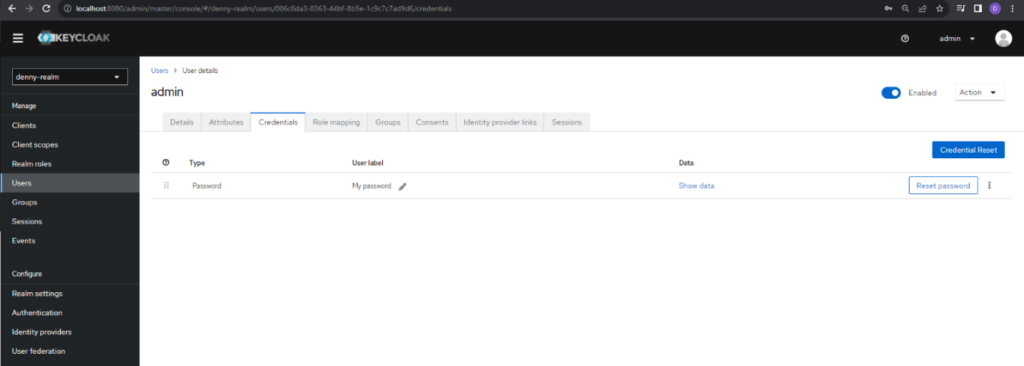
We can redirect to the previous screen after successfully creating a password.
Now we need to set a role for the user. Click the Role mapping tab and click Assign role button.
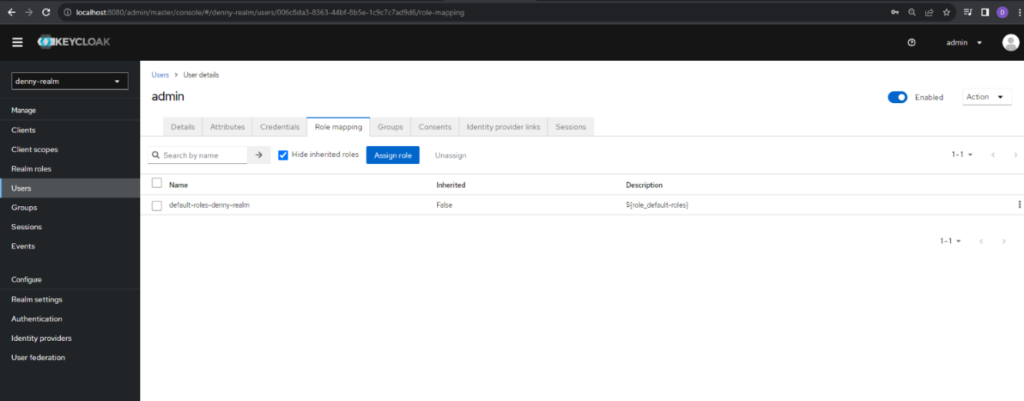
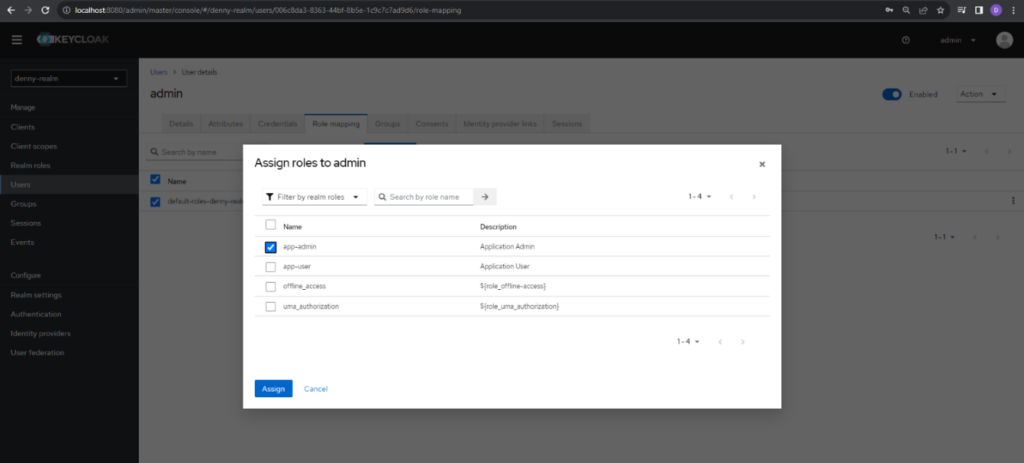
In this screen, select the role you want to assign and click Assign to set it. In this case we choose app-admin for the role.
Now one user is successfully created, and we can create the other two users as same as this. Once all users are created, we can see the list of them on the Users page.
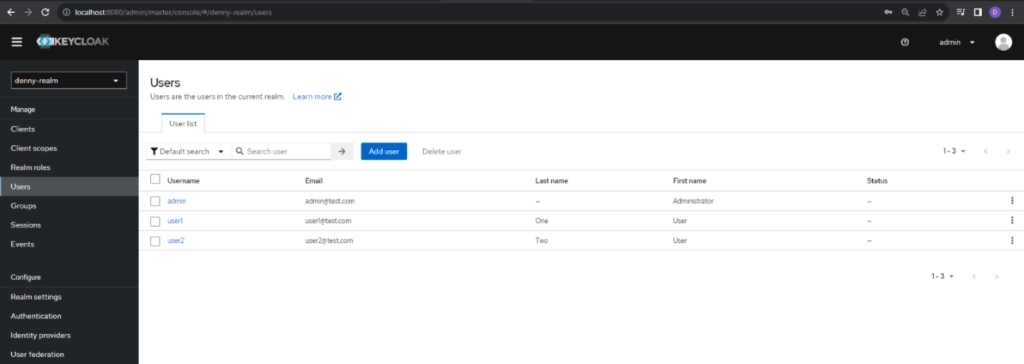
With that the configuration is finished. In summary we created the realm denny-realm which has denny-client as the client app. The denny-client app has 3 users: admin with app-admin realm role and user1 and user2 with app-user realm role.
Generating Access Token with Keycloak API
After we configure the Keycloak server, we can test our Keycloak server with its APIs. To test it, go to Realm settings and click on the OpenID Endpoint Configuration to see the available endpoints.
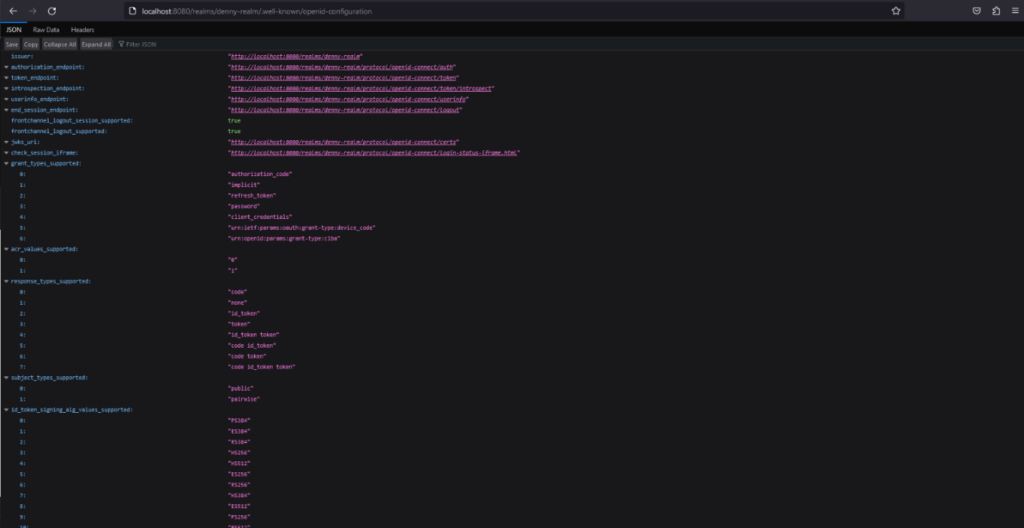
To generate access tokens, we can send a post request to this token endpoint to get a token. We can use one of the users we have already created. The request body should be in a x-www-form-urlencoded format. In this case, we will use user1 to generate the access token.
curl --location 'localhost:8080/realms/denny-realm/protocol/openid-connect/token' \

--header 'Content-Type: application/x-www-form-urlencoded' \

--data-urlencode 'grant_type=password' \

--data-urlencode 'client_id=denny-client' \

--data-urlencode 'username=user1' \

--data-urlencode 'password=user1'
Or else, we can test it using Postman. The response would be like the one below.
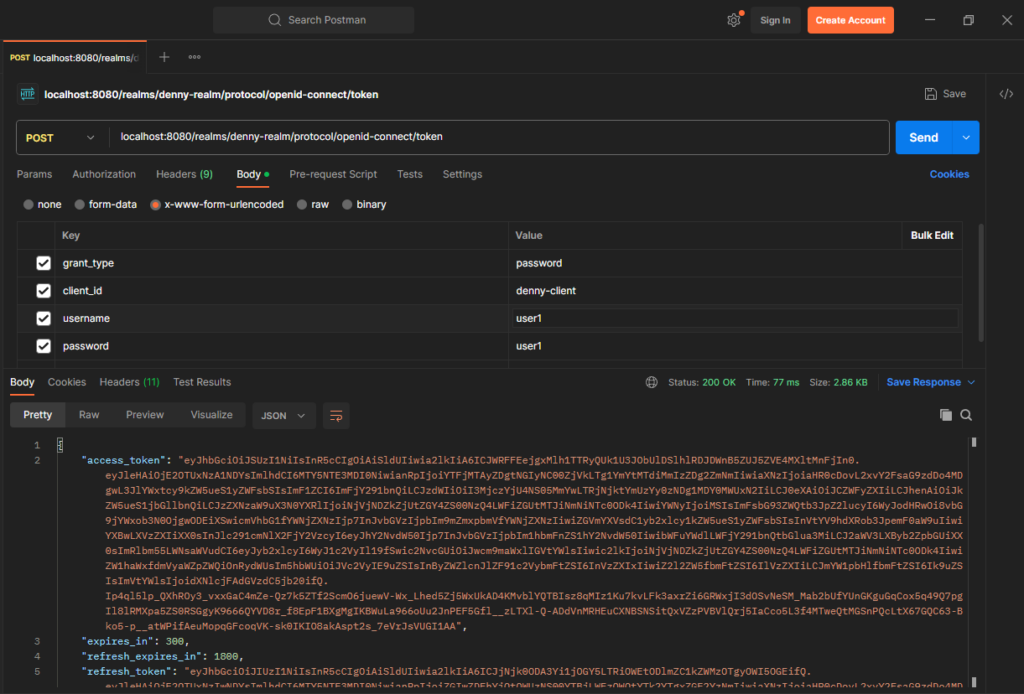
We can copy the access_token and decode it using the jwt.io website to see the information inside that.
Using IAM in Application
IAM, such as Keycloak, can seamlessly integrate into various applications, including Spring Boot, Node.js, Angular, React, .NET, Python, Mobile (iOS and Android), PHP, container application (Docker and Kubernetes), and more. In this article, our focus will be on integrating Keycloak with a Spring Boot Application. The diagram below details the flow for the implementation.

For authentication and authorization, here’s how IAM in this case Keycloak and manual security achieve these objectives conceptually, regardless of specific configurations:
- For authentication, Keycloak utilizes Single Sign-On (SSO) and standard protocols such as OAuth2 and OpenID Connect (OIDC) to authenticate users, while manual security directly verifies the user’s identity without relying on an external system.
- For authorization, Keycloak manages authorization through Role-Based Access Control (RBAC) or Attribute-Based Access Control (ABAC) with centralized role and policy management, while manual security handles authorization directly within the application, based on logic implemented by the developers.
We are going to integrate Keycloak by using OAuth2 protocols. Our Springboot application will need to include the Oauth2 dependency:
We also need to add some information from Keycloak Server and set port for our application to use 8081 as 8080 has been used by the Keycloak Server

Here we need to provide resource server configurations. JWT (JSON Web Token) access token includes all the necessary information about the signed user. The Resource Server needs to verify the signature of the token to ensure the data has not been modified. The jwk-set-uri property contains the public key that the server can use for this purpose. The resource-id specifies the identifier for the resource that the token is intended to access. The attribute property refers to the attribute in the JWT that the client will use to identify the authenticated user. In this case, we use preferred username field which means that the client will extract the value of this field from the access token and use it as the identifier for the authenticated user. We created a class named JwtAuthProperties.java to get those config properties into Spring Boot Application inside the config package.

After this step, we need to create custom claim on the Resource Server side. We need to add a class that implements the Converter interface. In this case, we created JwtAuthConverter.java class inside the config package.

Finally, we need to add a WebSecurityConfig.java class as follows to configure HttpSecurity with OAuth2 Resource Server’s JWT authentication. This configuration will set the “/page/admin” to only be accessible to administrators while the user page is accessible to both.

Now the project structure will look like the below.

We need to change the controller to provide detailed usernames and to change the router as well.

We can access the token from Principal class. The principal.getName() method retrieves the Principal Claim name, which is set as preferred username. Also, we can get from casting it to a JwtAuthenticationToken.
Testing the Application
All the configs are completed, now we can run this application to see how it works.
We can test our endpoints through Postman. We need to send a valid access token obtained from Keycloak Server. We can get a token as mentioned in the generating access token section. In this case, we use user1 access token to test it. Try to call http://localhost:8081/api/page/admin with user1 access token, the endpoint has getting 403 forbidden results because not valid access token.
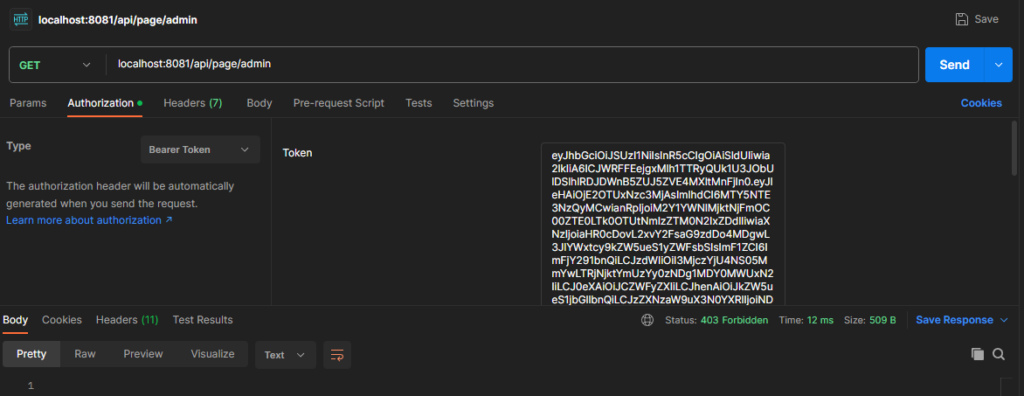
If the access token is valid, the endpoint was given the valid result include detailed user.
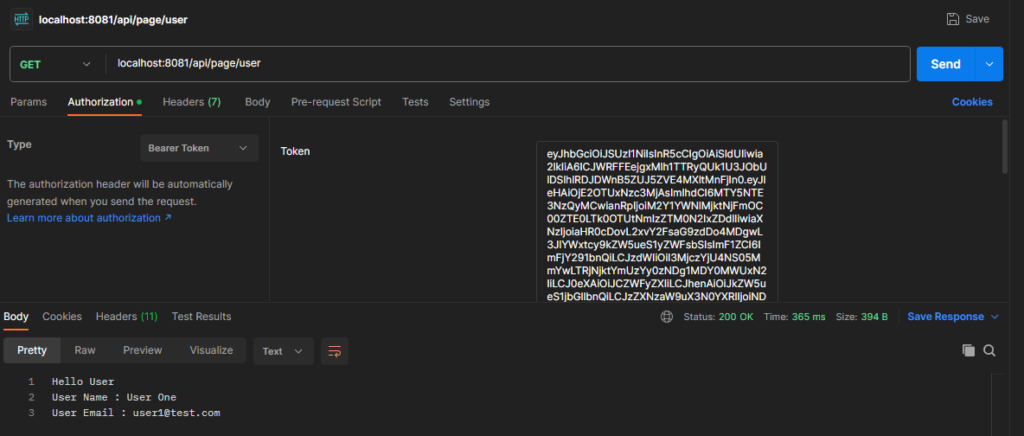
After this step, we have successfully connected our Spring Boot Application with Keycloak Server using OAuth2 Resource Server configuration.
In summary, IAM in this case Keycloak provides a centralized, standardized, and scalable approach to managing identity and access control, whereas manual IAM setups may be more suitable for smaller, less complex systems. The choice depends on factors such as the scale of our applications, the need for centralized management, and the desire for standardized security protocols.
Managing Access without IAM
Now consider if we do not use IAM such as Keycloak. We will need to configure access control directly within our application or infrastructure starting from handling users and roles by ourselves. This gives us total control, but it will take a whole lot of time to implement correctly. There are other drawbacks:
- Provisioning and deprovisioning users across multiple platforms will be slow and inefficient without centralized management.
- Without automation, manual configurations are prone to mistakes, potentially granting incorrect access rights.
- Manually managing user permissions and roles across multiple systems demands excessive time and effort.
- Tracking and auditing access manually is challenging, making it harder to comply with security regulations.
- Managing multiple access points separately increases complexity and reduces overall system security.
- Manually detecting and revoking compromised credentials is slower, leading to prolonged exposure to security threats.
Summary and Conclusion
In this article, we explain the importance of using IAM in the applications we build. Here are some reasons why IAM is important:
- Security: IAM enhances the security of our system by ensuring that only authorized users can access resources and perform actions.
- Identity Management: IAM systems manage user identities, roles, and permissions.
- Single Sign-On (SSO): IAM enables SSO, which allows users to log in once and access multiple applications or services without having to re-enter credentials.
- Fine-Grained Access Control: IAM allows us to define and enforce fine-grained access control policies.
- Auditability and Compliance: IAM systems maintain logs and records of user activities, making it easier to audit and demonstrate compliance with security regulations and policies.
- Integration: IAM systems can integrate with various authentication mechanisms, such as LDAP, OAuth, and SAML, as well as with external identity providers like Google or Azure AD (Active Directory).
The source code for this article is available on this GitHub Page for your reference. Hopefully, this article can be helpful for any other person who wishes to implement IAM. Thank you.

