
In today’s world, IoT (Internet of Things) devices have become increasingly common and play a significant role in improving our quality of life. From assisting with daily routines to remotely monitoring homes through CCTV, these devices continue to enhance our lives.
One of the most widely used protocols in the IoT ecosystem is MQTT (Message Queuing Telemetry Transport), known for its lightweight footprint, low power usage, minimal bandwidth consumption, and reliability in high-latency environments.
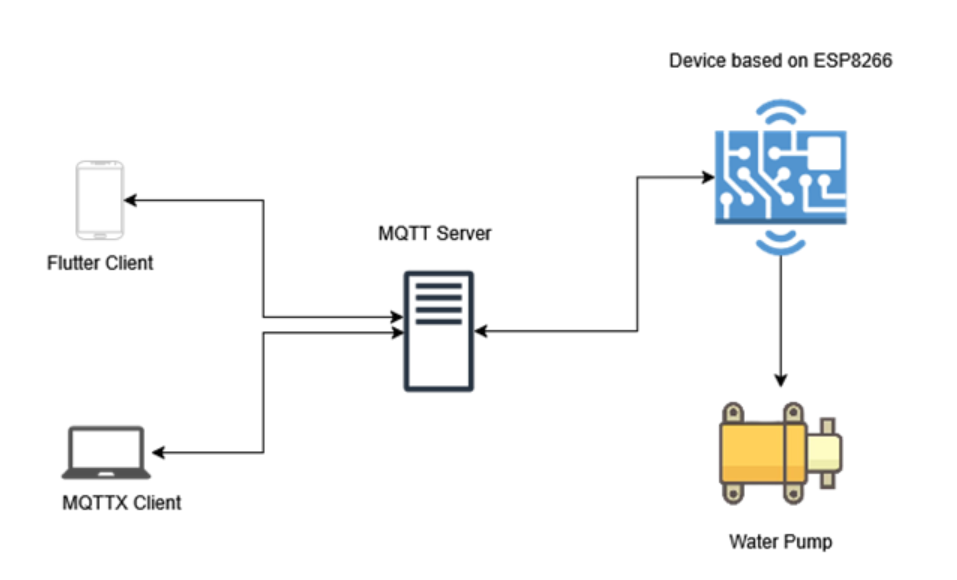
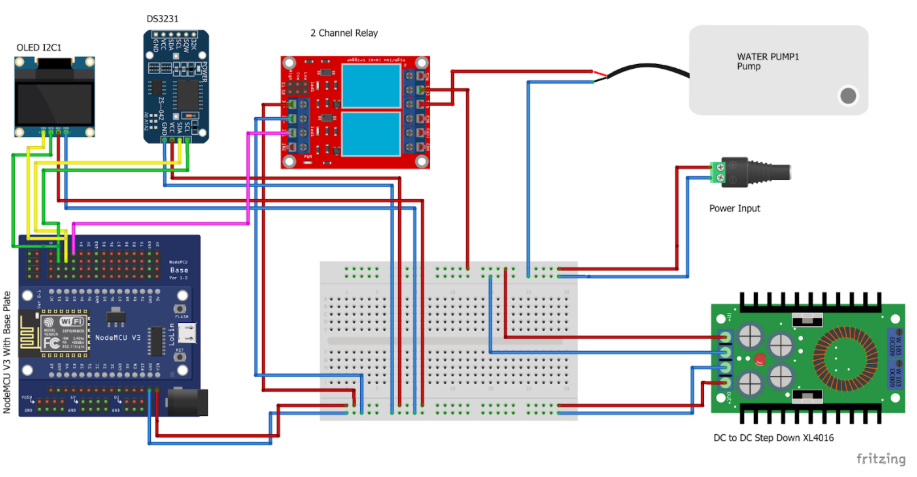
In this article, I will walk you through the implementation of MQTT in my DIY plant watering system. This system is designed to automate and remotely control the watering process using a combination of hardware and software components. It uses an ESP8266 microcontroller at the core of the device, which controls the water pump and handles the communication with the MQTT broker. The relay is connected to a 12V water pump and controls it by turning it on or off as needed to carry out the watering. The real-time clock (RTC) DS3231 module can be added to the system to provide accurate timekeeping and can also be used to implement features like watering once per day.
On the software side, a Mosquitto MQTT broker runs inside a docker container, acting as the central hub that facilitates communication between the microcontrollers and the client applications. These clients communicate with “topics” and can include tools such as MQTTX for testing or a Flutter mobile app for user-friendly control and monitoring. The microcontroller subscribes to a topic like “plant/pump” to control the water pump. It also publishes status updates to topics like “pump/status” to indicate whether the plant has been watered. This setup facilitates a responsive and modular system capable of both manual and automated plant care.
Beyond personal or small-scale use, this system is highly scalable and could be adapted for larger agricultural applications. For example, a farmer could deploy multiple ESP8266 units across their fields, each connected to a pump and configured with unique MQTT topics. This would enable centralised monitoring and remote control of watering schedules for multiple sections of crops, improving efficiency, reducing manual labour, and supporting more consistent irrigation.
- Requirements
- Wi-Fi connection
- Docker
Docker allows us to run the Mosquitto broker in a self-contained environment that’s easy to manage, test, and reproduce. This eliminates the need to install services directly on your operating system.
- Arduino IDE or PlatformIO
These are used to write and upload code to the ESP8266 microcontroller. PlatformIO is ideal for more advanced projects with dependencies, while Arduino IDE is great for beginners.
The download links can be found here :
- Arduino IDE https://www.arduino.cc/en/software
- PlatformIO https://platformio.org/platformio-ide
- Driver CH340
USB-to-serial (UART) driver is required to enable communication between your computer and certain microcontroller boards—especially those that use the CH340 (or CH341) USB-to-serial chip, used in many ESP8266 developments. The driver can be found here : https://sparks.gogo.co.nz/ch340.html
- MQTTX
MQTTX is a GUI MQTT client that simplifies testing and debugging for MQTT topics. This can be used to simulate what the app will send or receive. MQTTX can be found here : https://mqttx.app/
Hardware Requirements
- ESP8266
- Relay
- 12V DC power adaptor
- DC to DC step down converter
- 12V DC water pump
- Jumper wires
- Breadboard
The components listed below are optional and are only needed if you’re using an OLED screen for display or a DS3231 RTC for timekeeping:
- OLED I2C 128×64 screen
- DS3231
Setting Up MQTT Using Docker
When developing IoT projects, especially during the prototyping stage, having a dependable local MQTT broker can significantly streamline your testing process. Rather than relying on public brokers, which may be limited, rate-limited, or less secure, you can quickly spin up your own MQTT server using Docker. This is not only convenient but it also mirrors the kind of deployment setup you’d likely use in a production environment.
In this project, we’ll use Eclipse Mosquitto, a lightweight open-source MQTT broker, inside a Docker container. This allows you to run the broker isolated from your system, ensuring easy management and minimal conflicts. In addition,, since Mosquitto is widely adopted in the IoT community, it’s an excellent choice for compatibility and community support.
To get started, here’s a basic docker-compose.yml file that will launch the Mosquitto MQTT broker and expose the necessary ports:
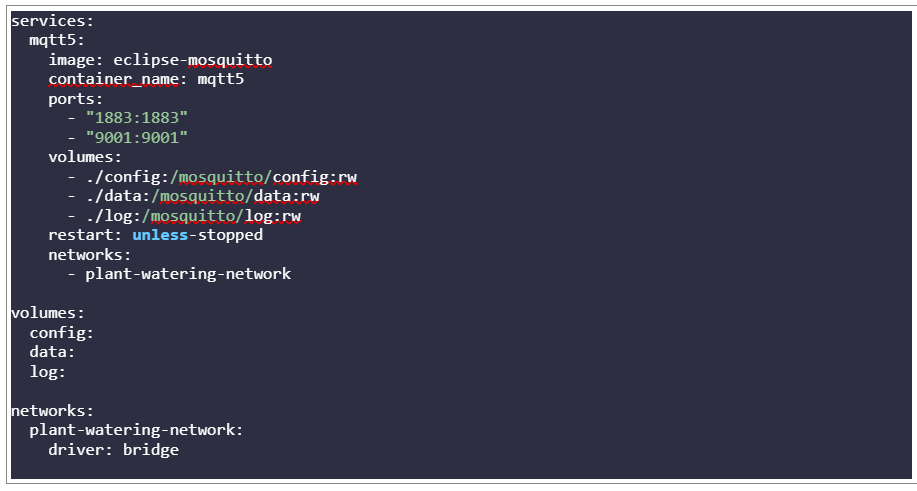
services:

  mqtt5:

    image: eclipse-mosquitto

    container_name: mqtt5

    ports:

      - "1883:1883"

      - "9001:9001"

    volumes:

      - ./config:/mosquitto/config:rw

      - ./data:/mosquitto/data:rw

      - ./log:/mosquitto/log:rw

    restart: unless-stopped

    networks:

      - plant-watering-network

volumes:

  config:

  data:

  log:

networks:

  plant-watering-network:

    driver: bridge
Bash script to create necessary folders :
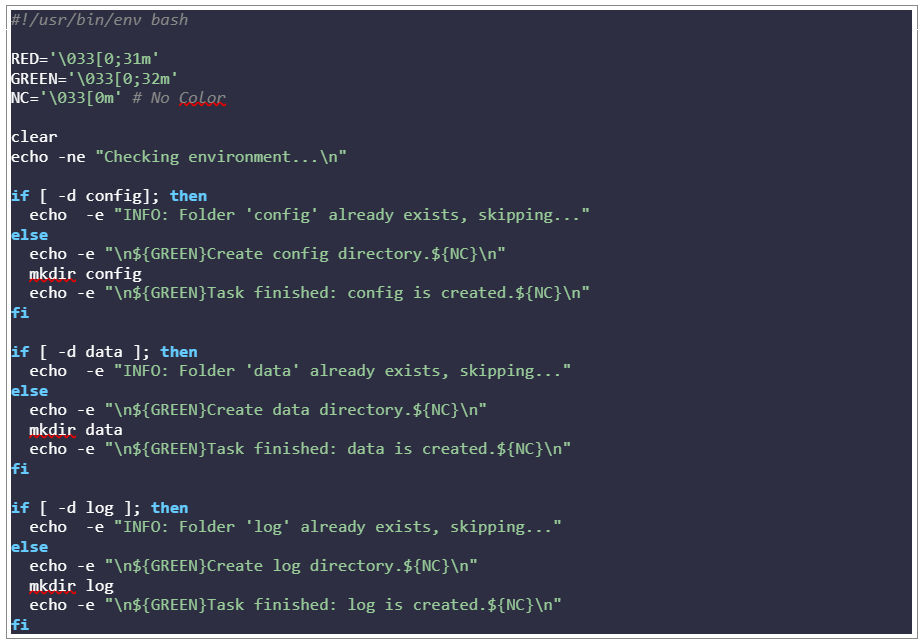
#!/usr/bin/env bash


RED='\033[0;31m'

GREEN='\033[0;32m'

NC='\033[0m' # No Color


clear

echo -ne "Checking environment...\n"


if [ -d config]; then

  echo  -e "INFO: Folder 'config' already exists, skipping..."

else

  echo -e "\n${GREEN}Create config directory.${NC}\n"

  mkdir config

  echo -e "\n${GREEN}Task finished: config is created.${NC}\n"

fi


if [ -d data ]; then

  echo  -e "INFO: Folder 'data' already exists, skipping..."

else

  echo -e "\n${GREEN}Create data directory.${NC}\n"

  mkdir data

  echo -e "\n${GREEN}Task finished: data is created.${NC}\n"

fi


if [ -d log ]; then

  echo  -e "INFO: Folder 'log' already exists, skipping..."

else

  echo -e "\n${GREEN}Create log directory.${NC}\n"

  mkdir log

  echo -e "\n${GREEN}Task finished: log is created.${NC}\n"

fi
Basic MQTT Configuration
Inside the config directory, create a minimal Mosquitto configuration file (e.g., mosquitto.conf) to only allow authenticated access. This will help secure your service and prevent unwanted users from connecting to your MQTT.
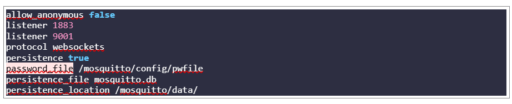
allow_anonymous false

listener 1883

listener 9001

protocol websockets

persistence true

password_file /mosquitto/config/pwfile

persistence_file mosquitto.db

persistence_location /mosquitto/data/
To start the service:
docker-compose up
To access the container:
docker exec -it <container-id> sh
To add a new user and create a new password file:
mosquitto_passwd -c /mosquitto/config/pwfile <name_of_the_user>
To add another user, remove the -c option from the command above:
mosquitto_passwd /mosquitto/config/pwfile <name_of_the_user>
To delete an MQTT user:
mosquitto_passwd -D /mosquitto/config/pwfile <name_of_the_user_to_delete>
Once the user credentials are created, you can try to connect to the MQTT service using MQTTX. To test publishing a message, enter the following command in your terminal or command prompt:
docker run --rm eclipse-mosquitto mosquitto_pub \

  -h <host> -p 1883 \

  -u <username> \

  -P <password> \

  -t test/topic -m "Hello from Docker"
Preparing the code for ESP8266
Before you start coding on Arduino IDE, you will need to install board esp8266 to your Arduino IDE. To achieve this, you can follow the instructions below.
- Open Arduino IDE
- Navigate to File -> Preference
- Paste the link http://arduino.esp8266.com/stable/package_esp8266com_index.json into the Additional Board Manager URLs field

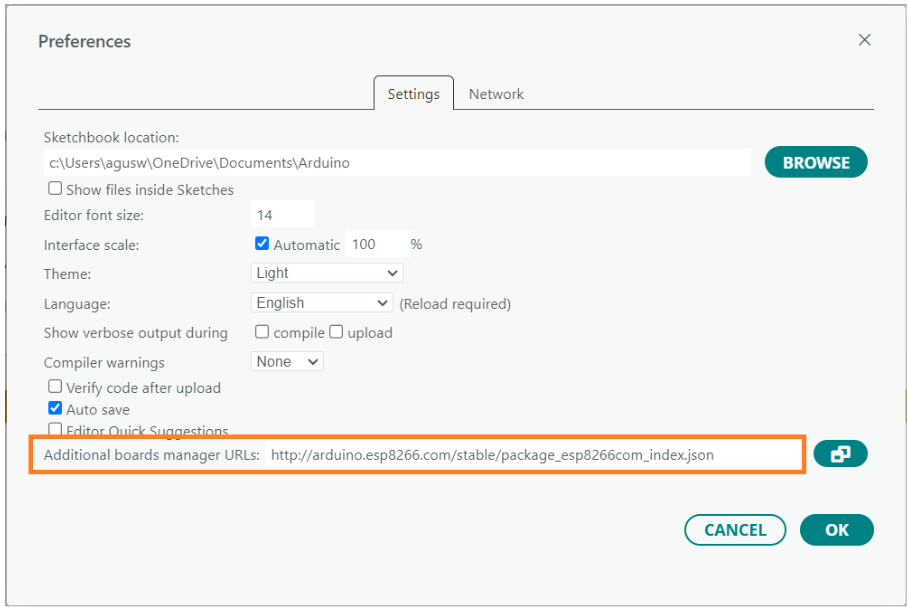
- Click OK
- Now click Tools -> Board -> Board Manager
- Type “esp8266” and hit enter

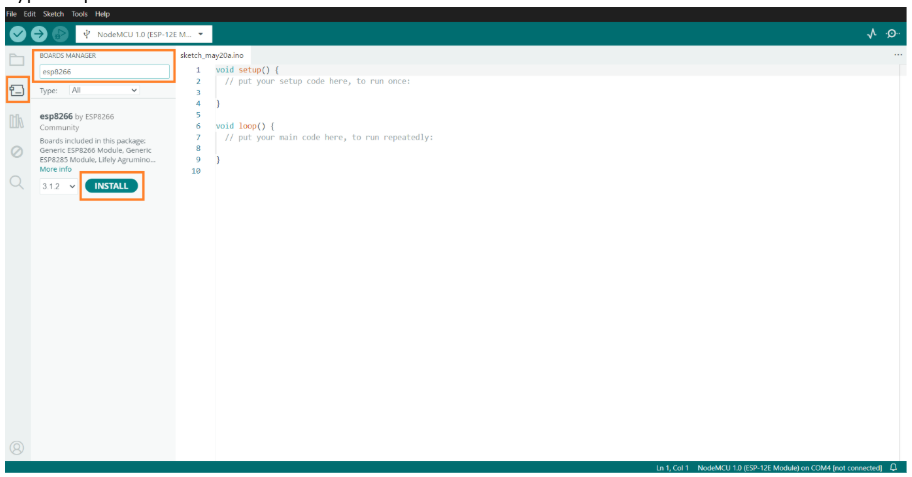
- Click Install
Once the ESP8266 is installed, you will need to install several libraries to enable the ESP8266 to communicate with the MQTT service, as listed below.
- ESP8266WiFi.h
- PubSubClient.h
- (Optional) Wire.h, Adafruit_SSD1306.h, RTClib.h for OLED & DS3231 support
Here’s an example code snippet that connects to the MQTT service and subscribes to/publishes messages.
You can use MQTTX to test if the data can be received and transferred correctly between MQTT and ESP8266.
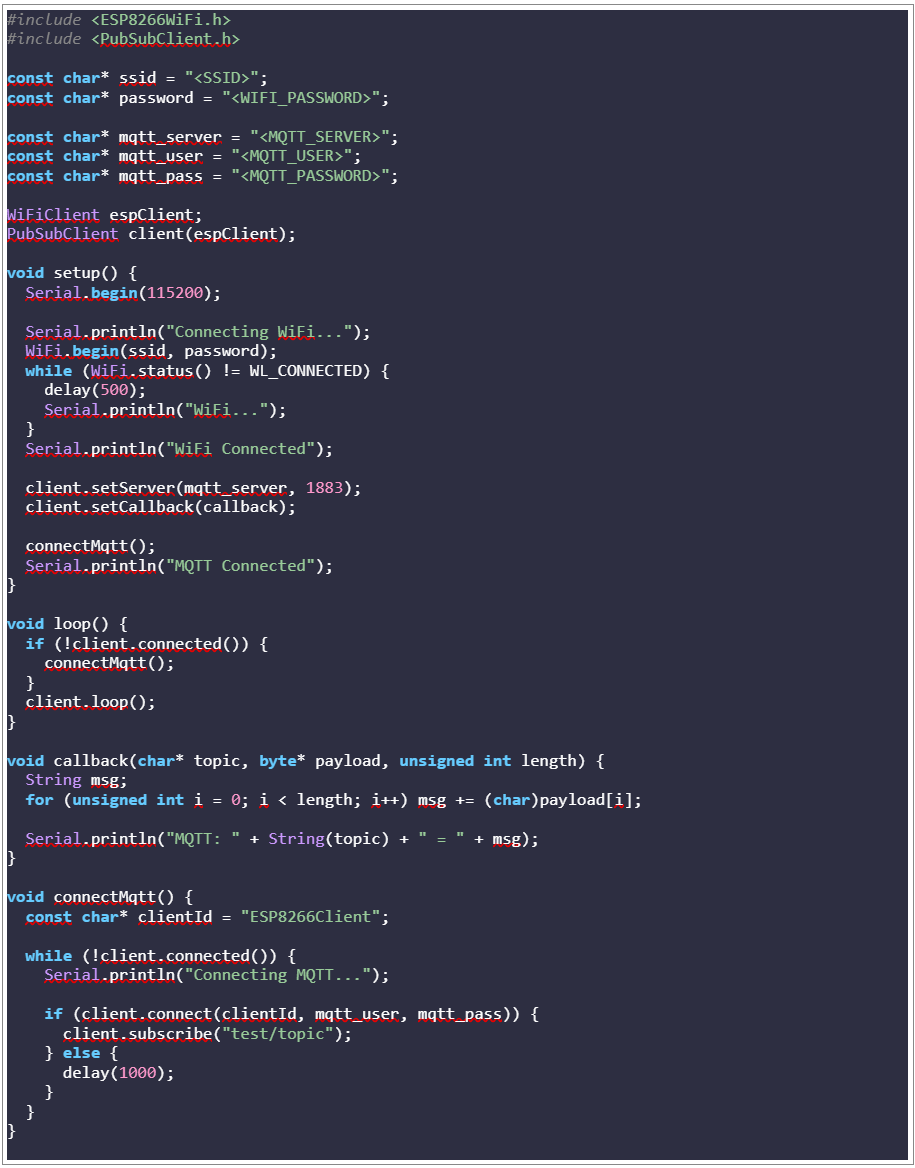
#include <ESP8266WiFi.h>

#include <PubSubClient.h>


const char* ssid = "<SSID>";

const char* password = "<WIFI_PASSWORD>";


const char* mqtt_server = "<MQTT_SERVER>";

const char* mqtt_user = "<MQTT_USER>";

const char* mqtt_pass = "<MQTT_PASSWORD>";


WiFiClient espClient;

PubSubClient client(espClient);


void setup() {

  Serial.begin(115200);


  Serial.println("Connecting WiFi...");

  WiFi.begin(ssid, password);

  while (WiFi.status() != WL_CONNECTED) {

    delay(500);

    Serial.println("WiFi...");

  }

  Serial.println("WiFi Connected");


  client.setServer(mqtt_server, 1883);

  client.setCallback(callback);


  connectMqtt();

  Serial.println("MQTT Connected");

}


void loop() {

  if (!client.connected()) {

    connectMqtt();

  }

  client.loop();

}


void callback(char* topic, byte* payload, unsigned int length) {

  String msg;

  for (unsigned int i = 0; i < length; i++) msg += (char)payload[i];


  Serial.println("MQTT: " + String(topic) + " = " + msg);

}


void connectMqtt() {

  const char* clientId = "ESP8266Client";


  while (!client.connected()) {

    Serial.println("Connecting MQTT...");


    if (client.connect(clientId, mqtt_user, mqtt_pass)) {

      client.subscribe("test/topic");

    } else {

      delay(1000);

    }

  }

}
The complete Arduino code can be found on my github repository at https://github.com/Agus-Wei/IoT-plant-watering-esp-8266
Conclusion and Improvements
This article demonstrated the practicality of using MQTT using docker to host the MQTT broker locally and to ensure secure, offline, and friendly operation.
One of the key advantages of this setup is its lightweight and real-time communication with the ESP8266 microcontroller, which makes it ideal for resource-constrained devices. Additionally, having full control over the broker enhances security and flexibility, allowing for tighter access control and local-only communication. The system is also highly extendable, supporting features like time-based automation through RTC modules and remote control via a mobile app.
At its current stage, the system can turn the water pump on or off by publishing to the plant/pump topic via tools like MQTTX. The ESP8266 also publishes its online status and plant watering status, giving users basic visibility into the system’s state.
However, to scale up the system, there are some challenges to consider. Ensuring stable MQTT reconnections on the ESP8266, especially in environments with unstable Wi-Fi, can be tricky. Managing retained MQTT topics, particularly to enforce limits like once-per-day watering also requires careful implementation. Lastly, securing the broker setup and managing credentials are crucial to prevent unauthorised access and ensure the system remains dependable and safe for future scaling.
What’s Next?
This project could be improved further by building a Flutter mobile application to provide remote control and monitoring of the watering system via smartphone access, anytime and anywhere. Integration with a soil moisture sensor would allow the ESP8266 to collect real-time soil condition data and make intelligent watering decisions based on actual moisture levels.
In addition to automation, this enhancement introduces the potential of soil data analysis. By logging moisture levels over time, the system can help identifying trends, optimizing irrigation schedules, and detecting potential issues such as overwatering or drought stress. Visualizing this data within the mobile application would provide greater insight into plant health, and support more informed, and sustainable farming practices, particularly valuable in agricultural contexts like vanilla farming in Indonesia, where managing multiple crop areas efficiently is essential.


