
1. Why use Bloc?
Have you ever started an application that crashed for no reason? Challenges can occur in many ways; for example, when you click a button, it freezes for five to ten seconds without displaying a message in the user interface. Also, perhaps an application that maybe only works with an internet connection doesn’t work correctly when an internet connection isn’t available.
Then, suppose your answer to the above is yes. In that case, you will know how frustrating it is for a user not to receive a visual representation or any interaction within the application.
The primary problem is that the code is not clear, organized, maintainable, or testable. The app developers generally concentrate on building it for the short term rather than maintaining it for a long time.
Programming is all about how you and your team need to write code using an architecture that features the best, accommodating every feature and scale over time.
The best way to keep your code organized, clean, and maintainable in Flutter is to have a component that can mediate what the user sees and its logic. This component I’m referring to is Bloc (Business Logic Component.)
2. What is Bloc?
Bloc is a design pattern created by Google to help separate business logic from the presentation layer and enable a developer to reuse code more efficiently.
A state management library called Bloc was created and maintained by Felix Angelo. It helps developers implement the Bloc design pattern in their Flutter application. It means that a developer must know the state of an app at any time. There should be something displayed on the screen for every interaction with the app to let users know what is happening.
Technically, for every interaction inside the application, there should be a state emerging from it. For example, when the data is fetching, the app should be in a loading state displaying a loading animation on the screen. When the internet is off, the application should display a pop-up to let the user know there is no internet connection.
A good app design includes considering every possible case and having a state emerging from it. So, the Bloc library separates the presentation layer from business logic and simplifies managing the application’s state.
3. The Core Concepts
Stream is the foundation of Bloc, and you need to become familiar with the concept.
3.1 Stream
A Stream is an order of asynchronous events. It is like an asynchronous Iterable—where, instead of getting the next event when you ask for it, the Stream tells you there is an event when it is ready.
Stream provides the means to receive a sequence of events. Each event is either a data event, referred to as an element of the Stream, or an error event, a notification that something failed. When a Stream has emitted all its events, a single “done” event will notify the listener that they reached the end.
3.2 Receiving Stream Events
A Stream can be created in many ways and can be used in the same way: the asynchronous loop commonly called await for iterates over events of a Stream like the for loop iterates over an Iterable. For example:
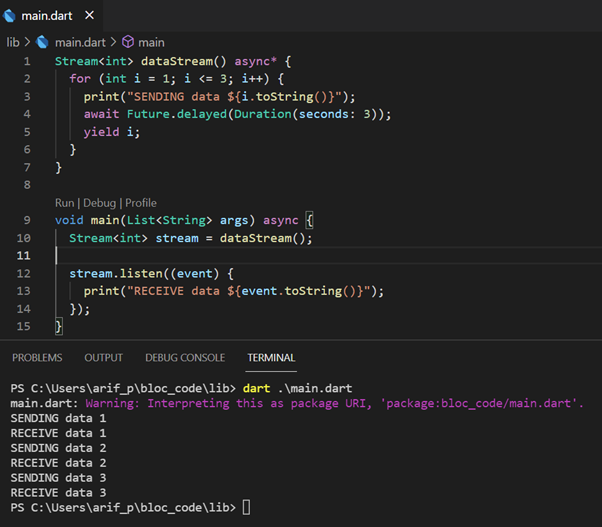
There is a DataStream that returns a Stream of integer number. We are iterating three times for the loop to send the integer in a correspondent number in this function. There are three main keywords here: async*, await, and yield
async* means asynchronous generation function, it generates async data. In an async* function, the keyword yield pushes the data (integer) through the Stream river. Every time we yield something in an async* function, we send that data to the Stream. The await keyword helps to wait for a process to finish before proceeding to the next step. In this case, we are waiting for a three-second gap between data dispatching.
We discussed sending the data, but what about receiving it?
In the primary function, we only need to initialize the Stream.
Stream<int> stream = dataStream();Then we will listen to the Stream and analyze if data is approaching or not. Remember, the receiver doesn’t know when the data will arrive, so we need to listen to it or practically watch it.
stream.listen((event) {
    print("RECEIVE data ${event.toString()}");
  });
After we dig deeper into the Stream, you might ask a question: Why Stream? Why do we need them?
As I mentioned in the “What is Bloc” section, there should be a state emerging from every interaction inside the application.
Can you see where Streams will come in handy in this situation? So, you will have interactions that need to be listened to emerging from the app to meet the state based on the sequence of the code that changes the application.
3.3 Cubit and Bloc
Cubit and Bloc are two essential concepts that we need to understand.
The only difference you should have in mind, for now, is that a Cubit is a minimal version of Bloc. We can say that Bloc extends Cubit.
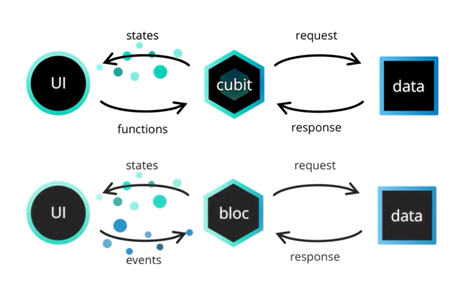
Cubit is a special kind of Stream component based on some functions called from the UI. Functions that rebuild the UI by emitting different states on a Stream.
Compared to Bloc, the Cubit functions are not part of a Stream but a predefined standalone list of what can be done inside the Cubit. The only Stream existing in a Cubit is a Stream of empty states.
Now, you might ask: What are the advantages of using Bloc? Isn’t Cubit enough?
Remember that Cubit is a component-based on some functions. It isn’t part of a Stream, but it emits a state Stream that modifies the UI. On the other hand, Bloc is more advanced as it emits a Stream of states and receives a Stream of events.
Therefore, Bloc is the brain of an advanced and complex component from your app. Depending on the user’s interactions with the app, there will be an event emerging from it that comes as an input to the Bloc. Then inside the Bloc, there will be a required mapped event to a state function, which will take the event and convert it into a state so the UI can successfully rebuild.
Let’s write a simple counter implementation using Bloc below:
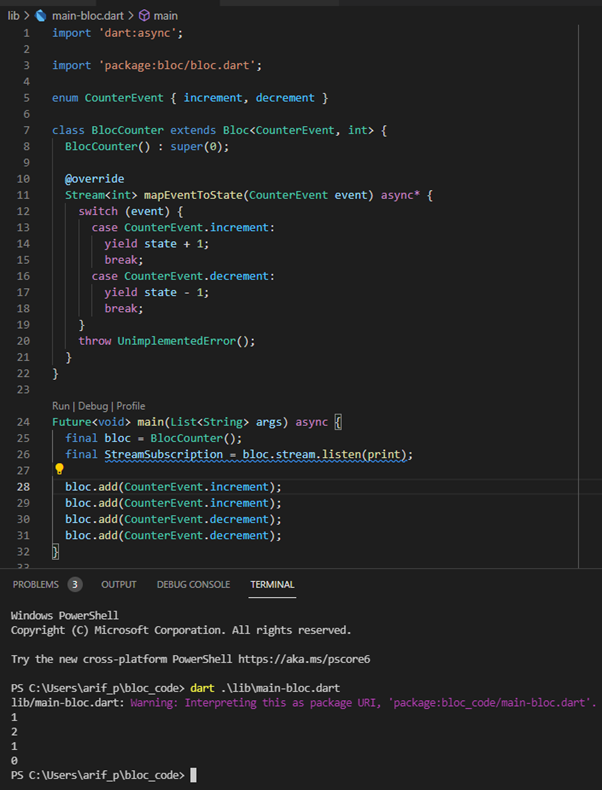
The Bloc brain will listen to the event Stream, receive the event, calculate the next value, and yield it on the state Stream.
4. Flutter BLOC Concepts
There are some essential basic Flutter concepts we need to understand before knowing about Flutter BLOC Concepts. Let’s start by mentioning a famous proverb that everyone interested in Flutter has heard at least once: “Everything in Flutter is a Widget.” Since this article will discuss Flutter Bloc Concepts, you must know that every concept is a widget. But, what is a widget? Widgets in Flutter are classes that have their attributes and methods. These classes can be instantiated as objects by defining the required parameters and practices into their constructor. As an example, let’s look at the FloatingActionButton widget:
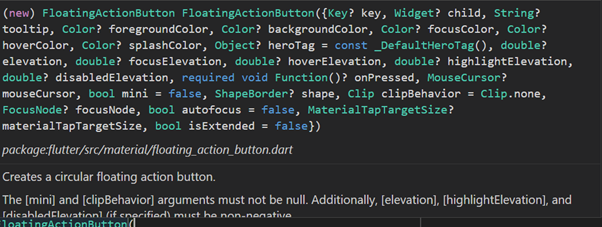
As you can see, there are different parameters passed through the constructor of this widget, the tooltip, foreground color, background color, etc. Open this FloatingActionButton by tapping control and clicking on the widget. You can see that this widget is a class with all kinds of attributes from primitive types like booleans, strings, doubles, integers to functions and even other widgets. You may have also noticed that some widgets have a child parameter. For what would that be used? As everything in Flutter is a widget, there must be a way for the framework to keep them organized. The best way to nest and organize is by using a tree. Let’s observe the below image.
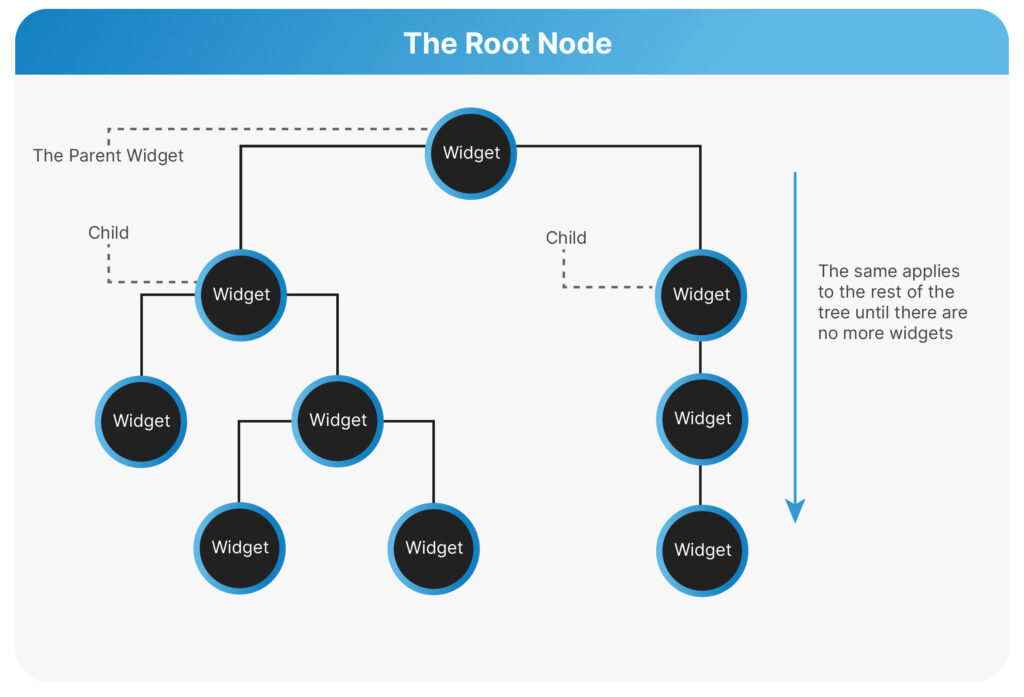
At the top of the tree is the root node. Below that node, we can see two other widgets, the children, emerging from it. The above widget is the parent widget or the ancestor. The tree evolves for every widget until there are no more children inside the tree.
Now that we know what a widget is and how Flutter organizes them, let’s start with the first Flutter Bloc Concept, which is BlocProvider
4.1 BlocProvider
After we write our first Bloc, then how will we access it in our UI? Some of you might think you will create a Bloc object for every widget that needs it, similar to the image below.
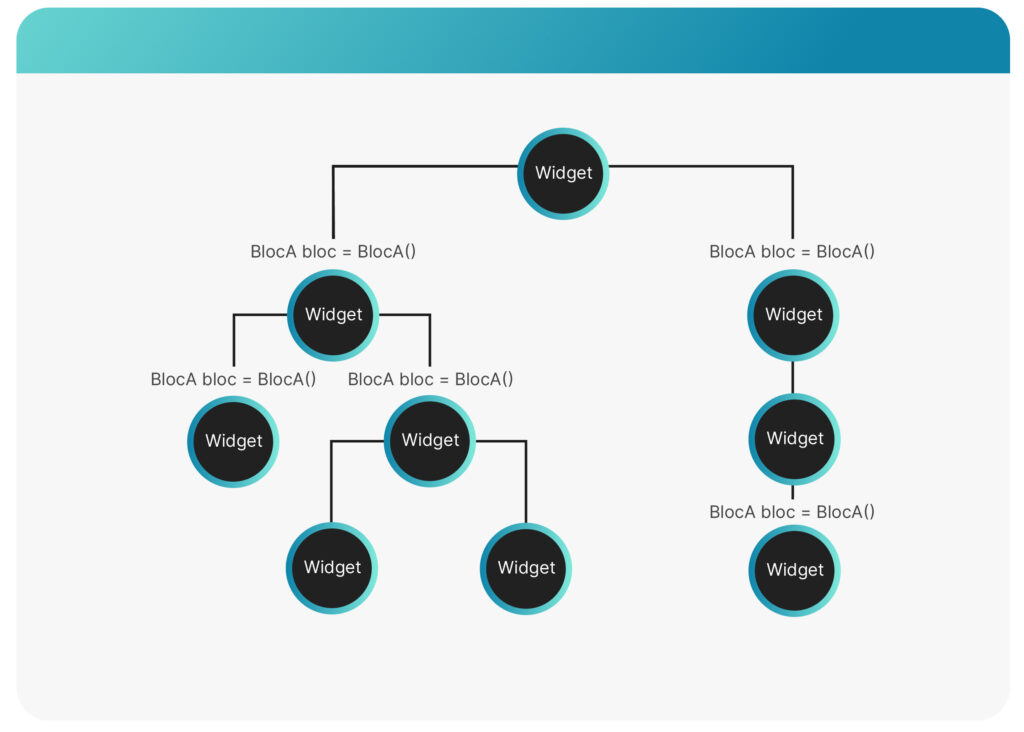
If that is what you’re thinking, then I have to say that you are wrong. What if you have an internet Bloc that manages the app’s current state in different network scenarios? Think about how many widgets should have a working instance of the internet Bloc available, so creating an event that coincides with every widget that needs it is not a good idea. Instead, what you must use is the BlocProvider widget.
BlocProvider is a flutter widget that creates and provides a Bloc to all of its children. This is known as a dependency injection widget, so that a single instance of Bloc can be provided to multiple widgets within a subtree. In other words, the entire subtree will benefit from a single event of a Bloc injected into it. Hence the subtree will be dependent on the Bloc we’re providing.
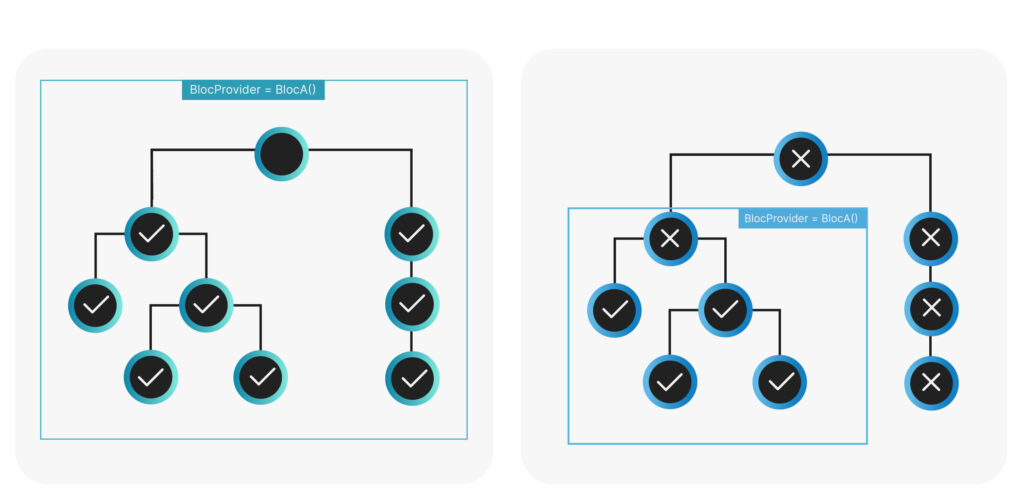
From the image above, if we instantiate a BlocProvider with a Bloc at the root of the node (left image), it will be available through the entire subtree below it. If we instantiate in the middle of the tree (right image), the Bloc instance will only be available to the nodes below and none above.
Please look at the code example below on how we instantiate BlocProvider.
class MyApp extends StatelessWidget {
  @override
  Widget build(BuildContext context) {
    return BlocProvider<BlocCounter>(
      create: (context) => BlocCounter(),
      child: MaterialApp(
        title: "Bloc Demo",
        theme: ThemeData(
          primarySwatch: Colors.blue,
          visualDensity: VisualDensity.adaptivePlatformDensity,
        ),
        home: MyHomePage(
          title: "Bloc Demo Home Page",
        ),
      ),
    );
  }
From the code above, we wrap MaterialApp using BlocProvider and instantiate our Bloc class, BlocCounter, inside the provider. Thus, our BlocCounter will be available to the MyHomePage widget and its children. Whenever we need to access the instance of BlocCounter, we only need to call the BlocProvider of BlocCounter with context as a parameter. Please refer to the below code,
BlocCounter bc = BlocProvider.of<BlocCounter>(context);We have an excellent way to provide our Bloc instance, and we know how to use it. Now, the questions are: How do we receive the new state inside the UI? How do we rebuild the specific widget after triggering an event from the Bloc?
It’s time to introduce the second important Flutter Bloc concept, which is BlocBuilder.
4.2 BlocBuilder
BlocBuilder is a widget that helps rebuild the UI based on some Bloc state changes. This magic component rebuilds the UI every time either Bloc or Cubit emits a new state.
Rebuilding a large chunk of the UI inside your app may take a lot of time to compute. That’s why it’s a good practice to wrap the exact part of the UI you want to rebuild inside BlocBuilder. For example, if you have a text widget that updates from a sequence of emitted states and that text is inside columns, rows, and other widgets, it is a colossal mistake to rebuild all of them to update the text widget. Instead, it would be best if you rebuilt only the text widget by wrapping it inside BlocBuilder.
Syntactically, BlocBuilder is a widget that requires a Bloc or Cubit and the builder function. The builder function will potentially be called many times as the Flutter engine works behind the scenes and should be a pure function that returns a widget in response to a state. A pure function is when the return value depends only on the function’s arguments. So, in this case, our builder function should return a widget which only depends on the context and state parameters.
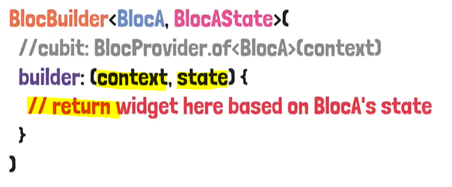
If the Cubit or Bloc is not provided, the BlocBuilder will automatically perform a look-up for each instance using BlocProvider and the current build context.
5. Code Implementation
Let’s build a simple app to implement this Bloc pattern. We will create a simple counter app that has two buttons to increment and decrement a number. Start a new Flutter project by typing “flutter create [project_name]” in the console.
Add flutter_bloc dependency in pubspec.yaml file

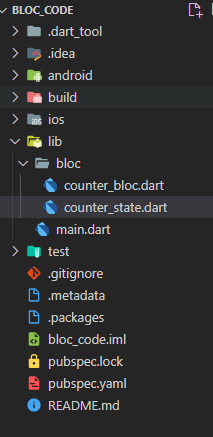
Create BlocCounter class in counter_bloc.dart file and CounterState class in counter_state.dart file. And the project structure will be like the image below.
counter_bloc.dart file
import 'package:bloc/bloc.dart';

import 'package:meta/meta.dart';

part 'counter_state.dart';

enum CounterEvent { increment, decrement }

class BlocCounter extends Bloc<CounterEvent, CounterState> {
  BlocCounter() : super(CounterState(counterValue: 0));

  @override
  Stream<CounterState> mapEventToState(CounterEvent event) async* {
    switch (event) {
      case CounterEvent.increment:
        yield CounterState(counterValue: state.counterValue + 1);
        break;
      case CounterEvent.decrement:
        yield CounterState(counterValue: state.counterValue - 1);
        break;
    }
  }
}
counter_state.dart file
part of 'counter_bloc.dart';

class CounterState {
  int counterValue;

  CounterState({
    required this.counterValue,
  });
}
main.dart file
import 'package:bloc_code/bloc/counter_bloc.dart';
import 'package:flutter/material.dart';
import 'package:flutter_bloc/flutter_bloc.dart';

void main() {
  runApp(MyApp());
}

class MyApp extends StatelessWidget {
  @override
  Widget build(BuildContext context) {
    return BlocProvider<BlocCounter>(
      create: (context) => BlocCounter(),
      child: MaterialApp(
        title: "Bloc Demo",
        theme: ThemeData(
          primarySwatch: Colors.blue,
          visualDensity: VisualDensity.adaptivePlatformDensity,
        ),
        home: MyHomePage(
          title: "Bloc Demo Home Page",
        ),
      ),
    );
  }
}

class MyHomePage extends StatefulWidget {
  final String title;
  MyHomePage({required this.title});

  @override
  _MyHomePageState createState() => _MyHomePageState();
}

class _MyHomePageState extends State<MyHomePage> {
  @override
  Widget build(BuildContext context) {
    return Scaffold(
      appBar: AppBar(
        title: Text(
          widget.title,
        ),
      ),
      body: Center(
        child: Column(
          mainAxisAlignment: MainAxisAlignment.center,
          children: [
            Text("You have pushed the button this many times: "),
            BlocBuilder<BlocCounter, CounterState>(
              builder: (context, state) {
                return Text(
                  state.counterValue.toString(),
                  style: Theme.of(context).textTheme.headline4,
                );
              },
            ),
            Row(
              mainAxisAlignment: MainAxisAlignment.spaceEvenly,
              children: [
                FloatingActionButton(
                  onPressed: () {
                    BlocProvider.of<BlocCounter>(context)
                        .add(CounterEvent.decrement);
                  },
                  tooltip: 'Decrement',
                  child: Icon(Icons.remove),
                ),
                FloatingActionButton(
                  onPressed: () {
                    BlocProvider.of<BlocCounter>(context)
                        .add(CounterEvent.increment);
                  },
                  tooltip: 'Increment',
                  child: Icon(Icons.add),
                )
              ],
            )
          ],
        ),
      ),
    );
  }
}
6. Conclusion
Bloc is a good pattern that will be suitable for almost all types of apps. It helps improve the code’s quality and makes handling states in the app much more manageable.
It might be challenging for someone who is just beginning to use Flutter because it uses advanced techniques like Stream and Reactive Programming. Still, if you master the fundamentals, it is straightforward to use this architecture to build an application.
Useful Link
https://bloclibrary.dev/#/gettingstarted – for getting started using the official page
https://pub.dev/packages/flutter_bloc – pub dev page for Flutter Bloc
Author:
Arif Nazar Purwandaru – Technology Evangelist


