
This article is a continuation of the previous article.
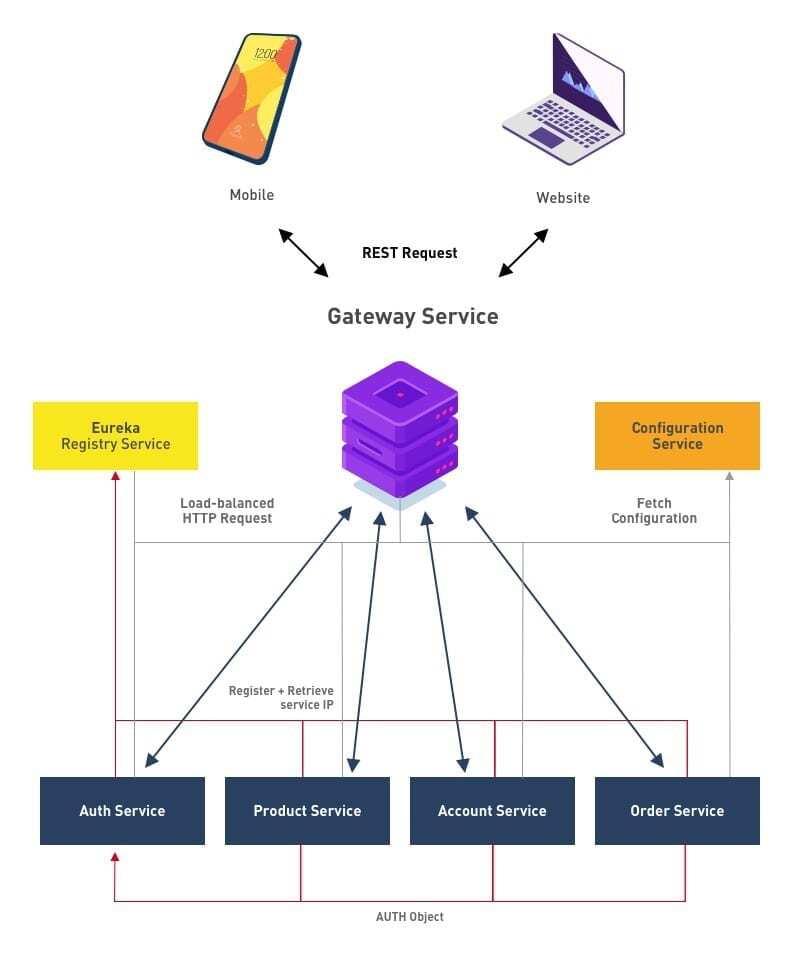
As described at previous article, we are migrating our monolithic service into microservice architecture, and we have created a schema on how we will do that. As a first step we will create our first non-functional service called the configuration service.
The Configuration service is a service use to externalise configuration in our microservice system. To implement the mechanism, we will use Spring Cloud Config because it provides server and client-side support for externalised configuration in a distributed system. All services in our microservice system can have their own configurations, such as:
- Application configuration
- Database configuration
- Communication Channel Configuration – queues and other infrastructure
- URLs of other microservices to talk to
The Configuration Service – what it is about?
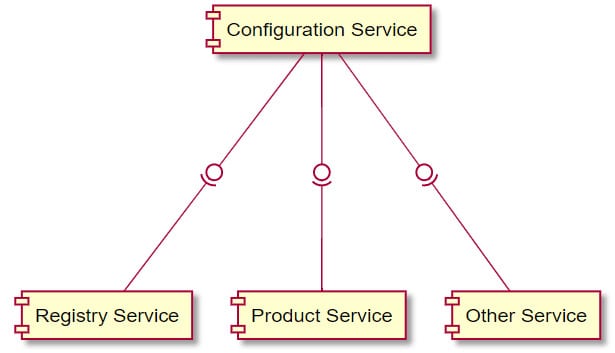
The Configuration service is a service use to externalise configuration in our microservice system. To implement the mechanism, we will use Spring Cloud Config because it provides server and client-side support for externalised configuration in a distributed system. All services in our microservice system can have their own configurations, such as:
- Application configuration
- Database configuration
- Communication Channel Configuration
- queues and other infrastructure
- URLs of other microservices to talk to
The Configuration Service – Why do we need that?
In my experience creating big monolithic services, I often experienced difficulties in maintaining a single configuration for a large application. Imagine if we needed to maintaining configurations for hundreds of microservices in different environments. That’s where a centralised configuration server steps in. The configurations for all microservices in all environments are stored at one place – a centralised configuration store. When a microservice needs its configuration, it calls the configuration service and the config server looks up the configuration and provides it to the microservice. The configurations are secured and have role–based access.
Project Layout
efore we get to how the microservice application will be created, lets take a look at how our project will be managed. Please note that, in this tutorial, we will be using IntelijIDE as our IDE and Apache Maven to manage the project.
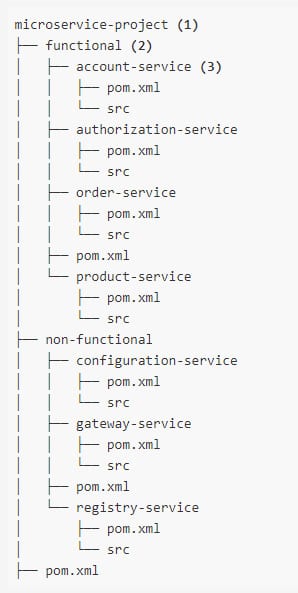
Apache Maven is used to manage the project. Because the project contains multiple services, it is wise to used Maven’s multi-modules feature to logically separate services from each other. This creates an explicit boundary between the modules (services) to avoid using components that belong to other services. It is good practice to implement encapsulation as early as possile, forcing the Separation of Concerns (SOC) principle in the project layout.
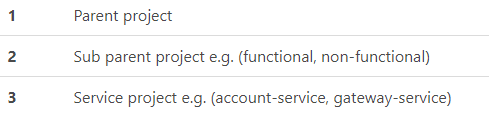
Parent Pom (Microservice Project)
Acts as a project aggregator and provides common dependencies across all modules.
microservice-project/pom.xml
<parent>
<groupId>org.springframework.bootgroupId>
<artifactId>spring-boot-starter-parentartifactId>
<version>2.1.0.RELEASEversion>
<relativePath/>
parent><properties>
<spring-cloud.version>Greenwich.M3spring-cloud.version>
properties>
<dependencyManagement>
<dependencies>
<dependency>
<groupId>org.springframework.cloudgroupId>
<artifactId>spring-cloud-dependenciesartifactId>
<version>${spring-cloud.version}version>
<type>pomtype>
<scope>importscope>
dependency>
dependencies>
dependencyManagement>
<dependencies>

<dependency>
<groupId>org.projectlombokgroupId>
<artifactId>lombokartifactId>
dependency>

<dependency>
<groupId>org.springframework.cloudgroupId>
<artifactId>spring-cloud-starter-netflix-eureka-clientartifactId>
dependency>

<dependency>
<groupId>org.springframework.bootgroupId>
<artifactId>spring-boot-starter-actuatorartifactId>
dependency>
dependencies>
Sub-Parent Pom
Functional Parent Pom
All functional services will have their own database and use JPA technology to provide data operation. They will also provide a RESTful web services using spring-data-rest technology.
microservice-project/funtional/pom.xml
<dependencies>
<dependency>

<groupId>org.springframework.bootgroupId>
<artifactId>spring-boot-starter-data-restartifactId>
dependency>
<dependency>

<groupId>org.springframework.bootgroupId>
<artifactId>spring-boot-starter-data-jpaartifactId>
dependency>
<dependency>

<groupId>com.querydslgroupId>
<artifactId>querydsl-jpaartifactId>
dependency>
<dependency>

<groupId>org.hsqldbgroupId>
<artifactId>hsqldbartifactId>
dependency>
dependencies>
Non-Functional Parent Pom
No non-functional services provide features related directly with the business process, so no specific dependencies are defined in the pom file.
How to create the Configuration service?
We create a Maven project inside the non-functional module, and then add this to our pom:
<dependencies>
<dependency>
<groupId>org.springframework.cloudgroupId>
<artifactId>spring-cloud-config-serverartifactId>
dependency>
<dependency>
<groupId>org.springframework.cloudgroupId>
<artifactId>spring-cloud-starter-netflix-eureka-clientartifactId>
dependency>
<dependency>
<groupId>org.springframework.bootgroupId>
<artifactId>spring-boot-starter-actuatorartifactId>
dependency>
dependencies>
<build>
<plugins>
<plugin>
<groupId>org.springframework.bootgroupId>
<artifactId>spring-boot-maven-pluginartifactId>
plugin>
<plugin>
<groupId>com.spotifygroupId>
<artifactId>dockerfile-maven-pluginartifactId>
plugin>
plugins>
build>
Then in our resources folder we create application.yml and add this:
spring:
application:
name: configuration
profiles:
active:
– native # important for file system based configuration server
cloud:
config:
server:
native:
searchLocations: classpath:/config # location for client’s configuration files (service-name.yml)
# EUREKA DISCOVERY
eureka:
client:
healthcheck:
enabled: true
fetchRegistry: false # no need to resolve other services
register-with-eureka: false
serviceUrl:
defaultZone: http://localhost:9091/eureka # register this service with registry
instance:
instanceId: ${spring.application.name}:${spring.application.instance_id:${random.value}}
leaseRenewalIntervalInSeconds: 5 # DO NOT DO THIS IN PRODUCTION
# TOMCAT
server:
port: 9090
# ACTUATOR ENDPOINTS
management:
endpoints:
web:
exposure:
include:
– health
– info
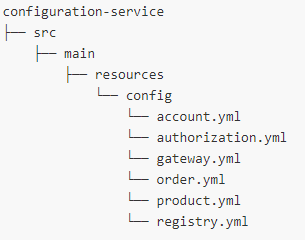
– envIn this example, we store our config for other services in the config folder inside the resources folder. In real production cases, we may consider other alternatives such as Git, Vault, SVN or JDBC as the backend. One thing to note in this configuration is the location of the configuration files for other services described in spring.cloud.config.server.native.searchLocations property. The value is pointing to classpath inside config directory, therefore configuration files for other services should be place in that directory with the file name format service-name.[yml|properties]. Here is the project layout for the configuration-service:
Create Spring Boot Application
We create a normal Spring Boot application with @EnableConfigServer annotation added to enable the Spring Cloud Config Server.
@EnableConfigServer
@SpringBootApplication
public class ConfigurationMain {public static void main(String[] args) {
SpringApplication.run(ConfigurationMain.class, args);
}
}
Testing
To test the service, we build and run the project, then open the browser and access the following URL format [hostname]:[port]/[service-name]/[profile]:
- [hostname] is the server name or ip address e.g. localhost, 127.0.0.1
- [port] is the server port e.g. 9090
- [service-name] is the configuration name.
- [profile] is the profile name.
By default, the service will run using port number 9090. For example, to load the default configuration for product-service use this URL http://localhost:9090/product/default.
That concludes this part of our journey into microservice architecture. In the next part we will take a look at the Gateway service, and how it is used in our microservice architecture.
Author:
I Kadek Dendy Senapartha – Analyst Programmer Mitrais


